if you are having trouble sending and receiving email from your wordpress site, using a free smtp server can improve reliability and deliverability at no cost.
by default wordpress tries to send transactional emails via php mail which leads to all sorts of problems. transactional emails are automated emails from your site, such as password resets, order confirmations, etc.
smtp, short for Simple Mail Transfer Protocol, allows you to send your site’s emails through a dedicated email server. this means your site can send email more reliably and those emails are less likely to end up in users’ spam folders.
In this post, we’ll look at seven free smtp server options that you can use with your wordpress site, including the free gmail smtp server.
For each option, we’ll briefly introduce you, share the limitations of the free plan, and show you how to set it up in wordpress.
watch this video guide to use a free smtp server for wordpress emails
what you need to use a free smtp server with wordpress
To integrate any of these tools into your wordpress site, you will need a plugin.
Some of these tools offer their own dedicated integration plugins. If not, you can find several quality free smtp plugins on wordpress.org, such as post smtp mailer/email log, which is a 100% free re-release of the popular postman smtp plugin.
for the tutorials below, we will use:
- a service’s dedicated wordpress plugin when available.
- publish an email/smtp record when a dedicated plugin is not available. however, you should be able to follow the same basic instructions with other plugins.
ready? let us begin!
7 free smtp server solutions to use with wordpress in 2022
these are the free smtp providers we will cover. read on for more details on each tool:
gmail smtp server
You probably already know gmail for its free email offer. however, google also allows you to use gmail as an smtp server to send email from your website.
With a free gmail account, you can send up to 500 emails per rolling 24 hour period. Or, if you’re a paid Google Workspace subscriber ($6 per month), you can send up to 2,000 emails during a rolling 24-hour period.
Setting up the free gmail smtp server is a bit more labor intensive than some of these other tools. however, the extra effort is worth it as gmail also offers the highest free sending limit of all the tools on this list.
You can use gmail’s smtp server information in several different places. you can use this in your local email client like microsoft outlook or within your wordpress site which is what we will focus on.
To set up gmail with your wordpress site, you will need to:
- create a google app
- set up your wordpress site to submit through the app using a plugin
If you want to send email from a custom domain (eg, [protected email]) instead of gmail ([protected email]), you’ll need to set up and pay for google workspace first. we have a full post on why we love google workspace and how to set up google workspace mx records to connect google workspace to your custom domain name.
If you’re not having trouble sending email from a gmail address, you don’t need to do anything before starting the tutorial.
here is how to use gmail smtp server to send emails from wordpress…
1. configure smtp mail/email log
To tell your wordpress site to send through your google app, you can install the free smtp mail sender/email registration plugin from wordpress.org.
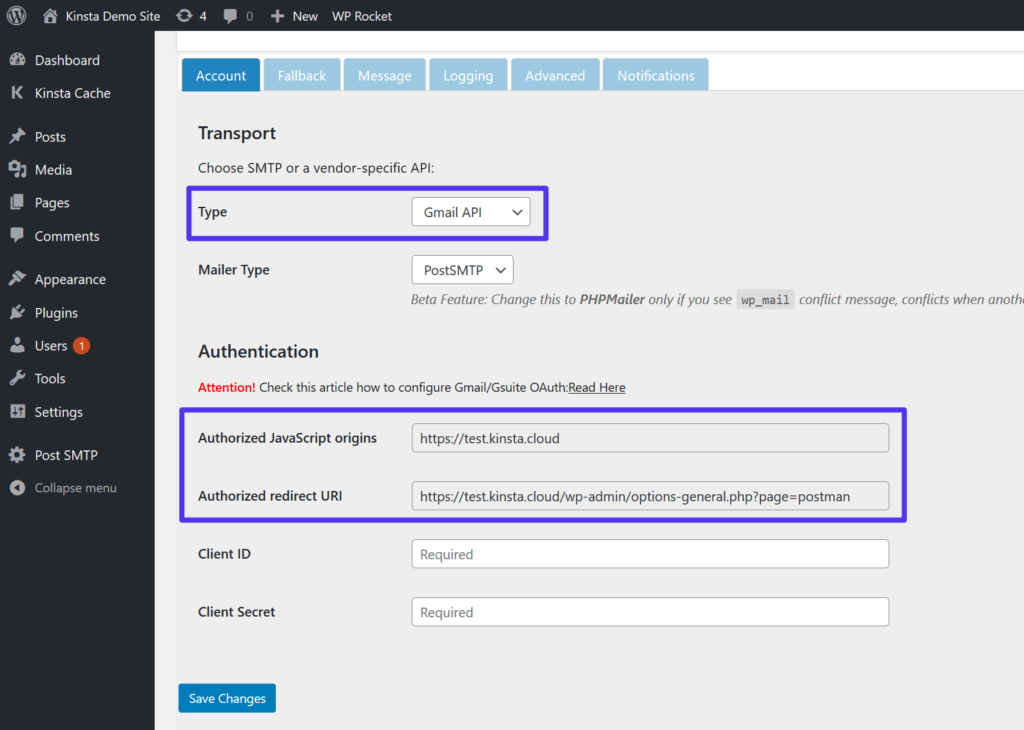
Once you’ve activated it, go to the new publish smtp tab in your wordpress dashboard and click show all settings to see all the options.
First, go to the message tab and set your name and “from” email address.
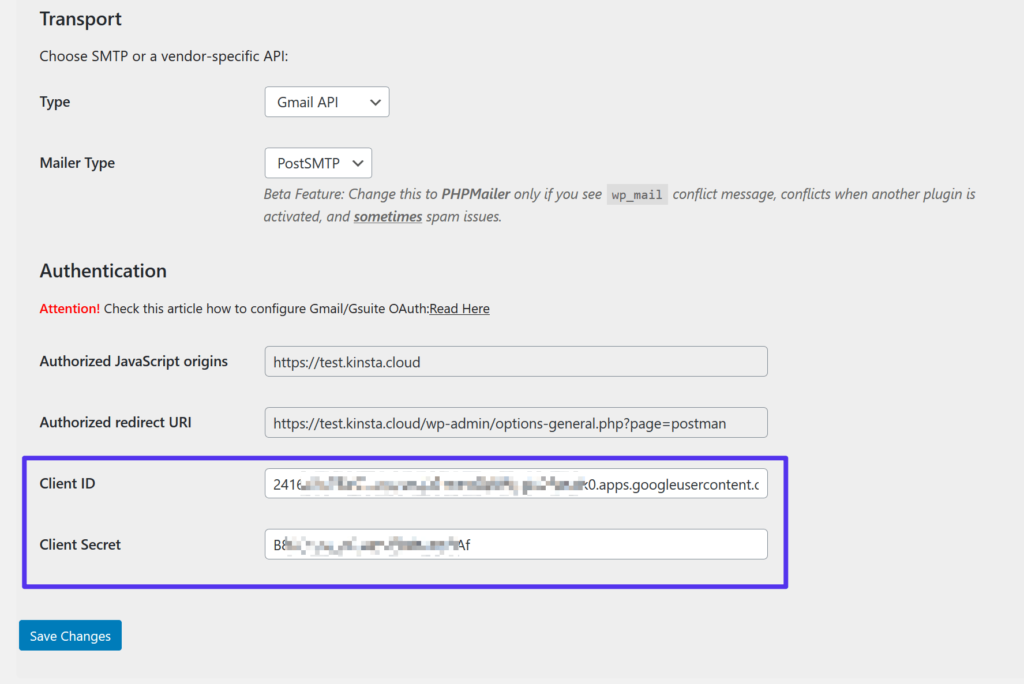
Once you’ve done that, go back to the account tab and use the type dropdown menu to select gmail api. this will expose some additional options. keep this page open because you will need the following information in the next step:
- authorized javascript sources
- authorized redirect uri
2. Create a Google App
then you need to create a google app. this is what allows your wordpress site (or any other application) to securely connect to gmail’s smtp server to send emails.
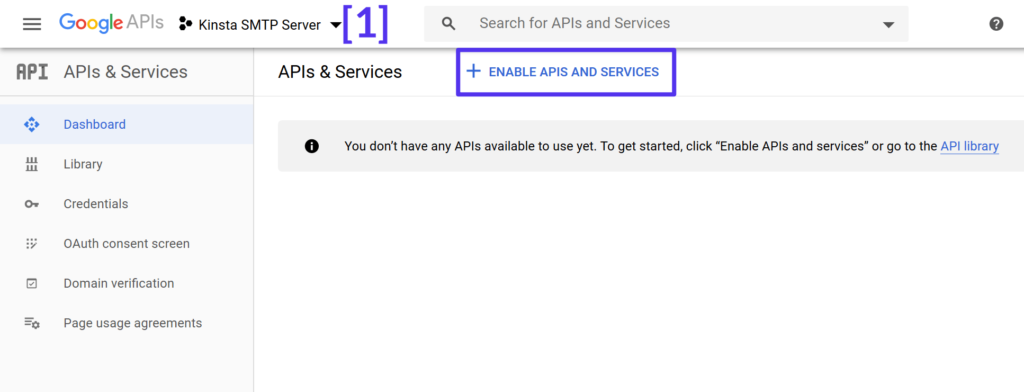
To do this, open a new browser tab, go to the google developer console and create a new project. If this is your first time logging in, Google should prompt you to create a new project. if not, you can do so by clicking the dropdown menu next to the google apis logo (denoted by [1] on the screenshot below).
once you have your app, click the button to enable api and services:
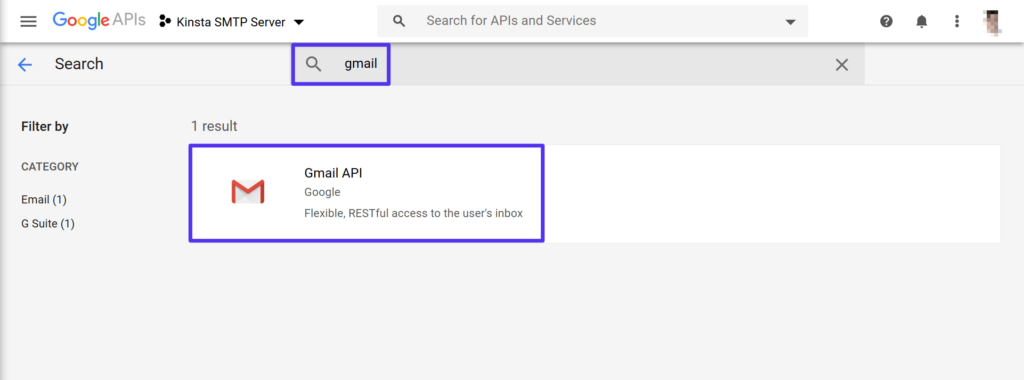
then search for “gmail” and select the result for gmail api:
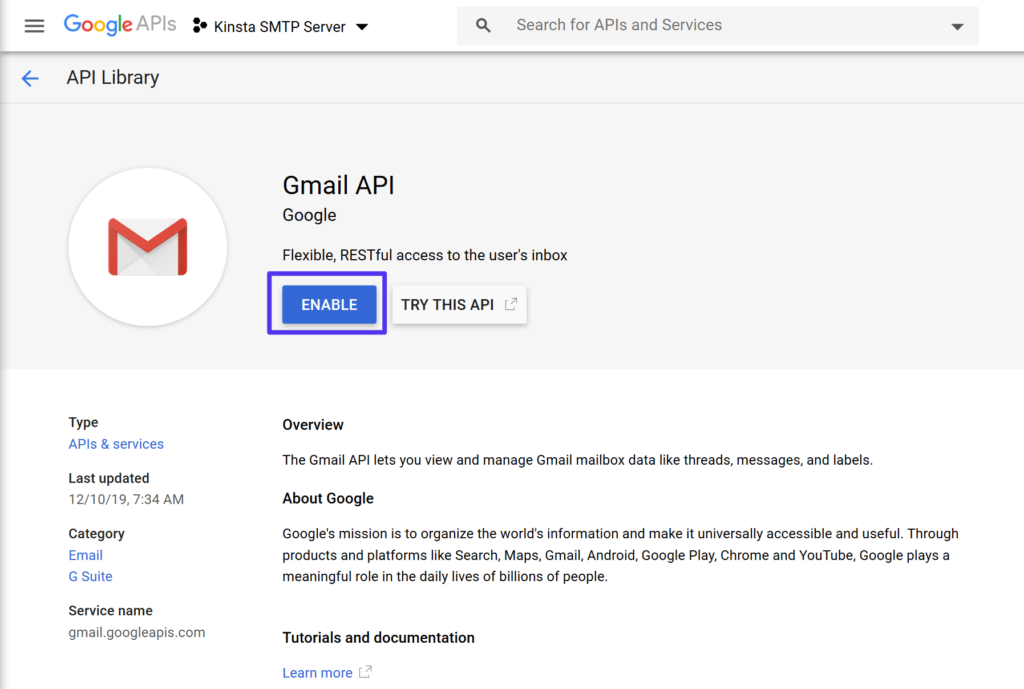
On the Gmail API results page, click the Enable button:
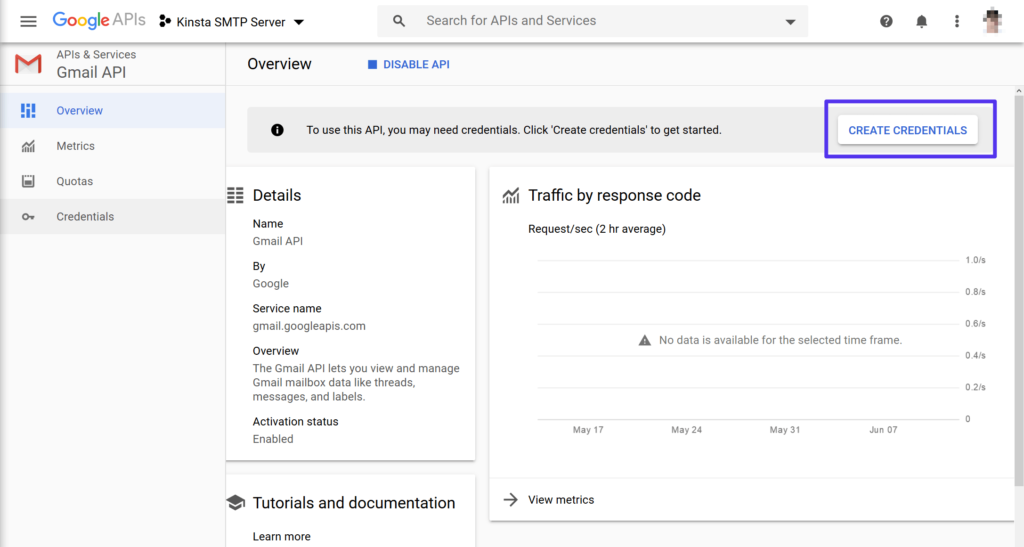
This should launch you into a dedicated interface for the Gmail API. To continue, click the button to Create Credentials:
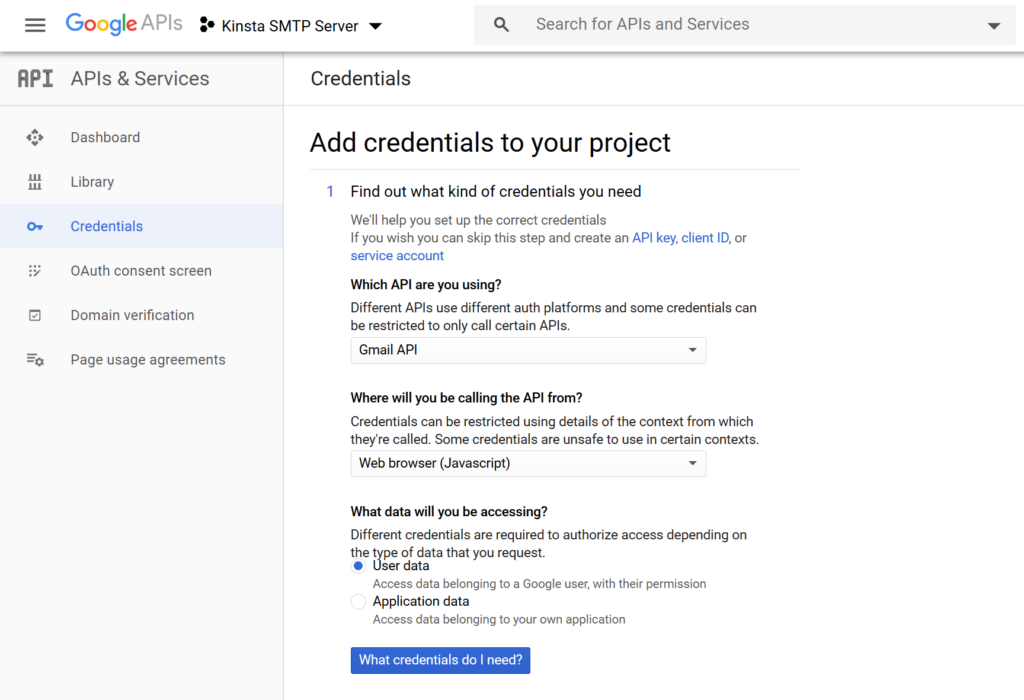
First, fill out the Find out what kind of credentials you need section using the following settings:
- what api are you using? gmail api
- where will you call the api from? web browser (javascript)
- what data will you access? user data
then click what credentials do I need? button:
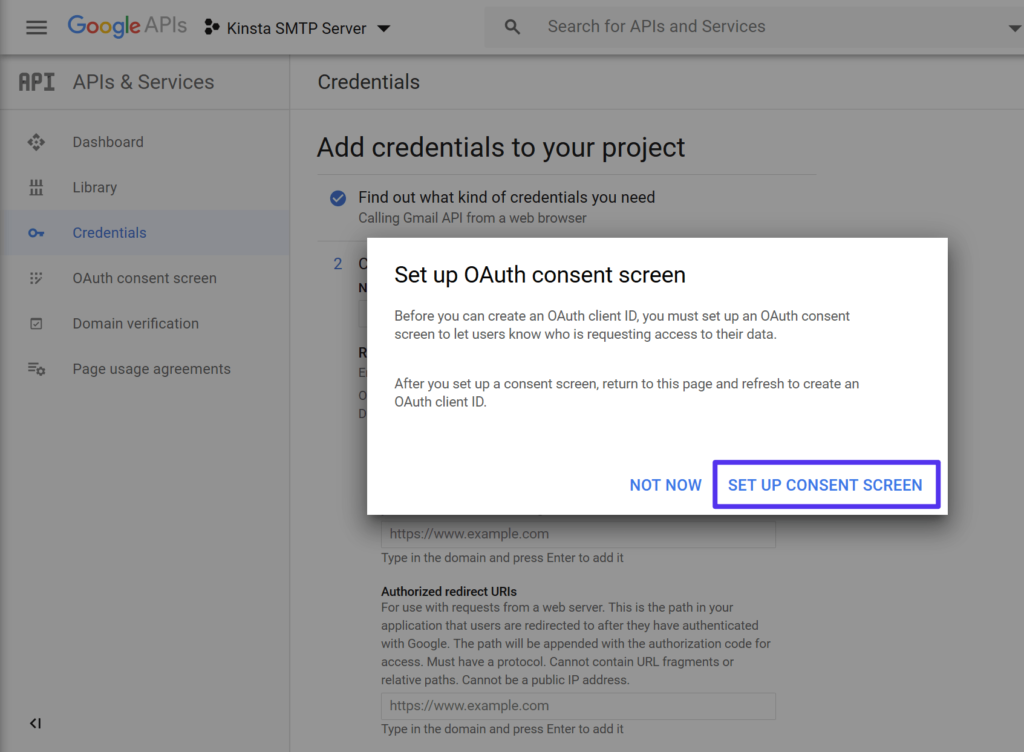
Google will then prompt you to set up an OAuth consent screen. Click the button in the prompt to Set Up Consent Screen:
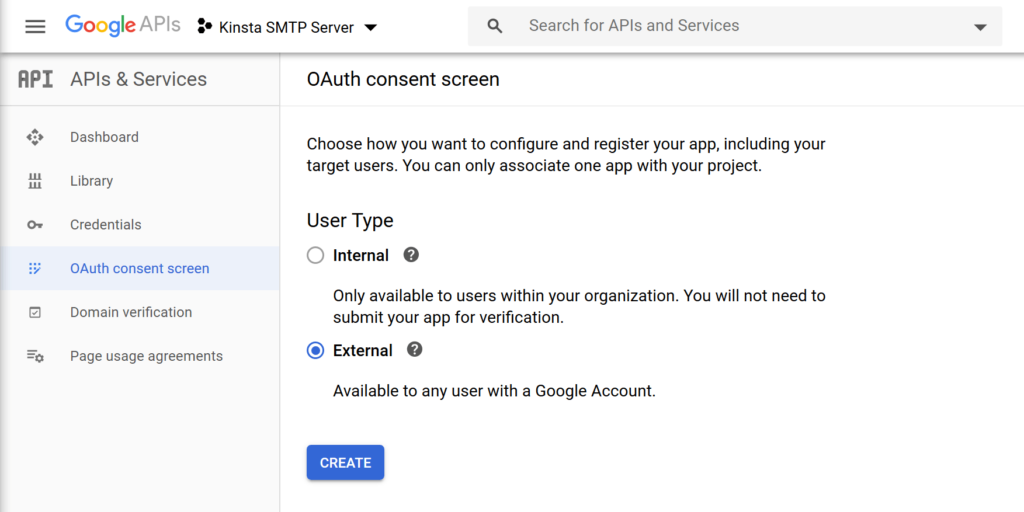
This will open a new tab for the OAuth consent screen. For the User Type, select External. Then, click Create:
On the next screen, enter the basic details for your site, such as the name and URL.
don’t stress too much, as you won’t actually need to use this information:
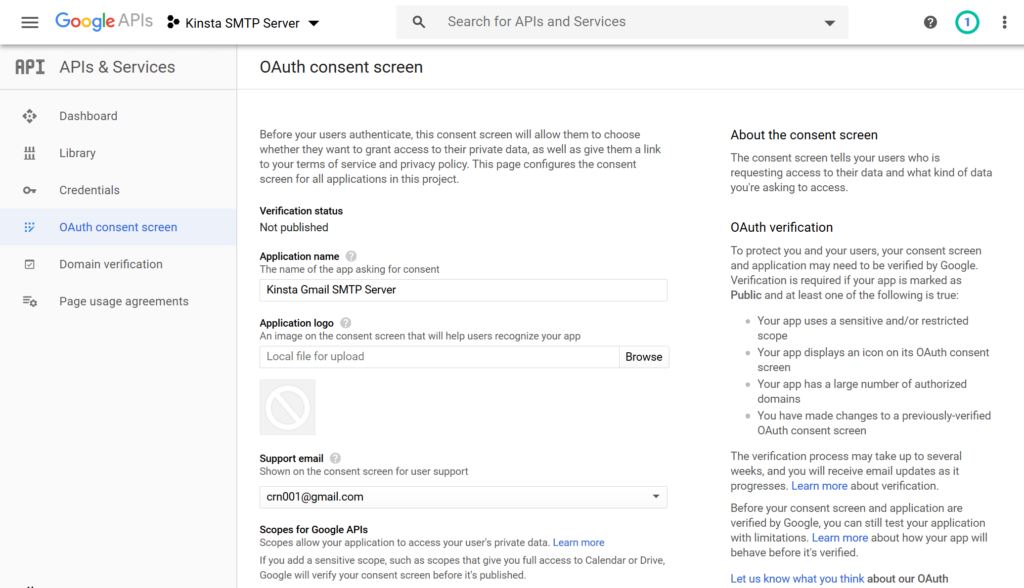
Once you’ve added everything, click the Save button at the bottom.
then, go back to the add credentials to your project tab and enter the following information:
- name: something easy to remember, e.g. the name of your website.
- Authorized javascript sources – Copy and paste this from the post email/smtp registration plugin (step #1).
- authorized redirect uris: copy and paste this from the email/smtp registration plugin in the post (step #1).
then click update:
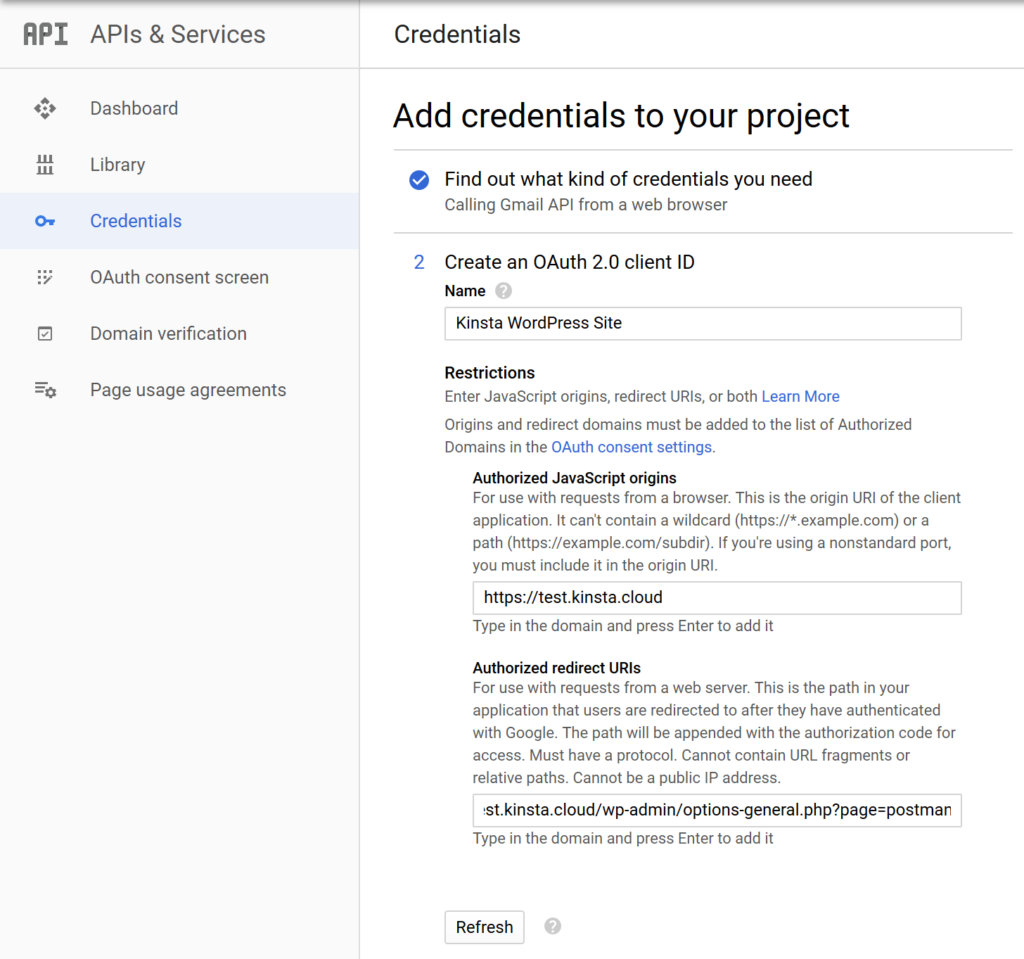
The Refresh button should change to Create OAuth client ID. Click that button to finish the process. Then, click Done.
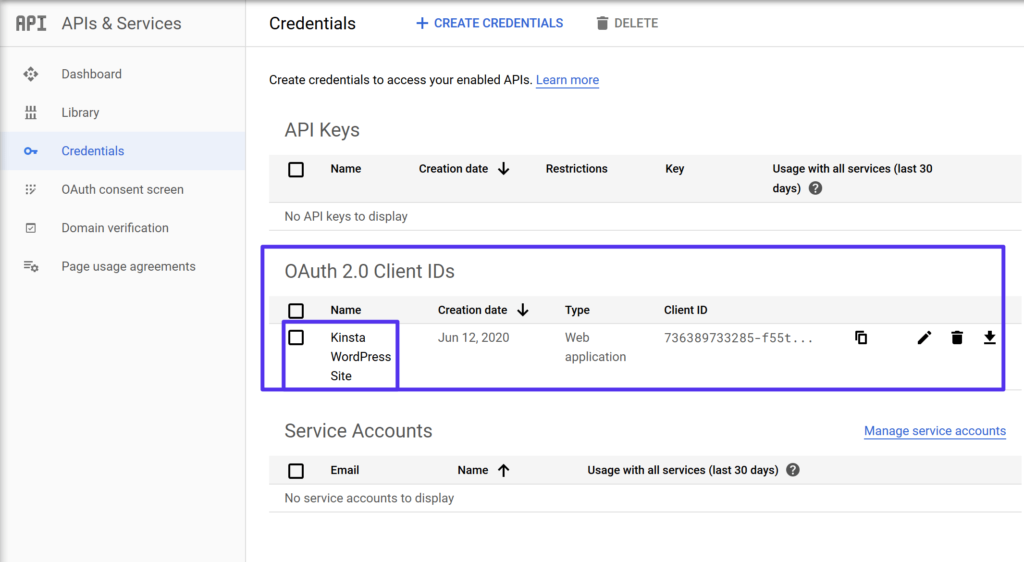
After clicking done, you should see an entry in the oauth 2.0 client ids section of the credentials tab (you should automatically be taken to this page after clicking done).
click on your client id entry to open your settings:
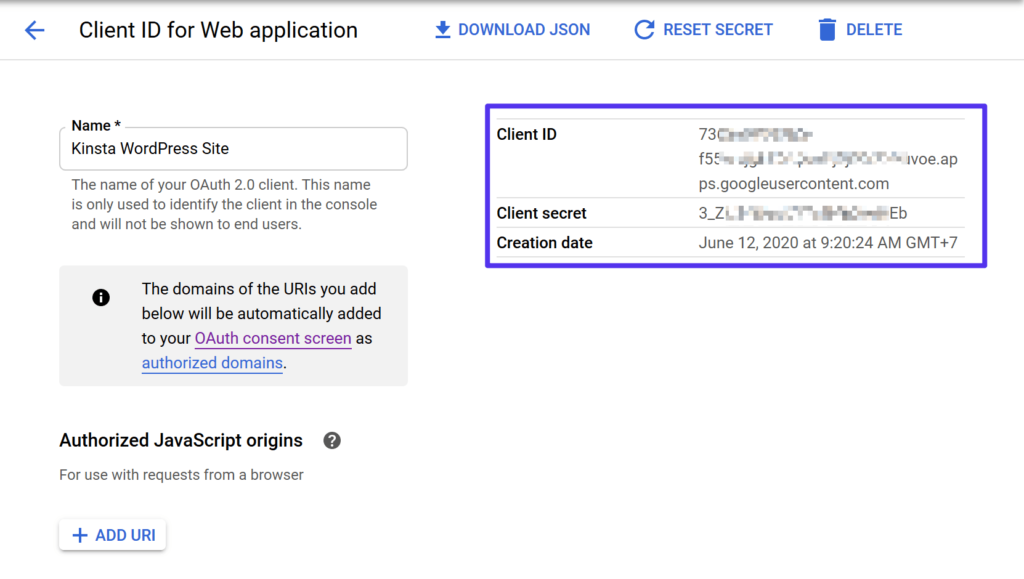
Then, look for two pieces of information:
- client id
- client secret
keep these two pieces of information handy because you will need them in the next step:
3. Add Client IDs to Post SMTP Mailer/Email Log
now, go back to your wordpress dashboard and smtp mail sender/email registration settings and paste in your client id and client secret . then click save changes:
Once you do that, Post SMTP Mailer/Email Log will prompt you to Grant permission with Google:
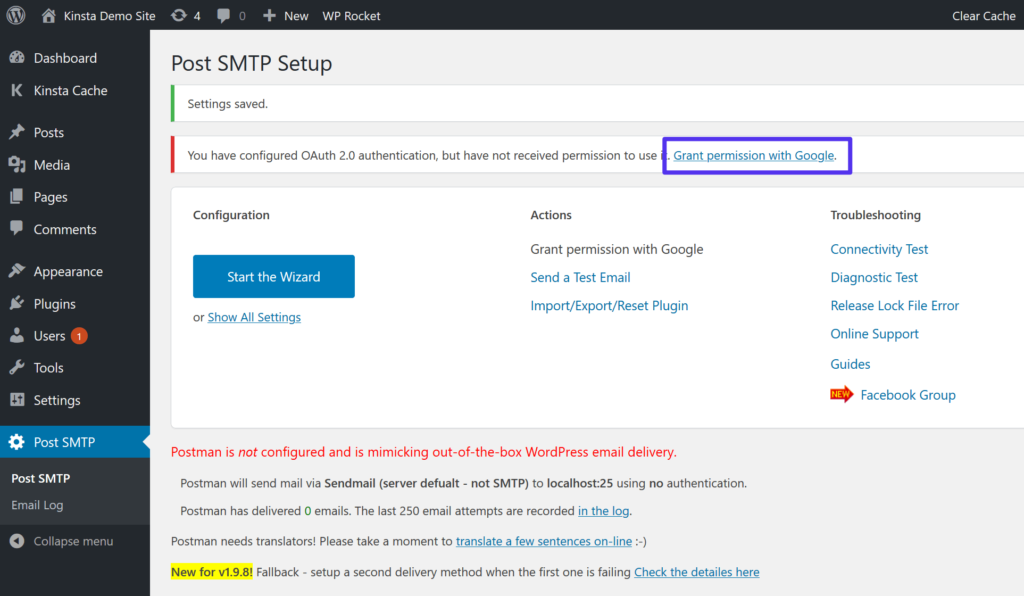
When you click that link, it will open the normal Google authorization process. You’ll need to click through and give your site permission to access your Gmail account.
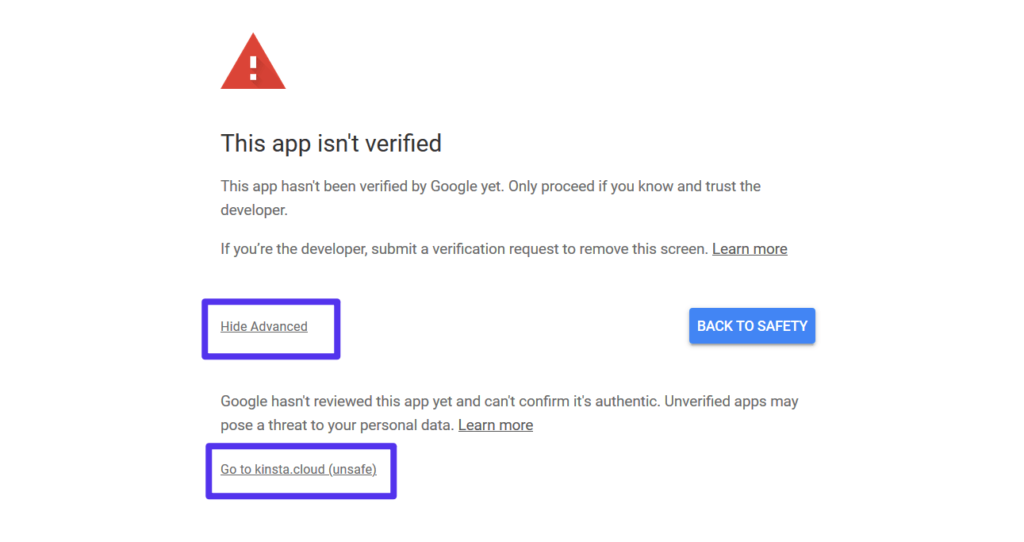
because you didn’t submit your app to google for review, google will give you a warning that your app is not verified. Since you created the app yourself, you can safely ignore this warning. click the link to display the advanced settings and then choose go to “your website” to continue with the authorization process:
Once you complete the authorization process, you’re all finished!
To verify that everything is working, the post smtp mail sender/email registration plugin includes a function that allows you to send a test email.
send grid
sendgrid is a popular transactional email service that is easy to set up with wordpress thanks to its api integration method. it also gives you detailed analytics and logs.
sendgrid offers a one-month free trial that allows you to send up to 40,000 emails. after your first month is up, you can continue to send up to 100 emails per day forever.
for smaller wordpress sites this limit should be fine. if you need to exceed the free limit, paid plans start at $14.95 per month for up to 40,000 emails.
sendgrid also offers a separate service that allows you to send marketing emails if you are interested. to configure sendgrid with wordpress, you will need to:
- generate a sendgrid api key
- add the api to wordpress using the dedicated wordpress plugin or a separate smtp plugin
for the full tutorial, we have a full post on how to use sendgrid with wordpress.
pepipost
pepipost is strictly an email delivery service. you can connect it to any application or service, including your wordpress site. you’ll also get real-time reports to analyze the emails you send.
pepipost allows you to send up to 100 emails a day for free forever. you will also be able to send up to 30,000 emails during the first 30 days.
If you need to exceed that limit, there are no à la carte prices. the next cheapest plan is $25 per month for up to 150,000 emails.
To help you use pepipost with wordpress, pepipost offers an official wordpress plugin that helps you connect to the pepipost api (instead of using smtp credentials).
here is how to use pepipost to send wordpress emails.
1. authenticate the domain name and access the api key
To get started, sign up for a free pepipost account to generate your api key.
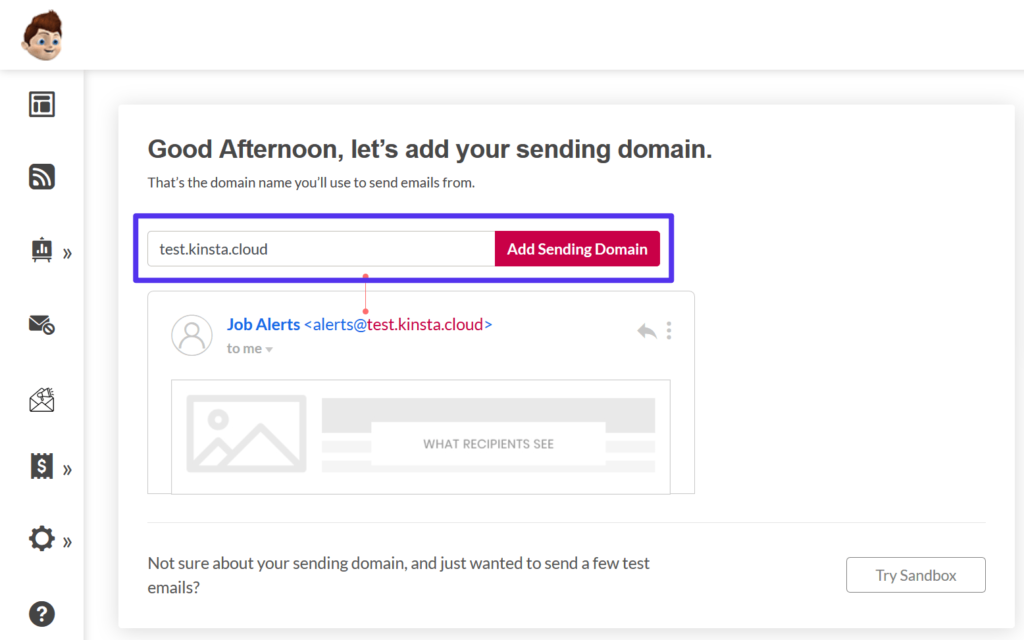
once you create your account, you will be prompted to add your wordpress site url as a submitting domain:
You’ll then need to add two TXT records to your DNS records to authenticate your domain name.
If you’re hosting on kinsta, you can add these txt records to your domain from the kinsta dns tab on your mykinsta dashboard. If you’re not sure how to do this, you can follow our email authentication guide to learn how to add these dns records and why they’re important.
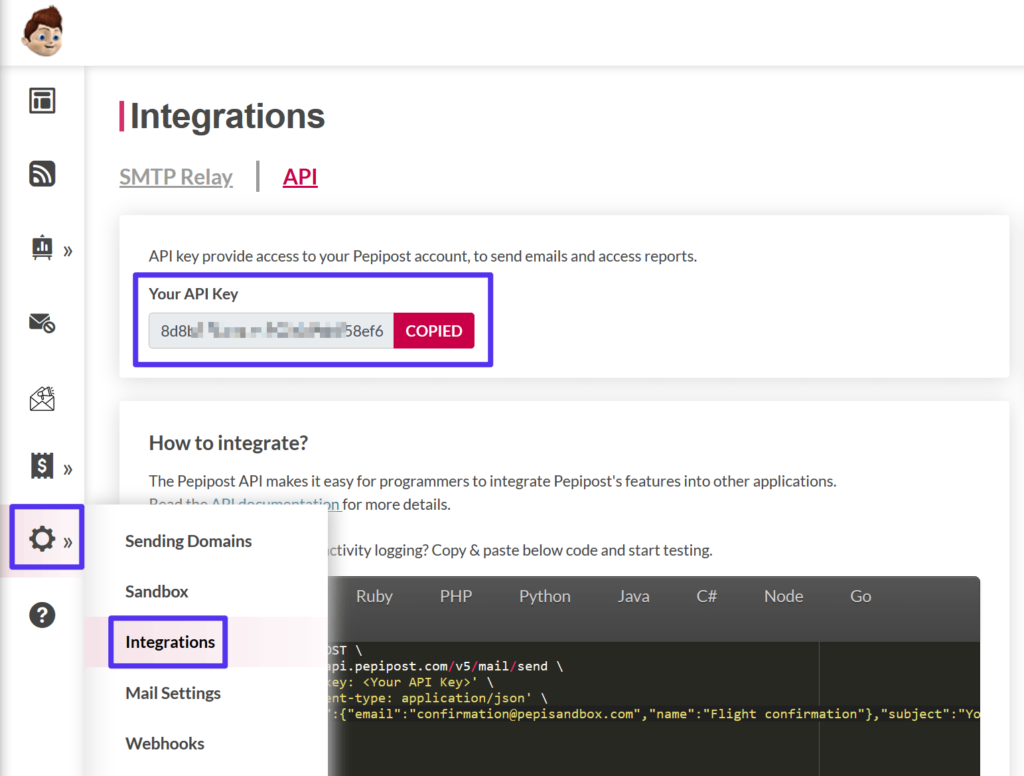
once you have authenticated your domain name, go to settings → integrations in your pepipost dashboard to find your api key. have this value handy because you will need it in the next step:
2. Install and Configure Official Pepipost Plugin
Once you have your pepipost api key, you can install the official pepipost plugin from wordpress.org.
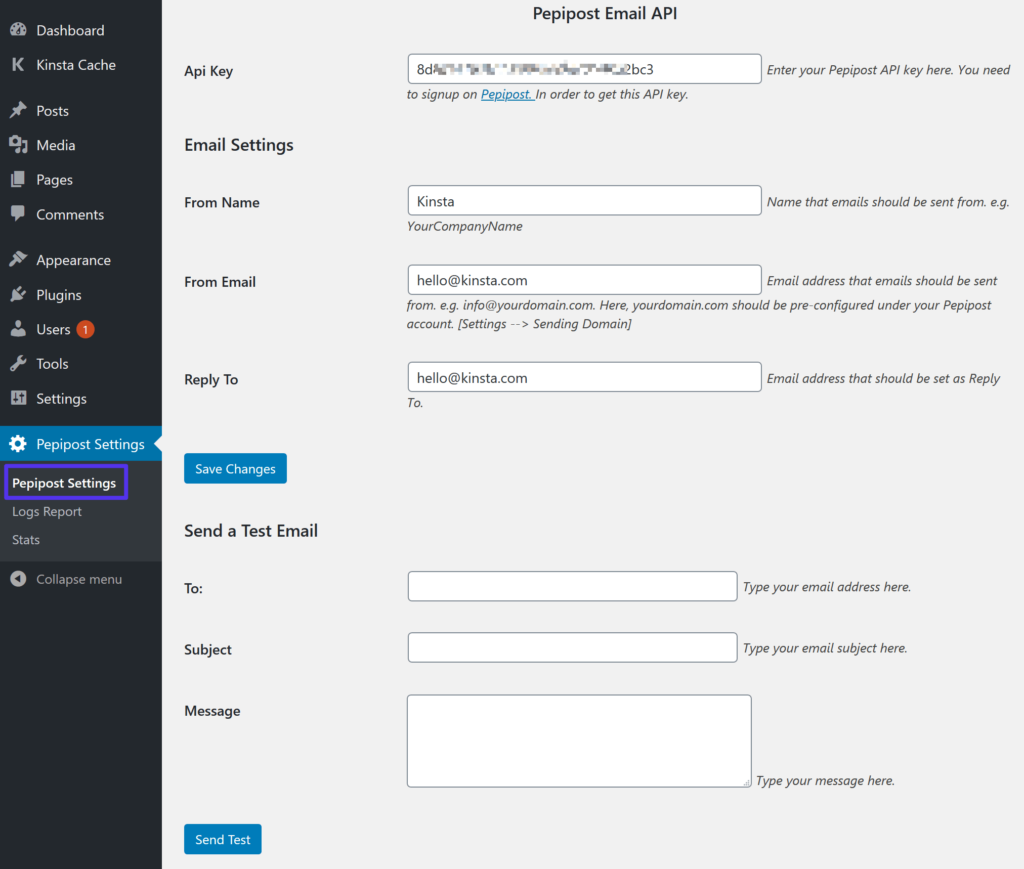
then go to the new pepipost settings tab in your wordpress dashboard and add your api key to the api key box.
Below that, you’ll also want to set up some basic sender information, like their name and email address.
Once you save your changes, you should be ready to continue. you can use the send a test email section to make sure everything is working properly:
Sendinblue
sendinblue can help you send marketing emails and transactional emails (also a good mailchimp alternative). focuses more on the marketing side, with marketing automation features and more.
sendinblue also has one of the highest free sending limits, allowing you to send up to 300 emails per day forever. however, if you need to exceed those limits, the cheapest option is $25 per month for up to 40,000 emails per month. so if you think there is a chance to exceed 300 emails per day, this might not be a good option.
To help you use sendinblue with wordpress, the sendinblue team offers a dedicated wordpress plugin.
here’s how to use sendinblue to deliver wordpress transactional emails for free.
1. register and generate api key
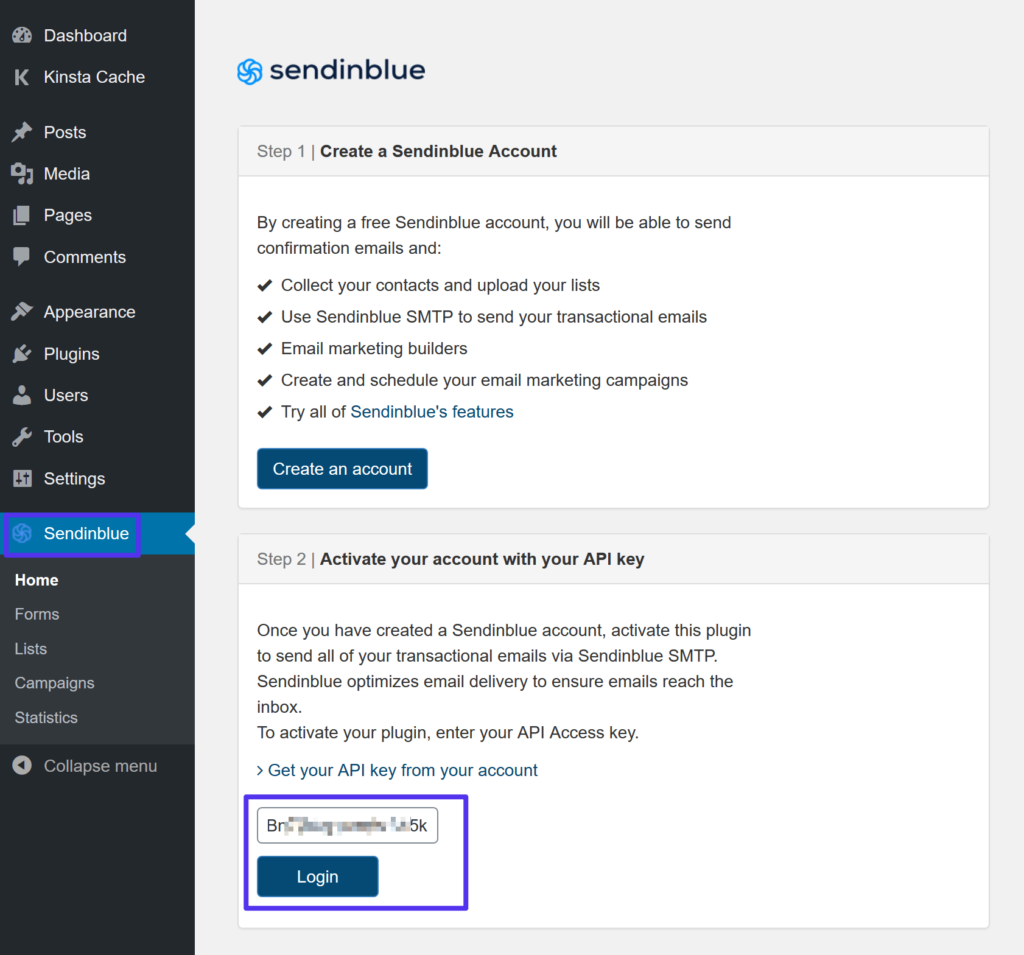
To get started, sign up for a free sendinblue account.
Once you’ve logged into your account, click your username in the top right corner and select smtp & api option. or you can visit this page while connected.
then click the key button create a new api. in the popup:
- choose version 2.0
- give it a name that will help you remember it (for example, the name of your wordpress site)
- click generate
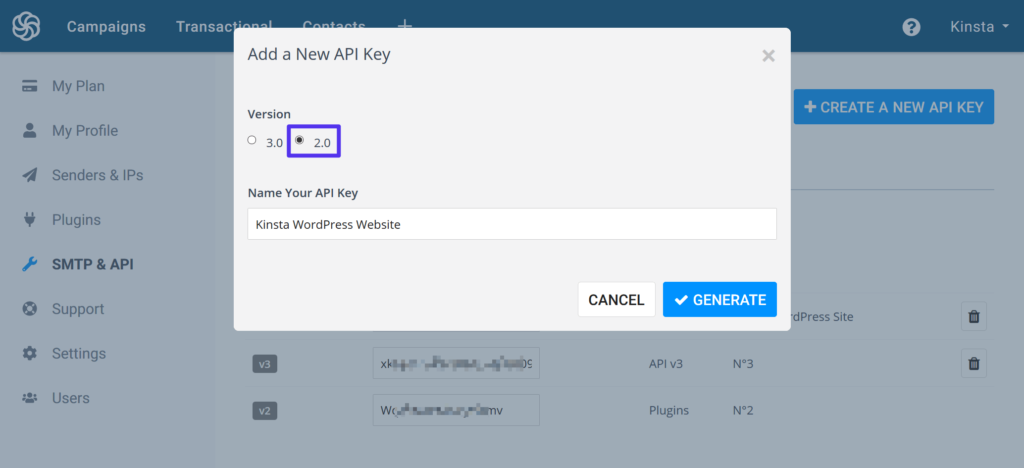
You should then see the value for your API key – keep this handy because you’ll need it in the next step.
2. install sendinblue plugin
Next, install and activate the official sendinblue plugin from wordpress.org.
then click on the sendinblue new tab in your wordpress dashboard and add your api key in the box. then click sign in.
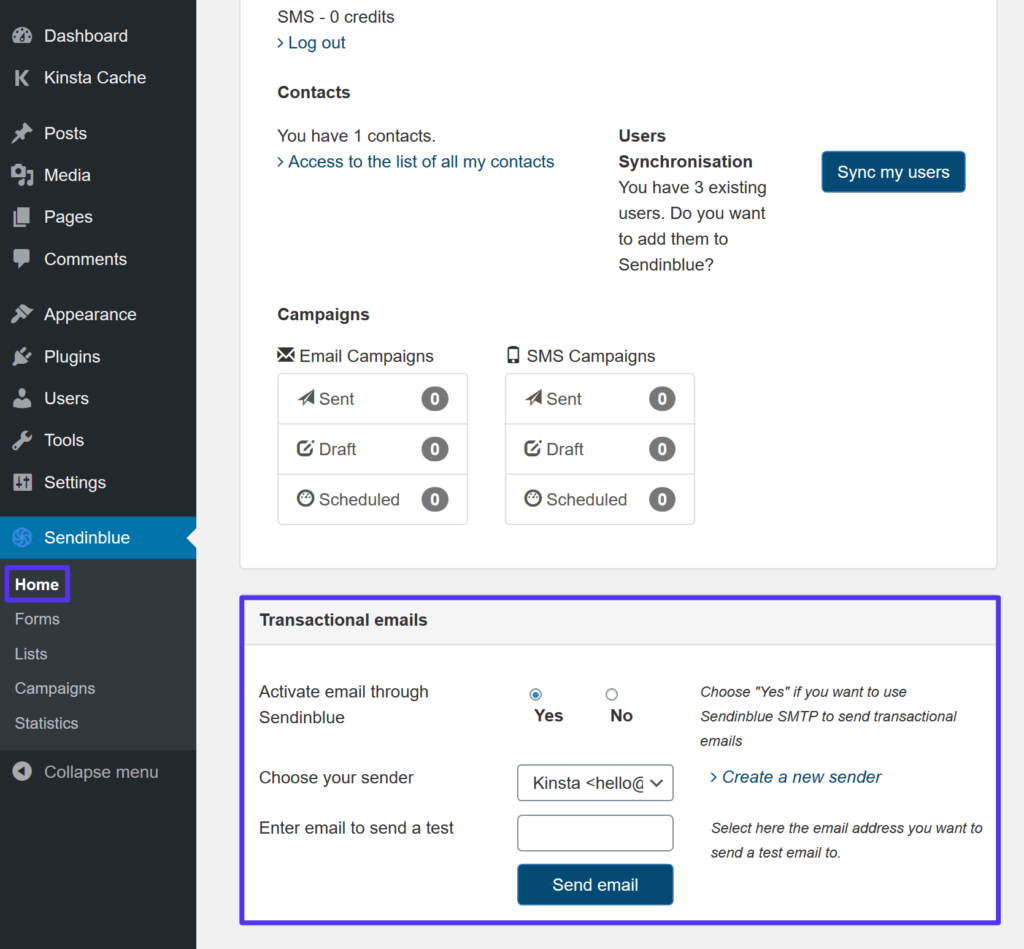
You should then see the plugin’s full settings area.
To start sending transactional emails from your site through sendinblue’s free smtp server, select the yes radio button in the transactional emails section.
then you can select your sender information (you can control this from your sendinblue dashboard) and send a test email:
Mailjet
mailjet is an affordable email solution that can help with both marketing and transactional emails. for the smtp send service, you can send up to 200 emails per day for free forever, though your emails will include the mailjet logo in the footer.
To remove the logo and/or increase your sending limit, paid plans start at just $9.65 per month for up to 30,000 emails per month.
here is how to use mailjet to send wordpress emails.
1. register and access the api key
To get started, sign up for a free mailjet account to access your mailjet api key.
once you activate your mailjet account, go to transactional → overview in your mailjet dashboard to find your api keys:
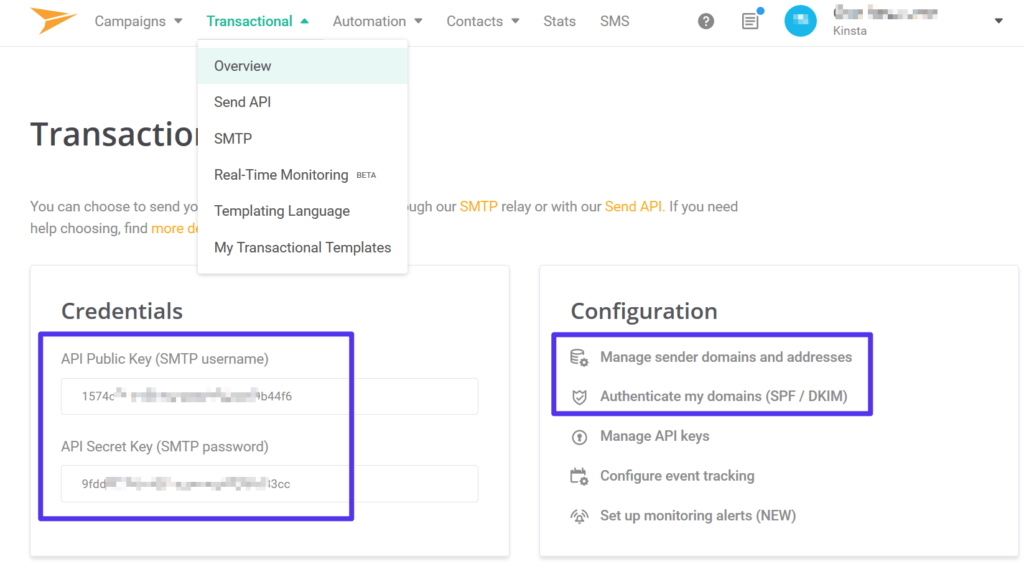
You can also use the Configuration options on the right to add and authenticate your sender domains and addresses. This will help improve the deliverability of your emails.
2. install official plugin
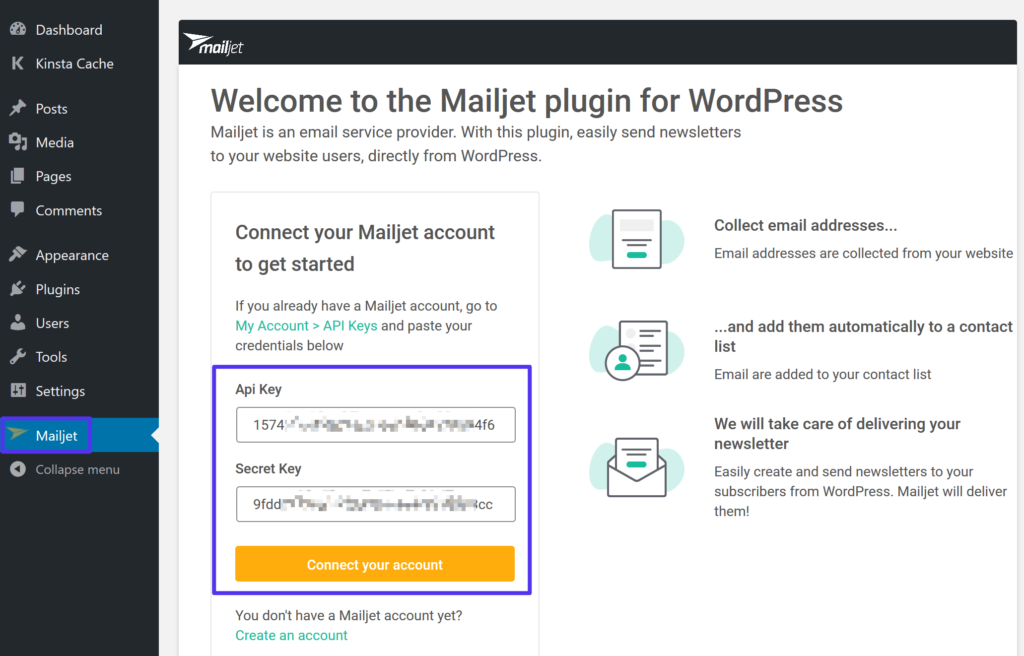
To set up your wordpress site to send transactional emails via mailjet, mailjet offers a dedicated integration plugin on wordpress.org.
once you have installed and activated the plugin, go to the new mailjet tab in your wordpress dashboard and add your mailjet account api keys:
After connecting your Mailjet account, you’ll see an option to sync your registered WordPress users with Mailjet. If you only want to use Mailjet for transactional emails, you can just click the button to Skip this step.
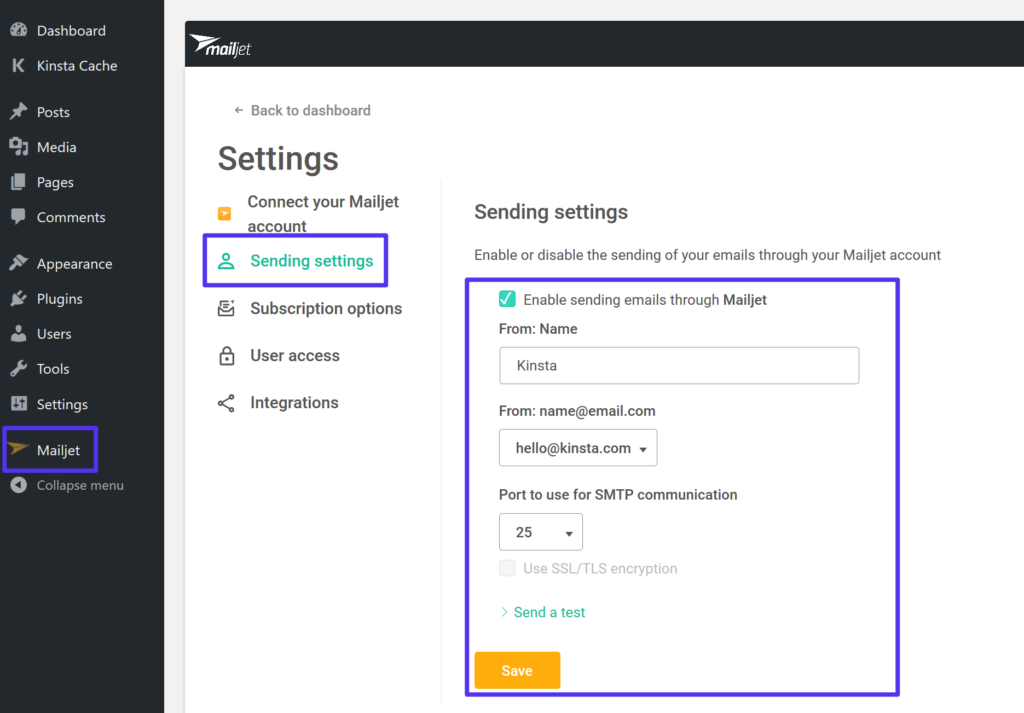
Next, open the mailjet plugin settings in your wordpress dashboard (mailjet → settings) and select send settings.
check the box to enable sending emails via mailjet. then fill in your sender information and send a test email to make sure everything works:
Elastic Email
elastic email offers an affordable smtp sending service with a free forever plan and cheap pay-as-you-go prices. With the forever free plan, you can send up to 100 emails per day. to go beyond that limit, you only pay for your usage: $0.09 per 1,000 emails.
You can also purchase a private ip address for $1 per day, as well as various other add-ons (such as email attachments).
1. register and access the api key
To get started, sign up for a free elastic email account to access your elastic email api key.
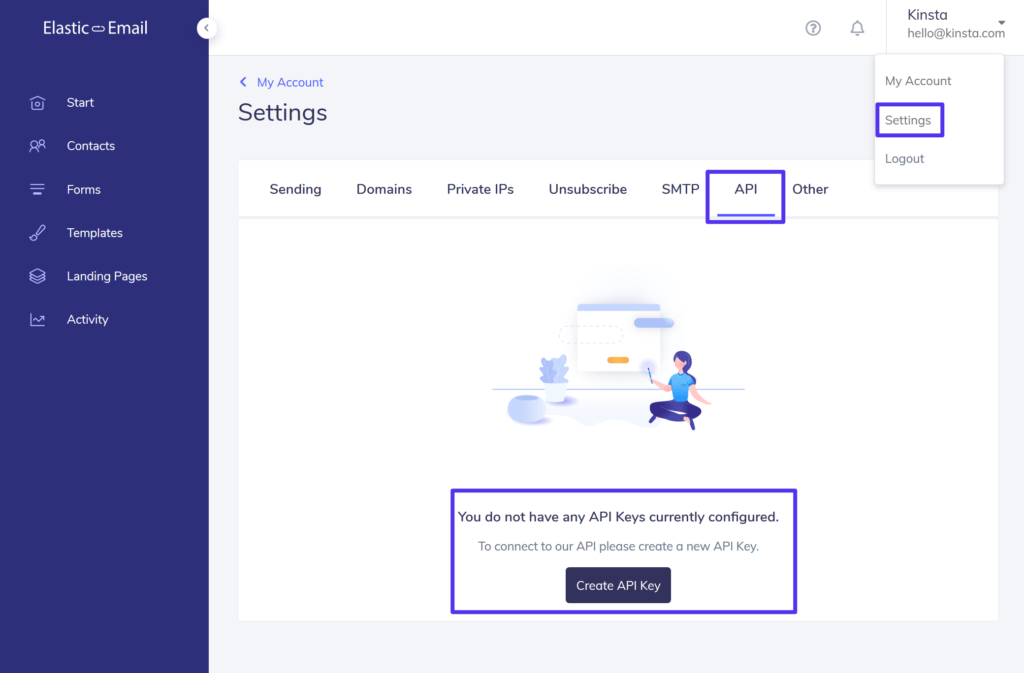
once you activate your account, click your username in the top right corner and select settings.
then go to the api tab and give your consent not to spam users. once you consent, the elastic email will show you a button to create api key:
Give the API key a name to help you remember it and select Plugin for the Permissions level:
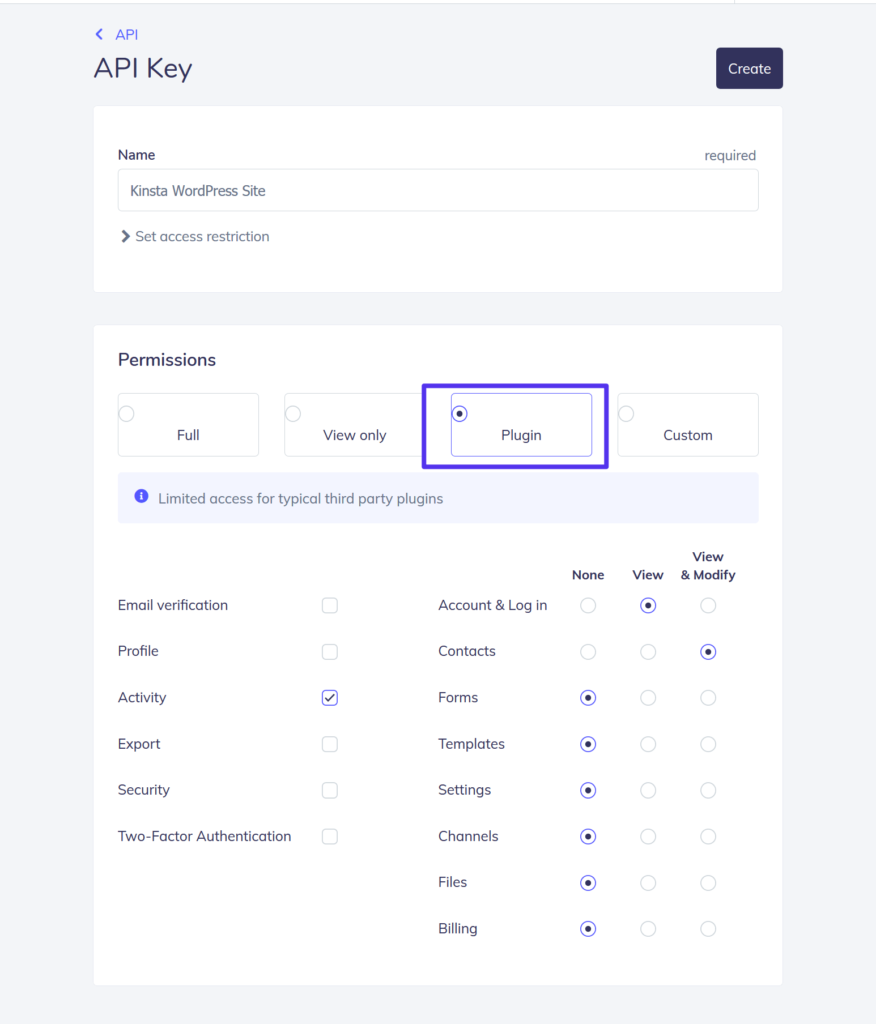
Then, you should see the value for your API key. Make sure to keep this window open because you’ll need it in the next step and Elastic Email will only show this once.
2. install official plugin
To help you use elastic email with wordpress, elastic email offers an official plugin on wordpress.org called elastic email sender.
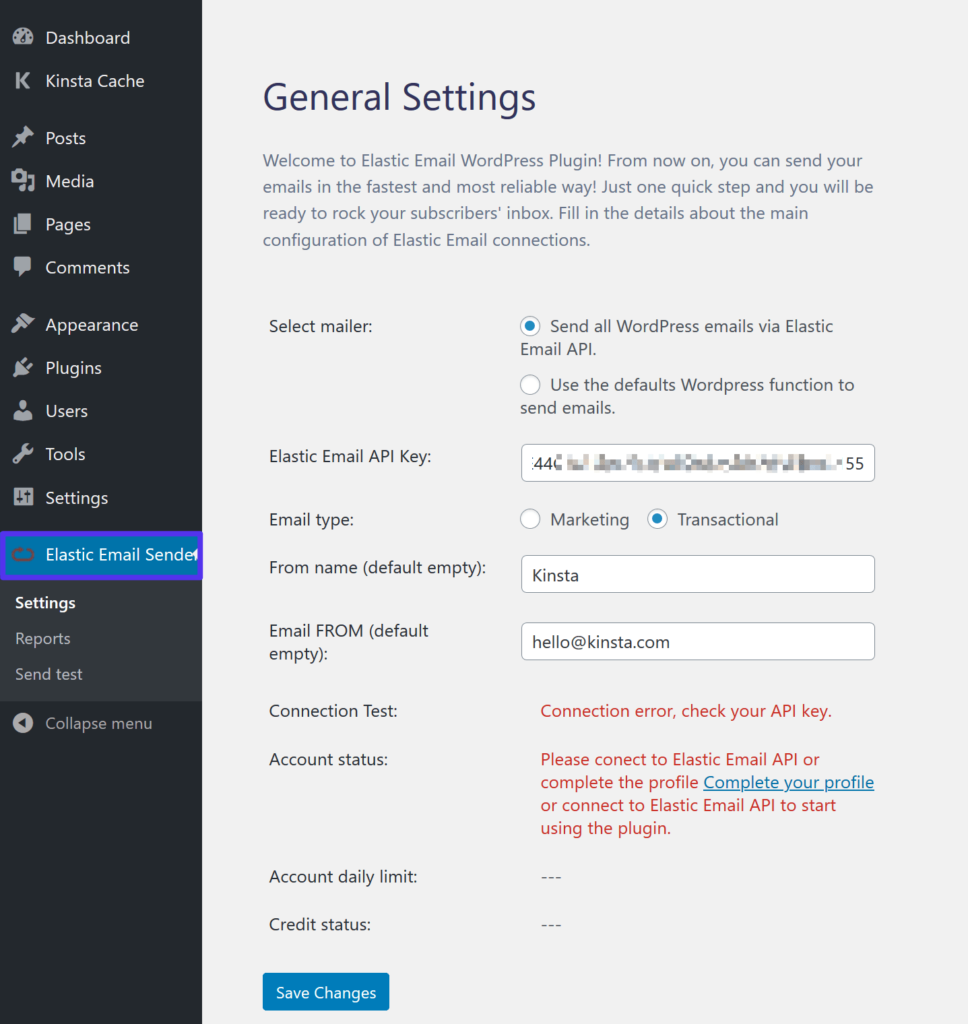
once you install and activate the plugin on your wordpress site, you can go to the new elastic email sender tab on your wordpress dashboard. then set the following details:
- select mail – Send all emails from wordpress via the elastic email api.
- elastic email api key: add the api key from the previous step.
- email type – transactional
- of name and email
then click save changes:
You should then see a success message.
To make sure everything is working properly, go to elastic email sender → send test to send a test email.
mail gun
mailgun no longer offers a free forever plan like these other tools. however, we still include it because it offers an extended three-month trial, as well as affordable pay-as-you-go pricing after that. still, if you want something that’s 100% free forever, mailgun is no longer an option.
mailgun offers a simple api based mailing service that you can integrate with wordpress in just a few minutes.
You can send up to 5,000 emails per month for the first three months for free. after that, you can use pay-as-you-go pricing starting at $0.80 per 1,000 emails.
we have a complete guide on how to use mailgun with wordpress.
summary
By default, the way wordpress sends emails leads to all sorts of issues with reliability and deliverability. To fix problems with transactional emails from your wordpress site, you should use a dedicated smtp server, instead of relying on wordpress defaults.
Fortunately, with a free smtp server, you can get access to reliable wordpress transactional emails without spending a dime.
These are the key things you should know about the different solutions you could take advantage of:
- gmail smtp server: allows you to send up to 500 emails in a 24 hour period with a free gmail account or 2000 emails if you pay for google workspace.
- sendgrid: allows you to send 100 emails per day forever (and 40,000 free emails during the first month).
- pepipost: allows you to send 100 emails per day forever (and 30,000 free emails during the first month). first 30 days).
- sendinblue: allows you to send 300 emails per day forever.
- mailjet: allows you to send up to 200 emails per day forever.
- elastic email: allows you to send up to 100 emails per day forever, with cheap pay-per-use pricing after that.
- mailgun: allows you to send 5,000 emails per month for free , but only during the first 3 months. after that, you have affordable pay-as-you-go prices.
To get the highest free sending limit, you can set the gmail smtp server. however, gmail also has the more labor-intensive setup process.
For simpler setups, you can consider other free options like sendinblue (300 emails per day) or sendgrid (100 emails per day).