Useful tools:1. newoldstamp – email signature marketing2. mailstrom – tool to clean your inbox3. reply.io: reach personal email, calls and tasks4. mailtrack: the link in the email opens tracking5. shift: desktop application to optimize all your email accounts and applications.
Although Apple Mail, which comes with Mac OS X, is a great email client for most users, some of us may feel that email has become more of a chore than a help. does it sound familiar to you? Today, we’ll talk about simple Apple Mail tips and tricks to make your life easier and improve productivity.
via giphy
tip #1: filter unread messages
If you need to focus on just unread emails, open the mail app on your mac. then look for the little “filter” button at the top of the list of messages in any mailbox. If you’re using iOS, tap the button in the bottom left corner. the button looks like a series of lines on top of each other. once you turn on the “unread” filter, you will only see unread messages. click the button again if you want the read and unread emails to show in the inbox.
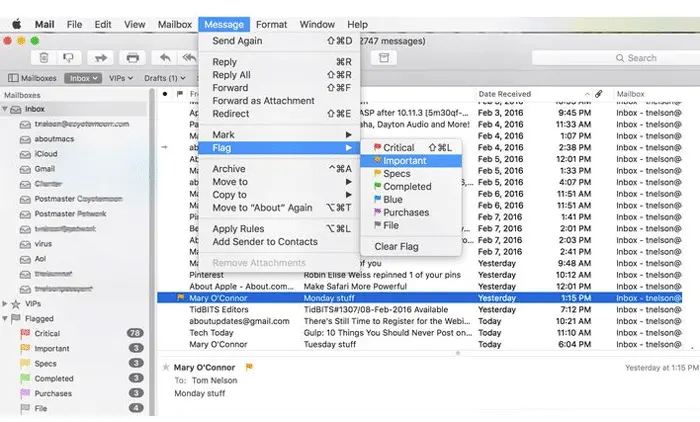
tip #2: use flags to flag messages
Our inbox is usually full of emails, but usually only a few need more attention. To avoid searching for these emails manually, simply mark important messages with flags for quick access at any time. to do so, right click on the email. then the pop-up menu will appear with a list of flag colors. These flags come in different colors like red, yellow, orange, green, blue, gray and purple. use any flag color to mark an email type. for example, you can mark the message that requires your response within 24 hours with a red flag. green flags can indicate tasks that you have already completed.
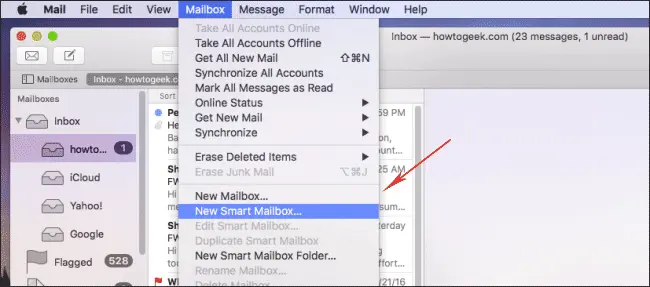
Tip #3: Set up a smart mailbox to categorize your messages
In the apple email application, you have two types of folders. they are regular folders that you can manually select and drag emails into. and smart folders (mailboxes) that filter and collect emails based on rules you configure. go to menu bar, click mailbox -> new smart mailbox. you can base your mailbox on the subject, recipient, date received, etc.
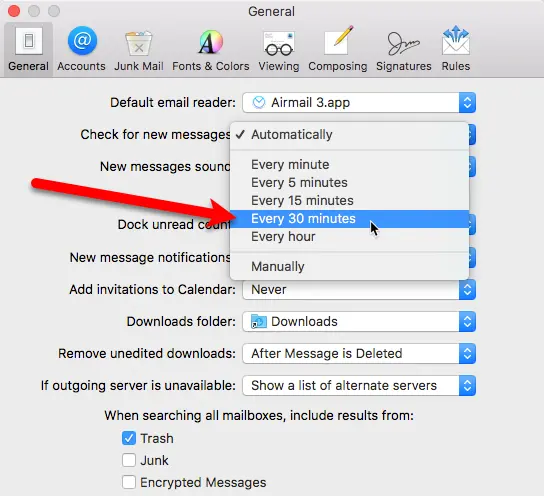
Tip #4: Set the frequency of inbox updates
the mac mail app automatically syncs messages and checks for new ones every five minutes. if you need more frequent or less frequent updates, you can choose between every 1 minute, 5, 15, 30, 60 minutes and even set the frequency manually. go to preferences, click on the general tab -> check for new messages and select the frequency.
tip #5: enable/disable image preview in apple mail
Whenever you receive an email with an image or pdf attached, you will be presented with a preview of those files. Although this is a great feature for most of us, apple mail gets slow in working. do you want to speed it up? exit the mail app, launch the terminal and paste the following command string:
then restart the mail application.
Tip #6: Add annotations and highlights to attached images
sometimes we need to add text and comments to the image we are going to send as an attachment. Of course you can edit the image using different software, but did you know you can edit directly from mac email? compose the message and add the attachment to it. click on the attachment, select the drop-down menu in the upper right corner, then choose “checked”. you will be presented with a list of tools like vector drawing, shapes, text, line color, etc. draw, write, or highlight the image as you like, then click “done” when you’re done.
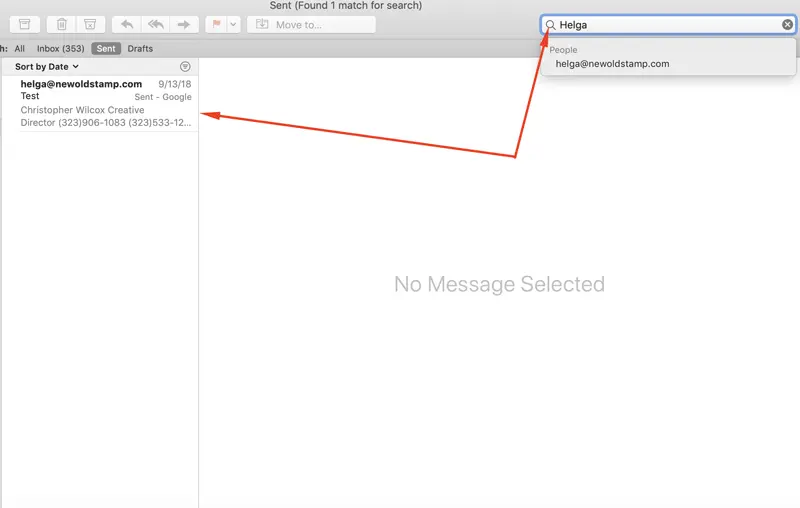
Tip #7: Use apple mail’s search and search operators to find the message quickly
email search is usually tedious and complicated. Most email clients offer a set of search operators to help you define any search query precisely. for example, you want to find an email “from natalie polly with attachments”, so you use the search operators “from:” and “has: attachment”. With mac mail, you can search how you feel, using your own words. just type “email from natalie polly with attachments” to get exactly the right results.
Tip #8: Keep track of important conversations in the apple email app
The vip function is extremely important for those who suffer from email overload. so if you want to highlight the important messages so you don’t lose them among the less important ones, find the email of the person you want to vip and click on it. then you will see a drop down menu. look for the “add to vips” option.
Tip #9: Block Spammers
Get rid of annoying emails by automatically blocking and deleting all messages from certain senders. the procedure is quite simple: mail -> preferences -> rules -> add rules. add the email address you want to block. tip: in the description field, use something like “block natalie@abccompany.com” to help you recognize the list rule from other apple mail filters.

Tip #10: Find a folder with stored messages from the apple email client
Ever wonder where Apple Mail stores your messages? it would be helpful to know where this folder is located in case you need to copy your emails to a different computer or make a backup. follow these steps:
1. open a new browser window
2. in the main menu, select the item “go”
3. select the “go to folder…” menu item (you can also use command-shift-g)
4. type ~/library/mail/v5 or ~/library/mail/v2 (for older versions of mac os x mail)
5. select “go” or “accept”.
Tip #11: Create Group Lists
If you need to send an email to a group of specific recipients, you can manually copy and paste the entire list of addresses, but it’s inefficient. instead, you can use the built-in contacts program that comes with your mac. go to “file” at the top left and select the second option which is “new group”. call it what you want and go back to “all contacts”. then drag and drop the recipients into the new group you just created. now open the email program, create a new message, type the name of your group in the “to” field, press the comma and you will see all the email addresses of those people.
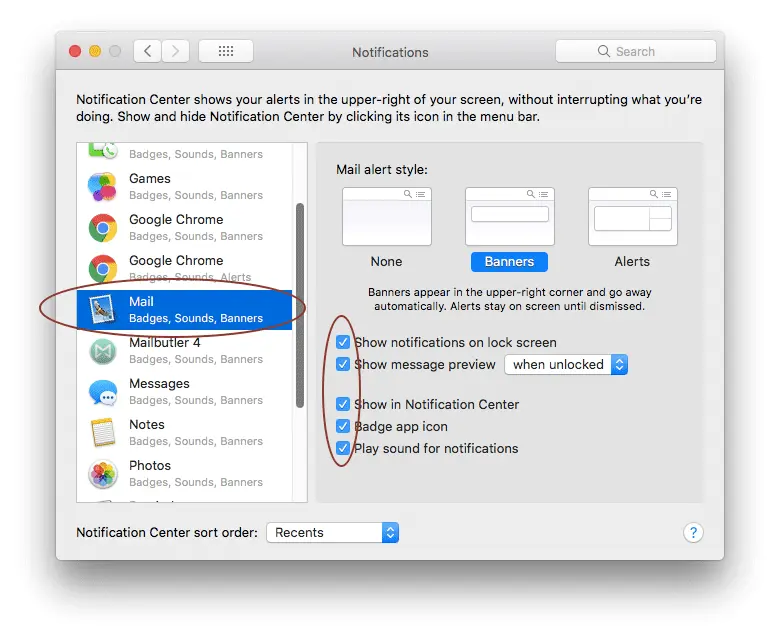
tip #12: get open notifications
verify that your email has been delivered with a read receipt. on mac unfortunately there is no option in the mail client to add a read receipt. however, you can force it to turn on through the terminal. to find it, go to search engine -> app -> utilities. then type the following command: defaults write com.apple.mail userheaders ‘{“disposition-notification-to” = “name <email@address>”; }’ don’t forget to write your name and email address. press return. From now on, mac mail will send a read receipt with every email you send. if you want to disable this feature, be sure to use this command: defaults delete com.apple.mail userheaders. that will disable read receipts.
Tip #13: See the source of a message
This feature can be useful if you want to identify spoofed senders or prevent a suspicious phishing effort. to see the full source code, go to view option -> message -> raw source.
tip #14: import outlook contacts to mac mail
transfer contacts from outlook to contacts app on your mac. First, you need to export Outlook contacts to a .csv file. go to the “people” page (see the bottom left corner). on the toolbar, choose manage -> export contacts. save the file in .csv format. now that your contacts have been copied to a .csv file, you can import them into the contacts app. open contacts, select file -> import from the menu. then locate and highlight the csv file. click “open”.
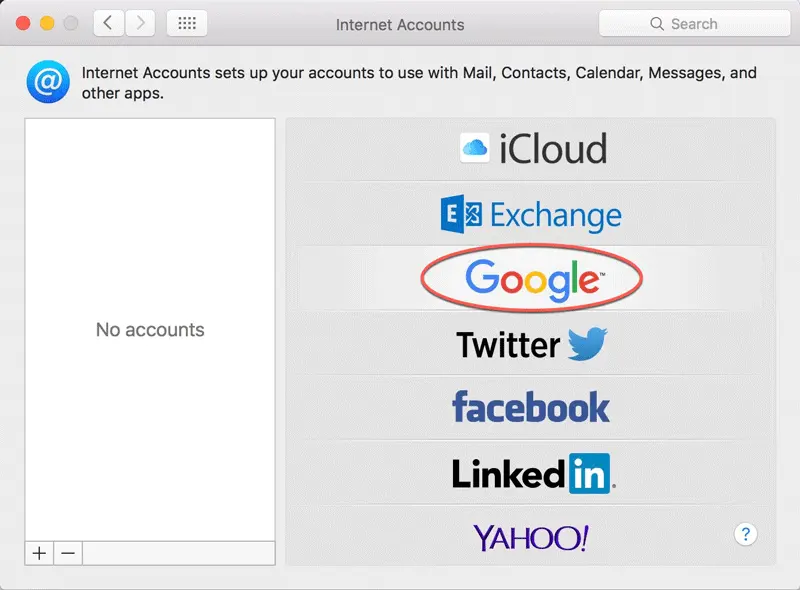
tip #15: add google contacts to mac mail
synchronize your contacts from gmail or google apps with the contacts app on your mac computer. This is a great way to always have offline access to your gmail or google app contacts. so after opening contacts app just go to contacts -> preferences from there, make sure you click on the accounts tab and select the plus sign at the bottom. make sure you choose the carddav option in the dropdown menu and in the username section enter your gmail or google apps account. for example, natalie.abccompany@gmail.com. then in the password section enter your gmail or google apps password. and for the server address section, go to google.com and click “create”. Once you’re done, your contacts will start syncing from your google account to your mac computer. any new contacts you make on your mac will be synced with your google account and vice versa.
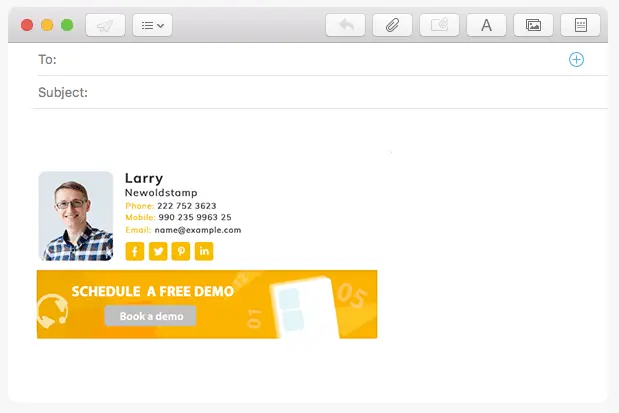
tip #16: add the mac mail html signature
Ever get an email from someone and see one of those really cute signatures at the bottom of their email? maybe it has your photo or logo. Have you ever felt a little jealous? so if you still have blank email footer every time you create a new email, let’s add a beautiful email signature that people can be jealous of, which is what everyone wants and likes . maybe you think getting a professional html signature with images, logos, clickable links etc. requires good coding skills. Of course, there is some truth to it, but modern email signature builders like newoldstamp can do the work for you. so once you’ve got the signature file ready to use on your device, go ahead and open apple mail, then from the top toolbar select mail -> preferences in your preferences window, you will see a series of tabs across the top. select “signatures” and then on the left side of the window select the email account you want to install your mac mail signature on and click the plus icon. then give your footer a name like “my new beautiful signature”, uncheck “always match my default font”. open the search engine and navigate to where your signature is saved. then go ahead and open it with google or chrome or firefox (don’t use safari because it may mess up the formatting). press command + a to select all and then command + c to copy the signature. go back to apple mail and paste your signature by pressing command + v.
click here to create your personal or business email signature in a few minutes
tip #17: create calendar events from apple mail
Quickly and easily add appointments and events found in email messages to your calendar. when you mouse over an item (date and time), a dotted gray outline will appear. click the down arrow on the right to make the possible item appear on your calendar. you can modify the name of the event, the location, etc. click “add to calendar” once you’re done.
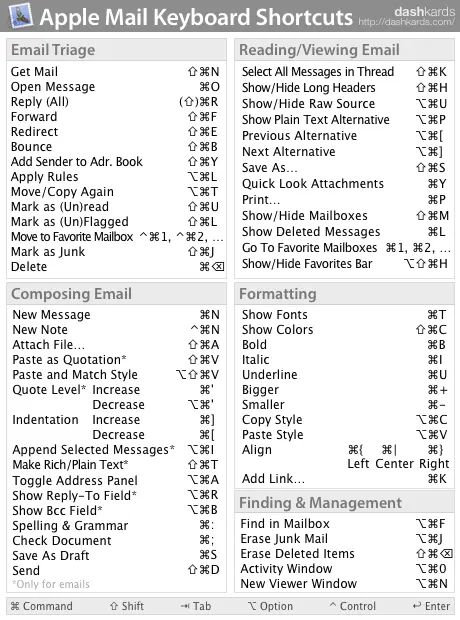
tip #18: use apple mail shortcuts
Want to send emails faster? See the image below for the list of apple mail shortcuts. to create your own keyboard shortcuts, click the apple menu -> system preferences -> keyboard -> app shortcuts. then click the plus button to add a new combination.
Tip #19: Create email templates in the Mail app
If you need to write the same email message over and over again, save it as a template for later use. with the mail open, go to create a new message. and whatever you type in this message will become your template. once you’ve filled everything in, go to file -> save as stationery. then give it a name like “my apple mail template” or something like this. next time just start a new message and look for the stationery icon in the top right corner, click that to see the list of folders. look for the folder called “custom”. there you will find the template you saved.
Tip #20: Keep emails in one file
If you need to have multiple emails in one file, highlight the emails you want to save by holding down the shift key. hold down the command to select disparate messages. then choose file -> save as… in the menu. save.
tip #21: read pdf documents directly from apple mail
Did you know that only one page pdf files are shown inline in the message text and files with two or more pages are shown as icons? however, you can right-click the preview and select “view as icon” or “view in place” to switch between icon and online display modes.
Tip #22: Change the sort order of messages
if we look just above the middle column in the mail app, we’ll see a menu called “sort by date”. In this menu, we will see different sorting options like “newest on top”, “sort by size”, “unread first” and many other options to choose from.
tip #23: customize the mac mail toolbar
customize the mail toolbar to your preferences, remove the buttons you don’t need and add the ones you use often. So how do you do that? double click on any message to open the mail window. then right click on any blank mail window and then choose “customize toolbar” from the drop down menu. to add, drag an item to the toolbar. a green icon indicates that you are adding it. to remove the button, drag it from the toolbar. visual and sound effects indicate that it has been removed. To rearrange items, simply drag an item to a new location on the toolbar. To change the way items appear, click the “show” pop-up menu and choose the option you want.
tip #24: preview links in messages in apple mail
Not sure if it’s safe to open the link you receive in an email? apple mail allows you to preview urls directly in the app. just hover over the link within the message until you see the gray box with a triangle. then click this box to preview the link in a side window.
tip #25: add apple mail attachments through the port
And the last cool trick for today is the option to send a new email with an attachment very quickly by dragging the file you want to attach over the mail icon. you don’t even need to open the mail! cool, right?