Three ways to create an email template with variables, text field, or dropdown list that will prompt for values to fill in before sending an email.
If responding to repetitive emails is part of your your routine daily routine, chances are you are using Outlook templates to automate this part of your work. But what if your template contains some variables that you need to change before an email will be triggered? Manual data editing is not the best way, as there is always a chance that you may forget to update some important details. So the question is: how do I create a template that asks me to enter the information and automatically inserts it in the appropriate place in a message? Get the answer, keep reading 🙂
- Create an Outlook email template with variables using VBA
- Create an email template with fillable fields
- Add dropdown to Outlook email template
Make an Outlook email template with variables using VBA
This example shows how to insert information variable in an email template using a macro. To keep things simple, I’ve created this little template with two input fields in the body of a message, [date] and [percent].
And here is the VBA code that will prompt for the values to fill based on subject:
For each variable mentioned in the code, a separate input box will be displayed:
The values you enter in the boxes will appear exactly where they should in the message:
How this macro works
There are two key points in the code to note:
- The template is identified by its subject. In our case, it’s “Your subscription expires soon.” Be sure to replace this text with the subject of your template.
- In our sample code, there are two placeholders, [date] and [percentage]. You can modify them as needed. Note that there are 4 instances of each placeholder in the code, not counting comments, and all of them must be replaced with their own placeholders. If you have more variables, add a similar code block for each of them (see code parts with corresponding comments).
How to create an email template with variables using the macro
Here is a brief summary of the steps to create an email template with variables and send a message based on the template:
- Create a new email, insert the text into the body of the message, place placeholders where necessary, and fill the Subject line with unique text to be used only in the subject of this specific template.
- Save your message as a template Outlook (*. often). For detailed instructions, see How to create an email template in Outlook.
- Press Alt + F11 to open the VBA editor, paste the macro code into the ThisOutlookSession module, and save the project (Ctrl + S ).
- Restart Outlook.
- Create an email message based on the template you just created. Detailed steps can be found here: How to send a message based on an email template.
- In each input box, type the value that is requested.
- Review the message finished and press Send.
Email template with variables does not work
If the VBA code does not work as expected or does not work at all in your Outlook , it is likely to be one of these reasons:
- You did not restart Outlook after inserting the code in the VBA editor. Outlook restart is required to run the code in the startup event handler.
- Mail.Subject in your code does not correspond to the subject of your template .
- The placeholders in your code are not exactly the same as those in your template.
- Regardless of how many macros are in ThisOutlookSession , the first two lines of our code (Private WithEvents…) should be in the general declarations section at the top of the Code window, before any other code.
- Macros are disabled in Outlook. To verify this, click File > Options > Trust Center > Trust Center Settings > Macro Settings and select:
- Notifications for all macros
- Enable all macros ( not recommended)
Note that the second option allows all macros to be executed, including potentially malicious code, so it is safer to choose the first.
Create an Outlook Email Template with Fillable Fields
Now, let’s explore a different approach to the same task.This time we are going to use our own tool called Shared Email Templates for Outlook. If you’ve never heard of it before, here’s a one-sentence introduction:
Shared Email Templates is an Outlook add-in for quickly creating your own collection of templates with predefined or fillable fields, custom formatting , images, and attachments.
What makes it different from . often templates? This example will show you 🙂
With Shared Email Templates installed in your Outlook, follow these steps to create a fillable template:
- In the add-in panel, select the destination folder and click the New Template button.
If the text you want to include in your template is in the message you’re composing, select that text, then click New Template. The selected text will be inserted into your template automatically.
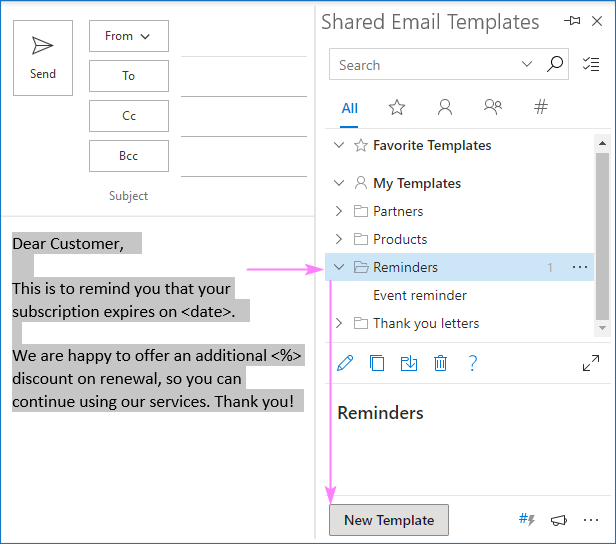
- If we wanted a simple text template, we could click Save right away and our work would be complete. But you do want a field where you can enter some information, so it will automatically be inserted in the appropriate place in the message, right? So, let’s do the first one.
In the template text, select your placeholder ( in our case) and click the Insert Macro button. If there is no placeholder in your template, place the cursor exactly where its value should be inserted.

- In the list of macros, find WhatToEnter and click it.

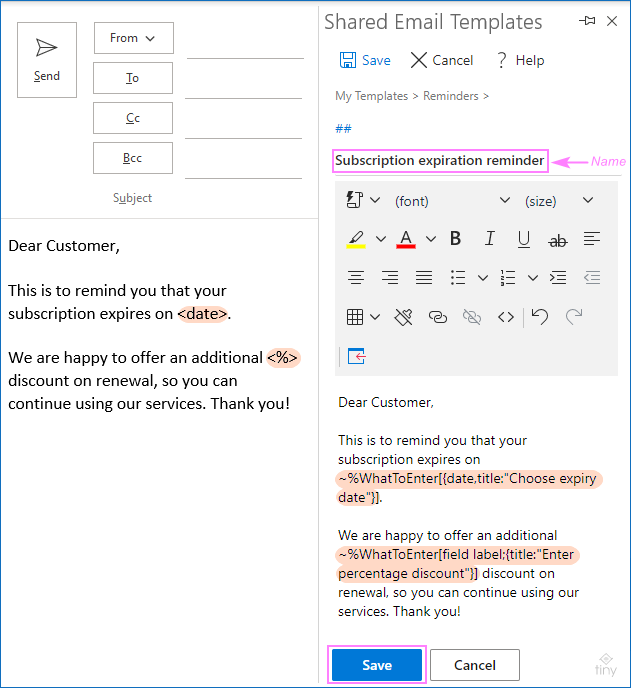
- Choose Field type (Date in our case), type the window title (usually some meaningful name for the value to be entered) and click Insert.

- As a result, a correctly configured macro is inserted into your template as shown in the screenshot:

Now you can save your template or add some more macros if you have more than one fillable field.
- Since our template has one more placeholder (), we select it and click the Insert Macro icon again. This time we choose Text in the first box, type the title of the corresponding window and click Insert.

- Apply some formatting to your template if necessary, name and save.
Done! Your fillable email template for Outlook is ready.
How to use an email template with input fields
Preparing an email template to send is as easy as it could be . To insert a template into a message, double-click it or click the Paste icon on the left.
A small form will appear, asking you to choose a date from a drop-down calendar and enter a percentage discount in the text box:
A moment later, your message with all the necessary information is ready to be sent :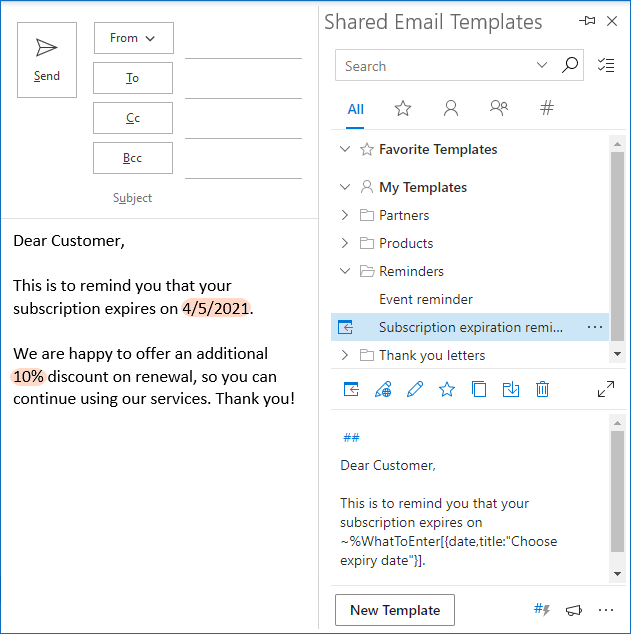
Insert Dropdown in Outlook Email Template
The steps to add a dropdown to your email template are the same as described above. The only difference is step 4 where you set up the What to Enter fields:
- In the first box, choose Dropdown List.
- In the In In the Window Title box, place some text that reminds you of what type of value you will select (Number of days before expiration in our case).
- In the Elements box, type the dropdown values one per line.
To be able to enter a value that is not in the drop-down list, select the User can edit selected items check box. To limit input to predefined elements, leave this checkbox unchecked.
The finished macro that will activate our dropdown list takes this form:
~%WhatToEnter[3;5;10;{title: “No.days before expiration”, editable}]
If changes are needed at a later time, you can edit the dropdown elements directly in the template without having to rebuild the macro from scratch.
Similarly, we insert one more macro for the discount percentage, in this case we limit the options to only the drop-down list items (the User can edit selected items checkbox is not selected):
After all these customizations, our Outlook email template with two dropdown lists looks like this:
When you insert the template into a message, the following will appear: this form prompting you to select both values:
It is also possible to automatically insert user-specific text, images, and attachments into each individual message. This tutorial explains how to: Create a dynamic Outlook email template for the current user.
This was a quick demo of just one capability of Shared Email Templates. You can find many more useful features on the above linked page. Are you curious to try it? Download a free version from Microsoft AppSource.
Here’s how you can create an email template with fillable or dropdown fields. Thanks for reading and we hope to see you on our blog next week!
Downloads Available
Why Share Email Templates? Top 10 Reasons (.pdf file)
Other ways to respond with a template in Outlook:
- Quick Parts: Little building blocks for your emails. It’s easy to create, but it lacks some important features, such as file attachments.
- Outlook Templates (.oft files): Hidden deep within the interface, they still come in handy when sending dozens of emails repetitive emails.
- Quick Steps: A kind of shortcut to automate repetitive tasks in Outlook.
- Outlook Signatures: Used by almost everyone, they shouldn’t necessarily be limited to standard information. Your signature can be an entire email and you can create as many as you want.
- Mail Merge in Outlook – Send personalized mass emails using templates.
.