Introduction
The Python programming language is a versatile, high-level language that can be easily used for web programming, among other tasks. Building web applications can be difficult and time consuming on your own. Web frameworks do much of the heavy lifting, and you can easily set up a template to build your web application.
Python has many different web frameworks. One of the most interesting is web2py. Web2py is a full stack web framework that can be used to fully develop your web application. It has SQL database integration, a multi-threaded web server, and comes with a full web IDE for designing your program.
This allows you to easily program with a unified interface from anywhere you can access a Web navigator . You can easily build and test your application in the same interface.
We will install and work with this framework on an Ubuntu 12.04 VPS.
Install the Web2py software
Your Ubuntu server instance should already come with Python installed by default. This takes care of one of the only things web2py needs to run properly.
The only other software we need to install is the unzip package, so we can extract the web2py files from the zip file you’ll be downloading:
sudo apt-get update sudo apt-get install unzip
Now, we can get the framework from the project website. We’ll download this to our home folder:
cd ~ wget http://www.web2py.com/examples/static/web2py_src.zip
Now, we can unzip the file we just downloaded and move it inside:
unzip web2py_src.zip cd web2py
Now that we are inside the web2py directory, how do we install it? Well, one of the best things about web2py is that you don’t install it. You can run it directly from this folder by typing:
python web2py.py
However, this will only launch the web interface that is accessible on the local machine. This is a security feature, but it doesn’t help us since our framework is hosted on a remote droplet.
To stop the server, type “CTRL-C” in the terminal. We’ll fix the web access problem in a moment.
Creating SSL certificates to allow remote access
To allow remote access, we need to start the web framework with SSL. We need to create our certificates before we can do that. Fortunately, the openssl package is already installed.
We can create an RSA key to use for certificate generation with the following command:
openssl genrsa -out server.key 2048
Using this key , we can generate the .csr file:
openssl req -new -key server.key -out server.csr
Finally, we can use these two pieces to create an SSL certificate:
openssl x509 – req -days 365 -in server.csr -signkey server.key -out server.crt
You should now have a server.key, server.csr and server.crt file in your web2py directory. We can use them to start the interface safely by passing some parameters to web2py when we call it:
python web2py.py -a 'admin_password ' - c server.crt -k server.key -i 0.0.0.0 -p 8000
You can select the password you want to use to log into your framework web interface. The “0.0.0.0” makes this accessible to remote systems.
You can access the interface by visiting:
https://your_ip:8000
You should get a warning that the SSL certificate is not signed by a known certificate authority.

This is normal as we signed the key. Click the button that allows you to continue anyway.
How to use the web interface to design your program
When you visit the site, you should be presented with the default web2py application:

If you do Click the “Administrative Interface” button, you can log in with the password you just chose when starting the server.
When you’re done, you should go to the administration interface:
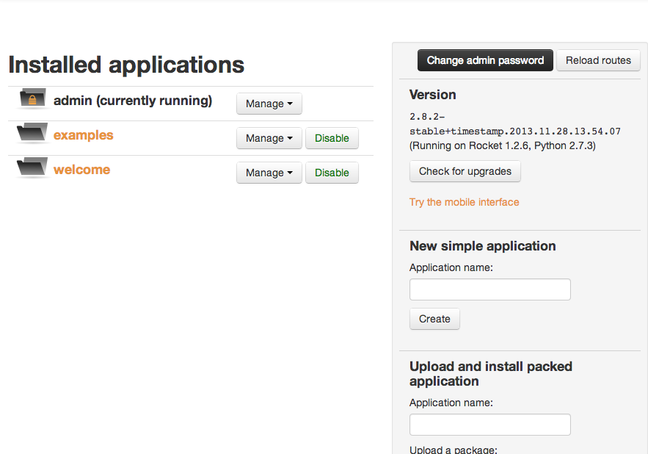
On the left, you can see three folders. Actually, these are included sample apps. Clicking on the folder titles will take you to the live applications. One is the “administrator” interface that you are using now. The “welcome” app is the basic app you saw before you logged in.
You can edit all these apps (except the admin) from this interface by clicking the “Manage” dropdown menu. and selecting “Edit”:

If you did this, return to the main interface by clicking the “Site” link in the top navigation bar.
Let’s create a new application via the “New Simple Application” field on the right side of the application, we’ll call it “application_sample”:

This brings us to the editing interface of our new application “sample_app”. It shows the standard MVC (model, view and controller), as well as a languages directory, a static pages directory, and directories for modules, plugins, and private files.

Actually, this is just a graphical representation of what’s going on in the file system. If you were to stop the web server with CTRL-C, and nav Navigate inside the web2py directory to the “applications/sample_app” section, you will see folders matching these categories.
If we visit the site by going to:
https:/ /your_ip:8000/sample_app
We can see that it looks almost exactly like the default welcome app (the only difference is is the title).
Exploring Web2py’s MVC Implementation
Web2py takes care of many of the details necessary to form a fully functional application. However, you must know how it interacts in order to develop effectively within this system. Web2py implements a “coding by convention” policy.
Coding by convention is a design option selected to reduce the number of decisions a developer must make. This means that a developer should only have to specify when they are straying from a convention.
For example, if an application’s controller is called “image_blog.py” and it has a function called “main ”, web2py will try to serve this page with a view called “image_blog/main.html”. The “.html” part is the default if no other extension is specified in the controller. If we break this convention, we would have to specify the alternative. Otherwise Otherwise, this is automatic.
We can see that there is a controller called default.py. This is the default controller that is used when no other controller is specified. If you click the “Edit” button to the To the left of this controller, you can see the functions it defines:

If we return to the main editing interface (by clicking on the “Edit” link in the top navigation bar), we can see that the functions that define user-facing actions have a matching view:

Create a sample controller and view
Let’s try this by first creating our own controller. In the “Controllers” section, click “Create” to create a new controller:

If we edit this file, we’ll see that it defines an “index” function that will be called if no other is requested. This serves as the default. This function simply returns a dictionary that stores a variable called message with a value of “hello from hello.py”.
# encoding: utf8 # try something like def index(): return dict(message=”hello from hello .py”)
You can edit this and click the disk icon to save your work. For our purposes, this does exactly what we want it to do.
Next, we need to create the corresponding view to represent the information being passed (the dictionary that defines the message). Click the “Edit” button or the “<<back" button to return to the application directory.
In the “Views” section, create a new view. We need to match the controller and function for this view to be applied automatically:

Edit the file by clicking the button to the left of it. You should see the default view, which contains something like:
{{extend ‘layout.html’}}
This is the template hello/index.html
{{=BEAUTY(response._vars ) }}
This file extends or builds on the layout.html view. This is a useful method for maintaining a consistent look across all of your pages. If we visit the page in our browser, we can see how it is rendered.
We can get to this page by visiting:
https:// your_IP:8000/sample_application/hello

You can see that it rendered the results in our dictionary below the header. We can print this directly by editing our view.
If we remove the two second lines, we can replace them with the text of our message, since it forms the entire message we want to display:
{{extend ‘layout.html’}}
{{=message }}
Now we should only see the message the controller passed, rendered as an h1 header:

If we want to get rid of the styling, we can remove the top line.
The {{=message}} is a way that we can embed python code in our files, this allows us to dynamically generate content that is not necessarily available at the time the program is written.
Conclusion
You should now have a very basic understanding of the web2py framework. More importantly, you should be able to see how easy it is to develop on this framework. The flexibility of being able to develop via text files or via a web interface means you can work well in different environments.
The web interface also comes with a host of tools for working with your application in growth. You can view stack traces when a bug is introduced, you can easily package your app for deployment, and see a log of all the bugs your app has encountered during development.
Web2py is a framework, an IDE and a development suite all in one package.
.