This detailed tutorial will walk you through the steps of creating a logo from scratch. Throughout the process, you’ll learn how to use many of the standard tools and find many tips and shortcuts that will come in handy not only for creating your own unique logo design, but also for other CorelDRAW projects.
Our simple logo design consists of a lighthouse on a sunburst background with the company name at the bottom. We will follow the process of creating each element step by step.

To get started, create a new CorelDRAW document. Since page size doesn’t matter for this project, you can use the CorelDRAW Default preset. We’ll be working in inches, so in the New Document window, make sure the units of measure are set to inches. Click OK.
TIP: You can also change the units of measure at any time by double-clicking the ruler at the top of the interface to open the Document Options window. In the Rules section, change the Units to Inches.
Step 1: Creating the Sunburst Background
The sunburst background for the logo will be based on a 3” diameter circle.
- Activate the Ellipse tool (hotkey F7).
- Hold down the Ctrl key and click and drag to create an ellipse of any size.
TIP: When activating a tool, look at the Status Bar at the bottom of the interface to see additional functions of the tool. For example, using the Ctrl key to constrain the ellipse to a circle.
Once you have finished creating the circle, it will be automatically selected.
To change the size of the circle to exactly 3”, use the Object Size fields on the Property Bar at the top. First, click the Lock Ratio icon to keep the aspect ratio of the circle. Type 3” for the width and press Enter, and the horizontal and vertical values will update.

The sun’s rays will be created by making a rotated array of lines.
- To create the first line, activate the Freehand tool (hotkey F5).
- As you can see in the Status bar, using the Ctrl key will make the line straight, not curved.
- Click once to the left of the circle to start the line , press and hold Ctrl, then click to the right of the circle to create a horizontal line, long enough to go through the circle.
- As with the ellipse , once you have finished creating the line it will be selected automatically.

Now we want to move the line so that it passes through the center circle.
- Activate the Select tool (shortcut key is Spacebar).
- Hold hold down the Shift key and select the circle, so now both the line and the circle are selected.

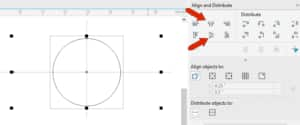
To center the line in the circle, we apply the command Align center vertically using one of the following methods:
- Press the hotkey E; or
- Go to Object> Align and Distribute > Align Centers Vertically; or
- Click the Align Center Vertically icon in the Align and Distribute docker introduced in CorelDRAW 2019 (Window > > Dockers> Align and Distribute).
Then, to center horizontally, use the shortcut key C or select Align Centers Horizontally from the Object > Align and Distribute menu or in the Align and Distribute docker .
Click on a blank space in the document to deselect the circle and line.
The ray pattern will be created by making duplicates of the line and rotating them . But before doing any duplicating, you may need to adjust the Duplicating Distance from the default setting of 0.25″.On the property bar, change the Horizontal and Vertical Duplicate Distance values to 0″. Now any duplicates we create will be placed exactly on top of the original, instead of being placed off the top of the original. 0.25″ from the original.
Open the Objects docker (Window > Dockers > Objects ) and you can see the design elements so far: an ellipse and a curve (the line).

Select the line with the Select tool and then press >Ctrl + D to duplicate it. In the document it looks like nothing happened because the duplicate is just above the original line, but in the Objects docker you will see that there are now two curves.
This is the new line will be the first rotated copy. On the property bar, enter 12 degrees in the Angle of rotation field.

Now we will take advantage of CorelDRAW’s Smart Mirroring > function, which creates additional copies using the above transformation, which is the 12 degree rotation in this case. Press Ctrl + D repeatedly, 13 times to be exact, to create new copies with the same rotation.

Turn on smart fill > tool, which is perfect for filling rays, as this tool fills in the boundaries of enclosed areas.

On the Property Bar, set the Fill Options > in Specify and select a sunny yellow in the Fill Color window. There should be no visible outlines in the final product, so set the Outline Options to No Outline.
Click inside alternating triangular shapes inside of the circle to create eight new yellow curves. These can be seen in the Objects docker.

Now that the rays are complete, we no longer need the lines. To select what to remove, return to the Select tool by tapping the spacebar. While holding down the Alt key, click and drag to create a marquee selection window, so that you have selected everything inside or touching the marquee window.
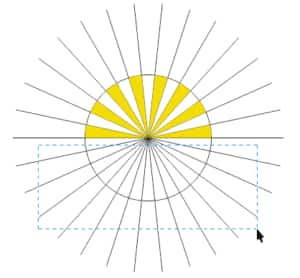
Press Delete to delete all the selected lines and this is what we’re left with.
For the last horizontal line, select it with the Select tool and press Delete .
To make the rays act as a single object from now on, we need to group them:
- With the Pick , once again click and drag to create a marquee selection around all the rays.
- Group them using the shortcut Ctrl + G ; or by clicking the Group icon on the Property Bar; or by right-clicking and selecting the Group command from the context menu.

The group of 8 objects can now be seen in the Objects docker.
TIP: To help keep your layout file organized, right-click the object group under Objects docker and select the Rename command, then rename the group to “Sunbeams”. Renaming your groups and objects makes it easier to find them in the docker, especially if your design is complex with many objects and groups of objects.
Step 2: Create the lighthouse
Next The task of creating this logo is a lighthouse, which is made up of four rectangles. Activate the Rectangle tool (hotkey F6) and click and drag to create a rectangle, which will be the base of the lighthouse. You don’t need to be precise about the size, as we’ll adjust it in the next step.

To size the rectangle to the exact dimensions we want, first turn off the Ratio lock on the property bar, then enter 0.5″ for the width and 1.25″ for the height.
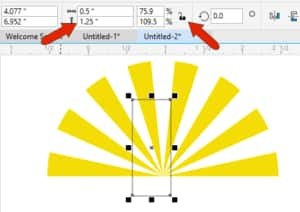
Now we need to center the rectangle on the sun rays.The rectangle should already be selected, so activate the Select tool, press and hold the Shift key and select the rays as well.Then use the shortcut key C to align the centers horizontally, and the shortcut key B to align the bottom edges.

We need three more rectangles to complete our lighthouse and using the w snap options will make it easier to be precise. In the View menu, make sure the command Disable is unchecked (shortcut Alt + Q).
Activate the Rectangle tool again. Hover your mouse over the top left corner of the base rectangle and the corner node will highlight.

Click and drag to the right edge of the base rectangle to create a second rectangle, resizing if necessary to align it with the right corner node.

The third rectangle will become the light of the lighthouse. Hold down the Ctrl key and click and drag in a blank space in your document to create a square.

On the property bar, turn the Lock the aspect ratio again and enter 0.25″ for the width, which will automatically make the height 0.25″ as well.
To position this rectangle centered on the top of the lighthouse, first go to the View menu and make sure the Alignment Guides command is checked.
Drag the rectangle on top of the lighthouse and the guides will appear, indicating when the top rectangle is perfectly centered on top of the lighthouse.

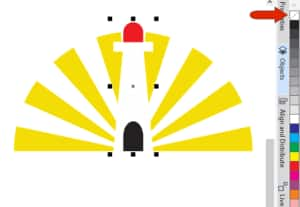
Now we are going to fill the rectangles with color. First, activate the Select tool and select the bottom rectangle. Hold down the Shift key and also select the middle rectangle. Then click the white swatch in the Color palette. Then select the top rectangle and fill it with red.

To make the lighthouse look more realistic, we want to modify the shape of the top and bottom rectangle. Right-click the bottom rectangle and choose Convert To Curves (shortcut Ctrl + Q).
Activate Shape tool (shortcut F10) and you will see several nodes in the rectangle that can be edited. The bottom rectangle will taper to the top, so drag the top left node in until you reach the intersection point. Then do the same for the top right corner.

Select the top rectangle, which does not have to be converted to curves. The Property Bar has four Corner Radius fields that we can use to round the top corners. Make sure the lock icon is off so the four corners don’t switch together. Use a value of 0.2″ to round both top corners.

The fourth and final rectangle will be the lighthouse door, based on the rounded rectangle that is our top light. With the top rectangle still selected , use Ctrl + D to duplicate this rectangle, then fill it with black.

The door should be longer vertically, say 50% longer. There is no need to get out the calculator and enter a new vertical dimension, we can use a Scale value instead.
The scale factor setting can be found on the property bar. The current scale values are not 100% because the original top rectangle was resized after it was created.
If we convert this shape to a curve (Ctrl + Q), the Scale Factor values will be reset to 100%. Turn off the Lock Ratio and change the Height Scale Factor to 150.
TIP: You can write 150, or you can add +50 to the >100 that’s already there.
With the black rounded rectangle still selected, hold down the Shift key and select the bottom base rectangle, then press B to align the bottoms. Now our door is positioned correctly.

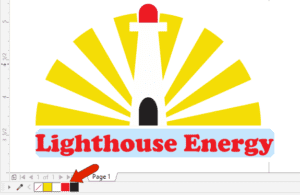
We have seen that left-clicking on a swatch in the Color palette will fill an object with color. Right-clicking on a color swatch will change the color of the object’s outline, and we can also remove the outline entirely by right-clicking on the No Fill swatch in the top of the color palette (indicated by a red line through it).
Hold down the Shift key and select the 4 lighthouse objects, then click with the right click on No fill. sample to remove outlines.
Step 3: Adding Text
All that remains to be added is the company name “Lighthouse Energy” for this logo. Activate the Type tool (shortcut F8) and click below the left edge of the logo to start typing.

To change the font, select the text and then open the Font List on the Property Bar. You can scroll down and mouse over the font names to preview what the text will look like. Or, if you know the name of the font you want to use, you can start typing the font name to jump to it in the list and click it to apply it.
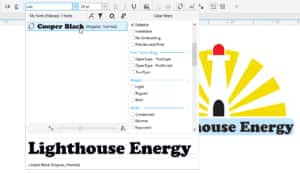
To match font color to the red that was used for the light, find the swatch in the Documents Palette at the bottom of the interface and click on it to change the text color to red.
The last step is to adjust the size of the company name so that it is the same width as the sun’s rays. To determine the width, activate the Select tool and select the group of rays. On the property bar, note the width dimension of 3”.
Select the text with the Select tool . On the property bar, make sure the lock ratio is on and enter 3″ for the width dimension.
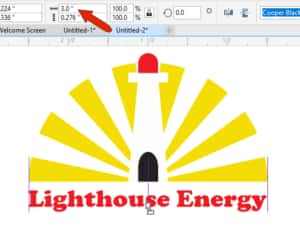
NOTE: You can also change the size of the text by simply dragging the center right size handle to align it with the right side of the rays, however this will distort the features from the original source.
Step 4: Save your logo
Now that we’ve completed the logo, it’s time to save it.To keep it in CorelDRAW format, use File >Save As and select CDR as the file type.
If you want to have the logo in other formats, such as PNG for a web graphic or EPS and AI formats, use File > Export strong>.
CorelDRAW Shortcuts
For a full list of CorelDRAW shortcuts:
- Go to Tools > Options > Customization.
- Click Commands in the left menu, then click Click the Hotkeys tab.
- Click the See All button at the bottom to see the full list of key combinations .
- Here you also have the option to print the list or export it as a CSV file for future reference.
Shortcuts used in this tutorial:
Freehand Tool: F5
Ellipse tool: F7
Rectangle tool: F6
Text tool: F8
Shape tool: F10
Select tool: Spacebar (except when the Type tool is activated; pressing the Spacebar when the Type tool is activated will will add a space in the text string)
Align centers vertically: E
Align centers horizontally: C
Align backgrounds: B
Duplicate: Ctrl + D
Group: Ctrl + G
Convert to Curves: Ctrl + Q
.