With the help of Netbeans, web development becomes easier. In this how to create a Java web application using Netbeans 8.2, we will cover the entire tutorial step by step from creating the new project to running the web application in the browser. If you need a more advanced tutorial, you can skip this tutorial and go to the Java Spring Boot Web Application, MVC, Data, and MongoDB CRUD tutorial.
1. Creating a New Java Web Application Project
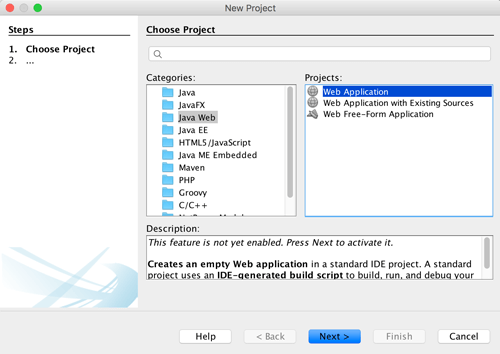
To create a new Java Web Application project simply open your Netbeans 8.2 IDE and then open File -> New Project. Then choose Java Web in the Categories column and Web Application in the Projects column. Then click next.
Give your project a name, mine is “SimpleWebApp”. Leave another field as default. Then click next.

Leave the default values for all fields in Server and Settings, then click Next.

In the framework, choose Spring Web MVC and leave the default in Spring library and then click Click Finish.
This creates a new Java Web Application Wizard generated the src folder and the web folder containing the parent element to create the java web application.
2. Simple Spring Web MVC
Now, I will explain a bit about the generated element when creating a new Java web application. First, open the web.xml file, this file contains the following code.
contextConfigLocation /WEB-INF/applicationContext.xml org.springframework.web.context.ContextLoaderListener dispatcher org.springframework.web.servlet.DispatcherServlet 2 dispatcher *.htm 30 redirect.jsp
This web.xml is the core of the Java web application that defines the descriptor element of implementation. There are many components used in this web.xml, but here we only use context-params, listener, servlet, servlet-mapping, session-config and welcome-file-list. Those tags are enough to run a simple Java web application that uses the Spring Web MVC framework (we won’t cover Spring Web MVC at this time).
The target page describes in the list of welcome files that this file points to redirect The .jsp file contains these codes.
This file only redirects the request from the root web application to index.html, but actually redirects to the controller that has the default page index.jsp. You can see this in the dispatcher servlet.
<!- era: -> indexController
And this is the content of index.jsp.
Hello! This is the default welcome page for a Spring Web MVC project.
To display a different welcome page for this project, modify index.jsp , or create your own welcome page and then change the redirect in redirect.jsp to point to the new welcome page and also update the configuration of the welcome file in web.xml.
Now, just run your application by selecting Run menu -> Run Project or just click the F6 button.It will take a long time because you are starting Glassfish and Java DB.Now , your web page will look like this:

Which is very simple web application with Java and Netbeans 8.2.
Grac yas.
.