In a previous blog post, we described the different options you have when creating a new web application with Visual Studio 2013 (VS 2013) and provided an overview of the various ASP.NET features and NuGet packages present in web applications. templates.
In this post, I’ll take a specific template in VS 2013, namely the Unauthentication Web Forms template, and describe how to create this project from scratch. By the end of the tutorial, you’ll get a template with content that’s pretty much the same as creating a new VS 2013 project using a non-authentication web forms template (File > New Project > ASP.NET Web Application (Visual C# ) > Web Forms > No authentication).
As we go through this post, you can see where and how the template takes advantage of different web technologies, which you can similarly take and apply to your existing web projects as needed.
Steps to create the Web Forms (No Auth) project from scratch
1. New Empty 4.5 CS
We start with the simplest web template: Open Visual Studio, File > New Project > ASP.NET Web Application (Visual C#) and provide a name for your project (eg, WebFormsNoAuth). In the ASP.NET project creation dialog, select the “Empty” template without any additional options, and click OK.
2. Add basic master/content pages and style them with bootstrap
a. Install the NuGet package: bootstrap
- Open the NuGet package manager UI or console window and install the “bootstrap” package.
- Note which, since this automatically opens its dependent NuGet package : jQuery
- You can read more here about the advantages of designing and theming your website using Bootstrap.

B. Add the basic master page and content pages to your site
- Next, we add the basic Site.Master master page and content pages: Default.aspx, About.aspx, and Contact. aspx
c. Add Site.css and design your pages using bootstrap and Site.css
- Note that it’s really easy to design with Bootstrap – you just need the bootstrap files in your project (installed by the bootstrapper) NuGet package), and then reference bootstrap.css and jQuery/bootstrap.js in Site.Master.
- We then use many Bootstrap css classes to do the styling on pages like Site.Master (for example: navbar , navbar-collapse) and Default.aspx (eg: col-md-4, btn).
- We also added a Site.css to add some custom styling. You can also add styles in Site.css to override styles already defined in Bootstrap. That way, if you update your Bootstrap version in the future, your overrides in Site.css will remain.
d. Add favicon.ico
- We added a favicon.ico file that many browsers will use to display in the address bar or browser tab next to your site’s URL.
At the end of this stage, you can F5 test your project and see that you have a fully functional web application with basic pages. The pages are designed with Bootstrap and are responsive to different browser sizes. The project is pretty simple with a clean Web.config and only 2 NuGet packages in packages.config: bootstrap and jQuery.
You can see the full code at this stage in the Git repository here.
3. Add friendly URLs
When you view a page like Contact.aspx in the browser, you may see that the “.aspx” extension still appears at the end of the URL (eg: http://localhost :14480/Contact.aspx). We can change this to generate a friendly URL without extensions and add routing to your web application (similar to MVC projects) by using ASP.NET friendly URLs.
ASP.NET friendly URLs can also add view switching functionality so you can easily switch between a mobile view and a desktop view.
To enable friendly URLs in our app:
a. Install the NuGet package: Microsoft.AspNet.FriendlyUrls
- Open the NuGet package manager UI or console window and install the “Microsoft.AspNet.FriendlyUrls” package
- Note that this automatically pulls its dependent NuGet package: Microsoft.AspNet.FriendlyUrls.Core
- If you don’t have an existing RouteConfig class (as in our project), a new RouteConfig file will be added .cs for you. If you already have an existing RouteConfig class in your project, you should call EnableFriendlyUrls() in your RegisterRoutes method *before* any existing route registrations.
- Automatically add Site.Mobile.Master and ViewSwitcher.ascx control user interface to help you easily add mobile views to your web forms project.
b. Add Global.asax and call RouteConfig.RegisterRoutes Method

Now you can F5 your project again and see that the website uses ASP.NET routing and the URLs are displayed without the .aspx extension (eg: http:/ /localhost:14480 /Contact). You can also fix the links in Site.Master to reference the friendly URL.
You can see the full code at this stage in the Git repository here.
4. Enable web optimization techniques such as Bundling and Minification
Bundling and minification are two web optimization techniques that you can use in ASP.NET 4.5 to improve request load time. Bundling and minification improves load time by reducing the number of requests to the server and the size of requested assets (such as CSS and JavaScript). You can also learn more about adding bundling and minification to web forms.
To enable bundling and minification in our application:
a. Install the NuGet package: Microsoft.AspNet.Web.Optimization.WebForms
- Open the NuGet package manager UI or console window and install the “Microsoft.AspNet.Web” package .Optimization.WebForms”
- Note that this automatically opens several dependent NuGet packages: Microsoft.Web.Infrastructure, Antlr, Newtonsoft.Json, WebGrease, Microsoft.AspNet.Web.Optimization,
- Web.config is updated to add the new assemblies to your application =”InstallAspNetWebOpt-WebConfigChanges” />
b. Configure the CSS file bundling
- Add a Bundle.config file to your project and define the CSS bundle
- Add the System.Web.Optimization namespace to web .config
- Replace the CSS references in Site.Master with the webopt:BundleReference control
At this stage, if you press F5 and view the page in your browser, and use the F12 tools to inspect HTTP requests, see that the CSS files are not included yet.

c. Enabling bundling and minification
- To enable bundling and minification, you can simply do so by setting the debug attribute to false in web.config
- Alternatively, you can override the Web.config by configuring with the EnableOptimizations property on the BundleTable class. So if you want to enable bundling and minification with debug=true, add a BundleConfig.cs file to your App_Start folder with the following code.
- You must then update Global.asax to call BundleConfig.RegisterBundles
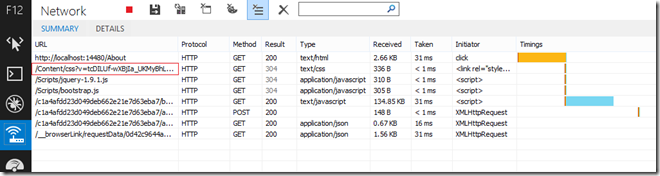
At this stage, if you press F5 and view the page in your browser, and use the F12 tools to inspect the HTTP requests, you’ll see that the CSS files are now they are grouped and minified.
You can see the full code at this stage in the Git repository here.
5. Use the ScriptManager control with Web Optimization
The ScriptManger control in ASP.NET 4.5 makes it easy to register, manage, and merge scripts using the ASP.NET WebOptimization feature.
Easy Integration with JQuery and Bootstrap
With the ScriptManager control, you can enjoy various benefits such as:
- Debugging/release support
- CDN support
- Unmap scripts
- Easily update Jquery/bootstrap libraries
Here are the steps to add the ScriptManager control to the application:
a. Install the NuGet package: AspNet.ScriptManager.jQuery
- Open the NuGet package manager UI or console window and install the “AspNet.ScriptManager.jQuery” package
- Note that this updates jQuery to the corresponding version
b. Install the NuGet package: AspNet.ScriptManager.bootstrap
- Open the NuGet package manager UI or console window and install the “AspNet.ScriptManager.bootstrap” package
C. Update the references in Site.Master to use the ScriptManager control

Reassigning Framework scripts
A feature of ASP.NET 4.5 is the decoupling of “Microsoft Ajax script files (MicrosoftAjaxCore, etc.)” and WebForms scripts (GridView.js, etc.). You can serve these scripts from your application’s Scripts folder instead of loading them from System.Web.This makes it easy for scripts to redistribute and update.
The following are the steps to remap framework scripts. See the “Remapping Framework Scripts” section here for more details on this feature.
a. Install the NuGet package: AspNet.ScriptManager.MSAjax
- Open the NuGet package manager UI or console window and install the “AspNet.ScriptManager.MSAjax” package
- This installs the scripts locally in your application’s ScripsWebFormsMSAjax folder
b. Install the NuGet package: AspNet.ScriptManager.WebForms
- Open the NuGet package manager UI or console window and install the “AspNet.ScriptManager.WebForms” package
- This installs the scripts locally in your application’s ScripsWebForms folder
c. Add the installed js files to a bundle in BundleConfig.cs and then reference the bundle from Site.Master.

You can see the full code at this stage in the Git repository here.
6. Add Modernizr for HTML and CSS feature detection
Modernizr is a small JavaScript library for HTML5/CSS3 feature detection.
a. Install the NuGet package: Modernizr
- Open the NuGet package manager UI or console window and install the “Modernizr” package
- This adds a file modernizr-*.js in the application Scripts Folder
b. Add the installed js files to a bundle in BundleConfig.cs and then reference the bundle from Site.Master.

7. Add better support for older browsers like IE8 with Respond.js
You can use Respond.js to provide better support for HTML5 elements and CSS 3 media queries in older browsers like IE 8 and earlier.
a. Install the NuGet package: Respond
- Open the NuGet package manager UI or console window and install the “Respond” package
- This adds the files respond.js and respond.min.js in the Application Scripts folder
b. Add the installed js files to a bundle in BundleConfig.cs and then reference the bundle from Site.Master.

8. Add _references.js for better intelligence
Finally, you can add a _references.js in your Scripts folder. This allows VS to provide JS intelligence when editing these files. With VS 2013, we added a new feature called auto sync. With this enabled (as shown below), when you add a new JS file to your project, it will automatically add an entry in the _references.js file for you.
Summary
Ok , the post was a bit long, but I hope this post was helpful in learning about some of the different technologies you can take advantage of using ASP.NET. You can see a list of all commits for this project here.
.