Last year I attended a Tech Days event and learned about the ease of use of jMaki widgets for building websites, and then gave a talk at Second Life on the subject of web programming using the NetBeans IDE, including what I had. learned at Tech Days. This article builds on those talks and shows how incredibly easy it is to create a website in NetBeans by dragging and dropping without writing any code, and how you can gradually learn to program in Java by adding to your JavaServer Pages (JSPs), and creating other features or programs that can be added to your site.
This article is intended for new developers and programmers, and developers new to the NetBeans IDE. To follow the examples, you must have the following software installed on your computer:
- The Java Platform Standard Edition (Java SE) (Note, you can download the JDK with the NetBeans IDE.)
- NetBeans IDE 6.0 or higher.
Benefits of NetBeans IDE for Website Developers
As many of you know, web applications often require many languages programming, and a way to combine various technologies. For example, you can use HTML and CSS for your page layout, JavaScript for some rollover buttons, and a Java or JSP servlet to render a form. The latter is a good way to learn the syntax of the Java programming language, and is a great entry point if you’re new to the Java platform.
One of the great things about the NetBeans IDE is that it doesn’t you have to know all the languages or how to combine the technologies. NetBeans handles languages and blends technologies perfectly for you. Also, NetBeans IDE has some wonderful drag and drop widgets from various built-in palettes. For example, you can drag and drop HTML components to create a form, Swing components to create attractive buttons or menus, or place interactive Ajax components using jMaki widgets.
The website you see below in Figure 1 It is not pretty, nor is it a design that I recommend. However, all of its components are simply dragged onto a page and are fully functional, so there’s no need to write any code from scratch. You can do a lot of website building in the NetBeans IDE with very little programming.
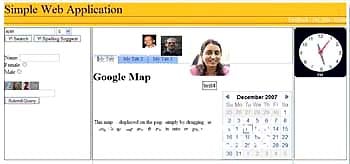
Figure 1: Sample Website
Notice the clock showing time (on the right) , a form (on the left) that collects data from users with the CAPTCHA (the image above the submit button) very important to avoid spam, a tab design in the center that makes the organization nice and an effect fisheye in the photos at the top. No programming was required for any of these. All of these features were added via drag and drop, which is much less time consuming than coding those components yourself.
There are also many services available that you can simply drop on a page, then add URLs or whatever you want. need to include to get that service, such as with a mashup. For example, adding RSS feeds to your page is very easy.
NetBeans also handles writing to and extracting data from a database, as described in the Using Data-Bound Components to Access a Database tutorial. of data.
Getting Started
To get started, start the NetBeans IDE. On the initial screen there are links to tutorials and sample projects. For what I am going to show you, we are going to go to one of the menus at the top. Follow the steps below:

Figure 2: Installing the jMaki plugin
Step 1: Go to the top menu and click ToolsIn addition, you can also drag and drop HTML components, such as forms, which are always difficult to write by hand. Further down the right hand side are JSP, JSF, and database drag and drop features that are invaluable for web applications and make programming much easier.
On the right side On the left of the page, you can see the Files in your project and how NetBeans organizes its files. Note that JSP pages are saved in the web directory and a css folder is in resources.
Adding pages is easy and NetBeans saves the page in the appropriate directory. You can add additional pages to your site through this panel, though there are other ways as well. You’ll see an example of this later in this article.
Adding Web Components with Drag and Drop
The central area is the workspace and the beginning of your web project. The NetBeans IDE automatically creates a JSP page for you when you create a web project and inserts the basic HTML for the page layout you chose earlier. Of course, you are not stuck with this layout and you can edit the page however you want if you know HTML and CSS. Also, you’re not stuck with JSP pages. If you want, you can develop in PHP instead. For this article, however, we’ll stick with JSP pages.
You can see what text to change by looking at the black font. If you know HTML, of course, you can add additional code, or you can simply drag and drop HTML components from the palette on the right, directly into the workspace.
Comments that have been inserted to indicate where you place your content for each section or column on the page is shown in Figure 3 below.
Figure 4: Insert text over black type
To place the tabbed panels in place in the center section, just find the Tabbed View widget under jMaki Dojo in the Palette on the right. Hold down the mouse button as you drag the component onto the page. The code for this widget suddenly appears in that area, and you can easily change the tab names to whatever you want. Additionally, you can set the tab to a link or insert content into the tab page by creating a separate page that is included. The last method is the one I used for the second tab.
Create a separate page to include in a tabbed panel by doing the following:
Step 1: In the Files panel, click right-click the project name and select NewAfter doing a build, you can add more components, then just Refresh or Reload the browser page. To build and run your project, follow these steps:
Step 1 – Go to Build in the main menu.
Step 2 – Select Build Main Project (if a pop-up box appears that says: “The main project has not been configured”, make sure that your project is selected in that window, and then click OK.)
In the Output window at the bottom of the screen, you can watch as the IDE creates .jar files, builds the JSP pages, and then tells you if the build was successful. Assuming it was, run your project with the following two steps:
Step 1: Go to Run in the main menu.
Step 2: Select Run Main Project.
Back in the Output window, you’ll see that NetBeans is starting the application server and any databases it needs, and then starting the browser. Finally, you should see the website you created in your browser window. If you return to the NetBeans IDE, drag and drop another component onto your site, and save it, you can return to the browser window and view your changes by clicking Refresh or Reload. It’s as simple as that.
If you had errors in your build, the NetBeans IDE informs you of this in the output window by listing the errors. If you followed this article, any errors you’re getting are likely due to the code change you made for the tabbed panel. Check that area for syntax areas, then run Build again. For more complex projects, the NetBeans IDE has a very useful debugger, which you can learn more about in the Debugging FAQ.
Adding Other Components

Figure 6: Using the JavaServer Faces Frameworks
If you want to play with a more complex design, Visual JavaServer Faces is also available, simply by checking the box when opening a new project. This provides a large selection of components that you can drag and drop onto the workspace. This saves an incredible amount of coding time and dramatically shortens the learning curve.
By choosing JavaServer Faces, you get a palette on the right similar to the jMaki palettes you saw earlier, giving you access to the components you need. You would normally have to build with a lot of HTML and CSS code. In addition, Palette provides more advanced components such as data providers and advanced data providers.
Adding Other Components
The NetBeans IDE has a surprising number of features in addition to the ones we just finished to speak. As you build, you’ll find yourself completing code in whatever language you’re working on. There are also other features, such as UML modeling that you can use, easy access to web services, and you can code, test, and debug for mobile applications.
NetBeans saves a lot of time and writes a lot of your code. for you. This is ideal for new programmers and advanced developers. As a new developer, or someone new to the Java platform, you can learn the Java programming language little by little by building small web applications and gradually working on complex enterprise applications.
As you get further into Java EE, then you will need to learn more about Java programming. In the next article, you will learn how to create scripts for your site using JSP pages and servlets. This is a great entry point into learning Java programming syntax and some of the API classes.
For more information
- Java Standard Edition Platform (Java SE)
- NetBeans IDE
- JavaServer Pages (JSP)
- Debugging FAQ
.