So, you are thinking about taking your rental activity or business to the next level by using booking software. Brilliant! But, we know from 13 years of being in business that one of the biggest hurdles with an online reservation system is the setup process.
Your business is a true original with specific requirements, but most reservation technology requires a one-size-fits-all software solution. The result? You end up having to create complicated workarounds and only get part of the functionality you expected.
That’s why, when choosing an online reservation system, it’s important to consider whether it can handle your company’s unique needs. needs. Take Checkfront, for example. Our booking software supports a wide variety of product types, including activities, rentals, tours, accommodations, or a combination of all.
Depending on your business, the setup process may take time to figure out. But, with Checkfront you get a free trial, so you have 21 days to explore the booking platform, familiarize yourself with all it can do, and see if it’s a good fit before you jump in. (We promise we’ll be there for you.)
To give you an idea of how to create an online reservation system for your business, we’ll walk you through a basic setup in Checkfront using a hypothetical company: The London Experience:
- Enter company details
- Add products and inventory
- Customize the booking page
- Enable a online payment flow
- Connect reservation system to website
- Automate reservation notifications
- Create waivers and digital documents
- Assign users and commissions
- Start reports and analytics
- Integrate other business tools
1. Enter your company details
First things first: Leah, the owner of the company, creates an account for The London Experience. By doing so, she can adapt the booking platform to your company’s time zone, base currency, language, hours of operation, and more.
Using the navigation menu, you click Manage, then Configure and see four tabs where you can enter essential business information:
- Company: Leah enters her company name, website URL, selects her primary industry as bus travel and her secondary industry as bed and breakfast, and lastly, Add contact information, including your email address, phone number, and business location
- Regional Settings: Select Europe/London as time zone, Pounds Sterling as base currency, english as language, en_GB for locale. and the date and time format she prefers
- Settings : With Checkfront’s default settings already in place, she realizes that she can set some of these options on a per-item basis . and you decide to skip this step for now
- Calendar: After selecting Customize Available Hours, you click Open for all days of the week and set the hours of operation to 9: 00 a.m. m. to 5:00 p.m. m., designating hours of availability, not when guests can make reservations online (that’s always 24/7)

2. Add Products & Inventory
The London Experience offers over 5 different types of bookable experiences, ranging from walking tours to rentals and overnight stays. The good news is that Checkfront can help you sell them all!
To keep everything organized in Checkfront, Leah creates four categories for all of her products by going to Inventory > Categories . These are the categories it creates:
- Activities
- Rentals
- Guided tours
- Accommodation
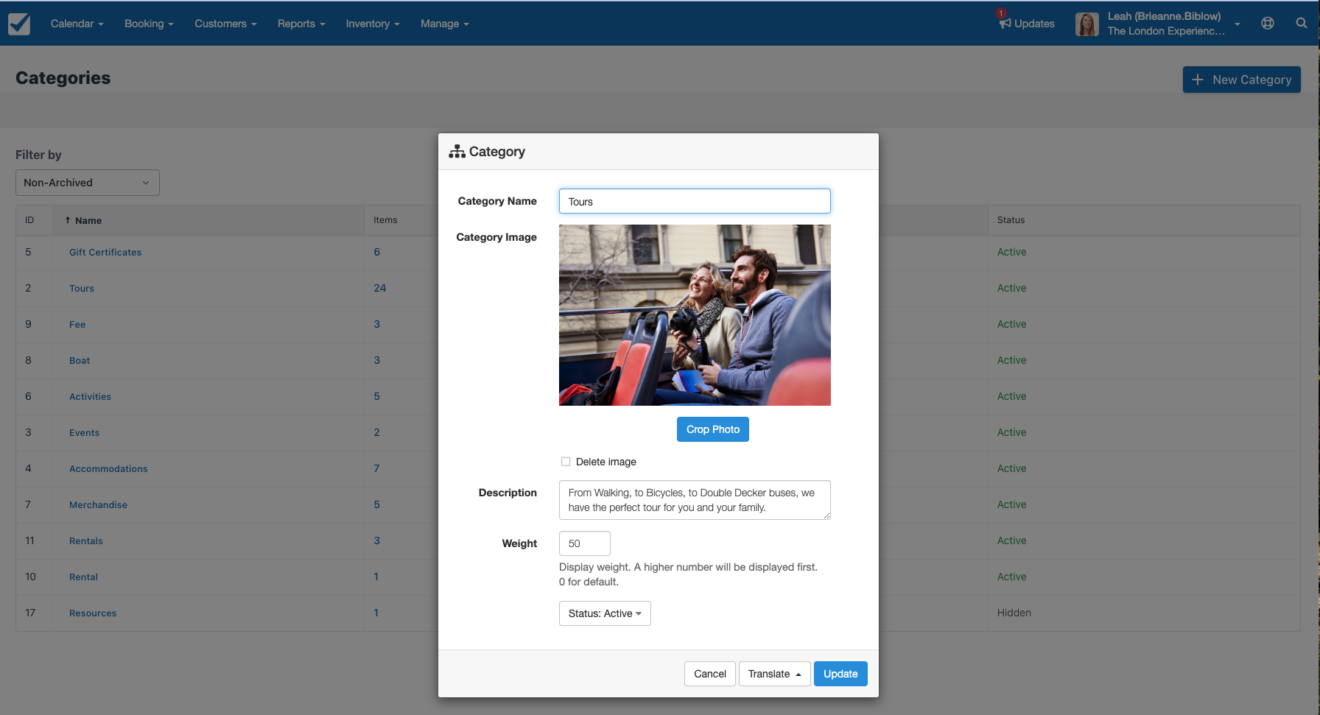
Since Leah has done her homework and wants to use the Hero page fallback layout with grid view for her website, she includes a photo and description for each category that best represents the experiences within. This makes it easy for guests to narrow their search by first selecting a category on the booking page. Since Leah did her homework and wants to use the Hero page booking layout with the grid view for her website, she includes an enticing photo and writes an intriguing description for each category that represents the experiences that were offered. they find inside. This makes it easy for guests to narrow their search by first selecting a category on the booking page.

Now, you’re ready to add the experiences you sell. In Checkfront, select Inventory > Products strong> and you can add as many experiences (known as Products at Checkfront) as you can dream up, from walking tours and zip-lining courses, to kayak rentals and a deluxe queen room, and even a gift certificate or merchandise. it starts with her most popular tour: a bus tour of London’s top sites.
With Checkfront’s Product Builder, Leah can set up all the parameters for her tour in one place.First, she adds the description and photos of your product, then you select the asset your experience is connected to. Then you set when the tour is available to book and add your price. All of this can be completed in less than 10 minutes, which means you can c Start booking tours online in no time.

Going to Inventory, then Product, clicks + Add New, then + New Product
Details
- Name: Leah names her bus tour: The Must-See Bus Tour of London
- Category: Since Leah already created categories, simply select Tours from the Dropdown
- Photos: Since nothing convinces someone that a tour is worth booking than authentic but professional pictures, Leah uploads a few different photos of the bus tour in the media section and links to your promotional video on YouTube.
- Details: Write an engaging product description that is sure to get guests to book.

Inventory
- Inventory Type: Because guests will book their tour for individual seats on her bus, Leah selects “Active.” This tells our reservation system that this product will be reserved based on the number of seats available.
- Resources: Leah now selects + Create New to add her 2 double-decker buses as an asset.Set the Asset Category to Bus and set her Total Assets to “2” and her Capacity at “20” because there are 20 seats available on the bus. Since it knows the buses need cleaning between runs, it adds 20 minutes of maintenance time. This way, when you set your availability, Checkfront knows to add 20 minutes to each booking window.
- Availability: L eah choose who this product is available for: adults, children and seniors. Then she selects time slots and adds two-hour time slots. It starts at 9:00 a.m. and ends at 5:00 p.m. Under Show time slots, select Show end times and turn on Show unavailable time slots for the booking page.
- Pricing: Leah charges guests based on the time slot for the bus tour and easily set your different prices for your types of guests. To make sure the tour is family friendly, she sets a group price modifier for families with 3-5 kids and charges them $5 less per child. Finally, Leah adds any applicable taxes or fees and decides if she wants to accept a deposit for this product.
- Bonus: But you’re not done with pricing yet. Although The London Experience runs year-round, it tends to get fewer bookings during England’s rainiest months, October through January, so Leah decides to offer a low-season rate as well.

Pricing
In the Pricing Table, click Add Rate and select Availability from the dropdown menu.In the pop-up form, Leah clicks + Create New and fills in the following:
- Name: Fall/Winter Rate li>
- Date Range: Sets the start date to October 1 and the end date to January 31
- Time intervals: Since weekends are usually busy no matter what, only check the low season rate on weekdays
- Reservation rules: it does not have any restrictions that enforce, but in the future, you might consider adding a day cutoff to avoid same-day bookings, as you only have a minimal crew in the off-season
- Save: now has a new Availability Event
- Price: Leah chooses to apply her Percentage discount and types “-15”
After double checking the formula io, press Save and see the new pricing table displayed for reference

Now with your initial tour set up, you can easily duplicate this product, make a couple of small changes, and have half and full day tour experiences in bus ready to roll.
Packages
Since the bus tour is the first item Leah has created so far, she has nothing to add, but plans to return to the Products to create an optional photo package that guests can include at a discounted price.This add-on will appear on the booking form for the bus tour.

3. Customize the Booking Page
Before adding each product, Leah wants to try The must-see bus tour of London on your website.To do this, you must first set up your booking page, so head over to Manage > Layout:
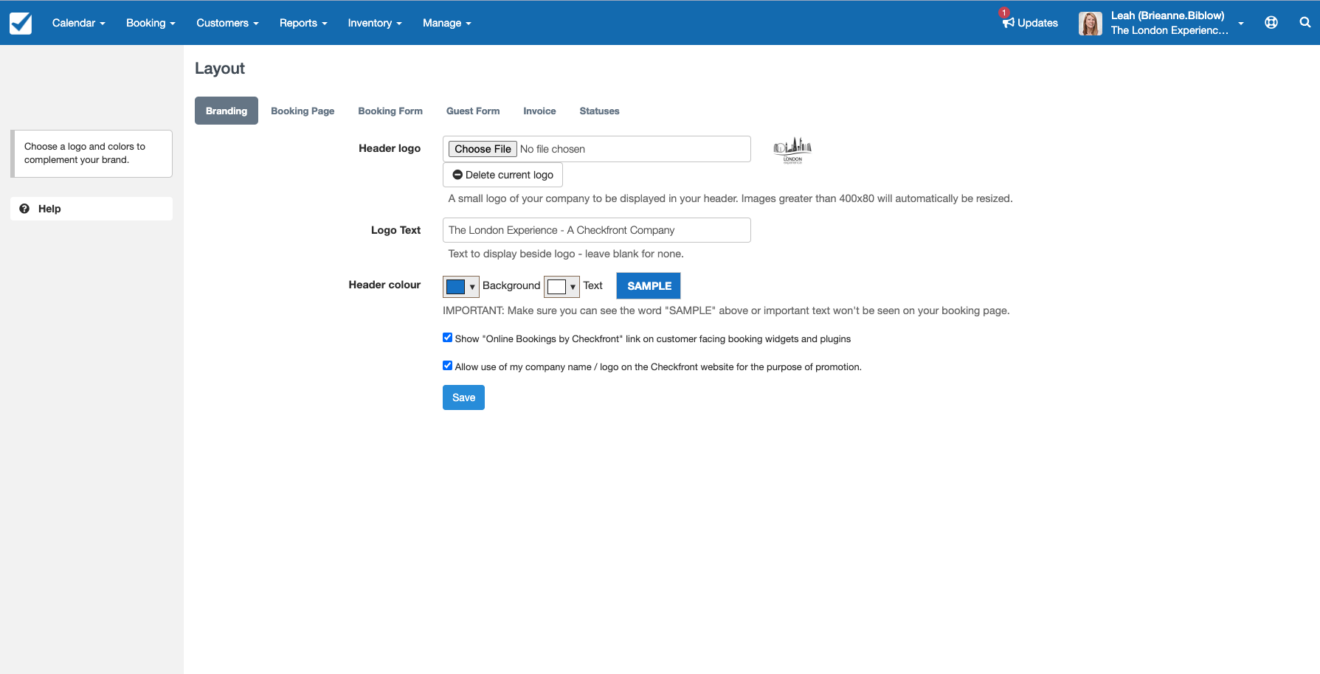
Branding
Leah uploads the London Experience logo, adds her company name for the logo text (what appears next to the logo on the booking page), and changes the header to her main branding .color.
Booking Page
As mentioned above, Leah likes the look of the booking design from the main page, so you click on the Featured Page right away and complete the following:
- Upload a 1920 × 450 banner image that best represents the types of experiences your business offers company (you could also add a YouTube background video here)
- Sneaking in a keyword for SEO, Leah enters the main text overlay (booking page header) as London Sightseeing Tours
- as she plans to embed a booking widget on her website, Leah selects Show Main Image/Video on Embedded Pages
- She chooses Tabs for Category Display, Walks for Default Category, Word Search key for Search Bar Options, and to create urgency; she also selects Number of items available to guests under Display so guests can see how many places remain
- she completes the rest of the setup, which includes customizing the item wording out of stock and unavailable

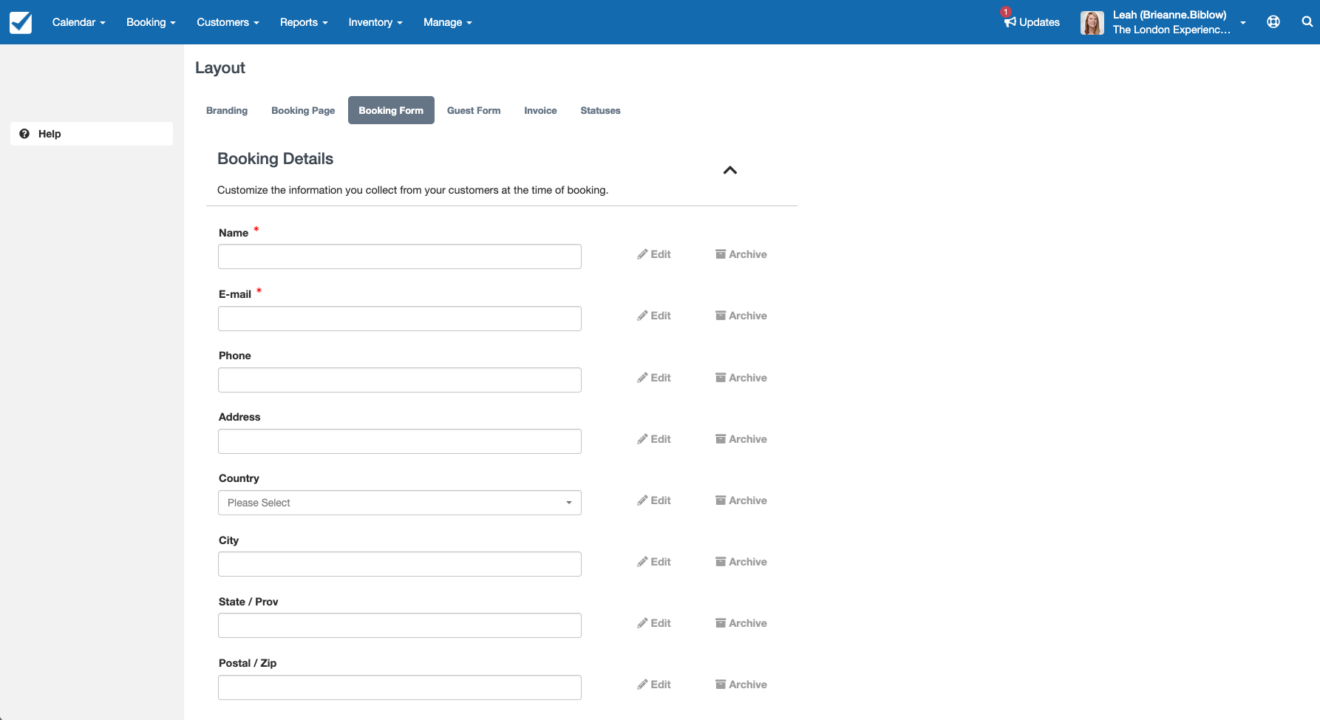
Booking form
Leah adds the following form fields for the lead booker to complete at time of booking:
- Name
- Address
- How did you hear about us?
Since it is good practice to keep the number of steps in the booking process to a minimum, just check the name and email as o Mandatory fields so that the main person in charge of the reservation can make the payment as soon as possible. Long booking forms only get in the way.
Guest Form
Just because the booking form is short doesn’t mean Leah can’t get all the specific details she needs from the guests. Instead of handing out paper forms at check-in, she can collect important information ahead of time per guest with the Guest Form.
All you need to do is select Add New Guest Field, and you can add as many custom fields as you like, including things like Dietary Restrictions or Accommodation preference (for night tours).
How does it work for the customer?
After checkout, the primary booker is taken to the guest details page, where they can submit the guest’s email address of each participant or share the link with members in a group chat. That way, each guest can access the Guest Form and fill it out in their own time (before check-in).

Invoice
Leah sets up the Reservation Invoice, what the guest sees at checkout and in the reservation confirmation email , entering a title, uploading your logo, adding company details (including the address of the ticket office as a meeting point) and selecting the Pay Now Link option.
Here This is where you also copy about the Reservation and Cancellation Policy, which covers the required deposit, refund and cancellation rules, and what happens in case of itinerary changes. This will be displayed at the bottom of the invoice and Booking Form, which guests must click to accept the Terms and Conditions before proceeding with payment.

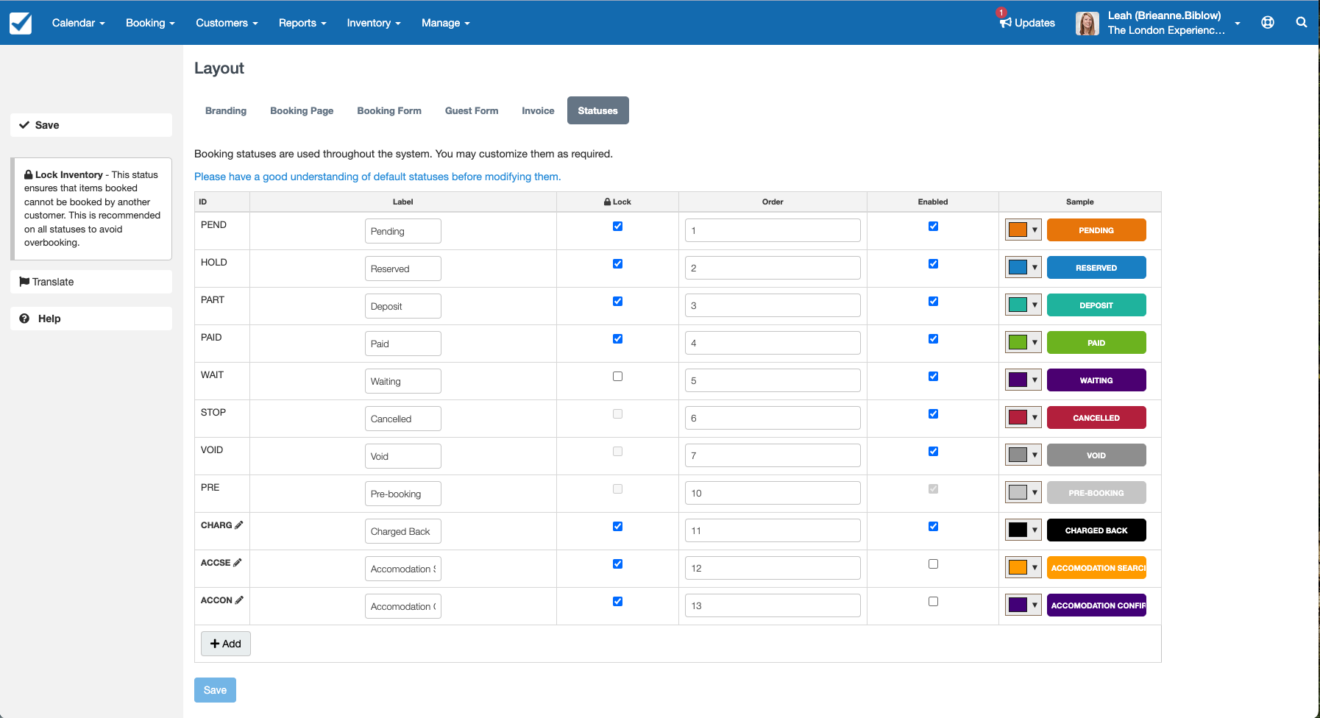
Statuses
For back-end management and to work seamlessly with your push email and SMS notifications, Leah customizes booking statuses with labels and colors that will make the most sense to your staff members. .
4. Enable an online payment flow
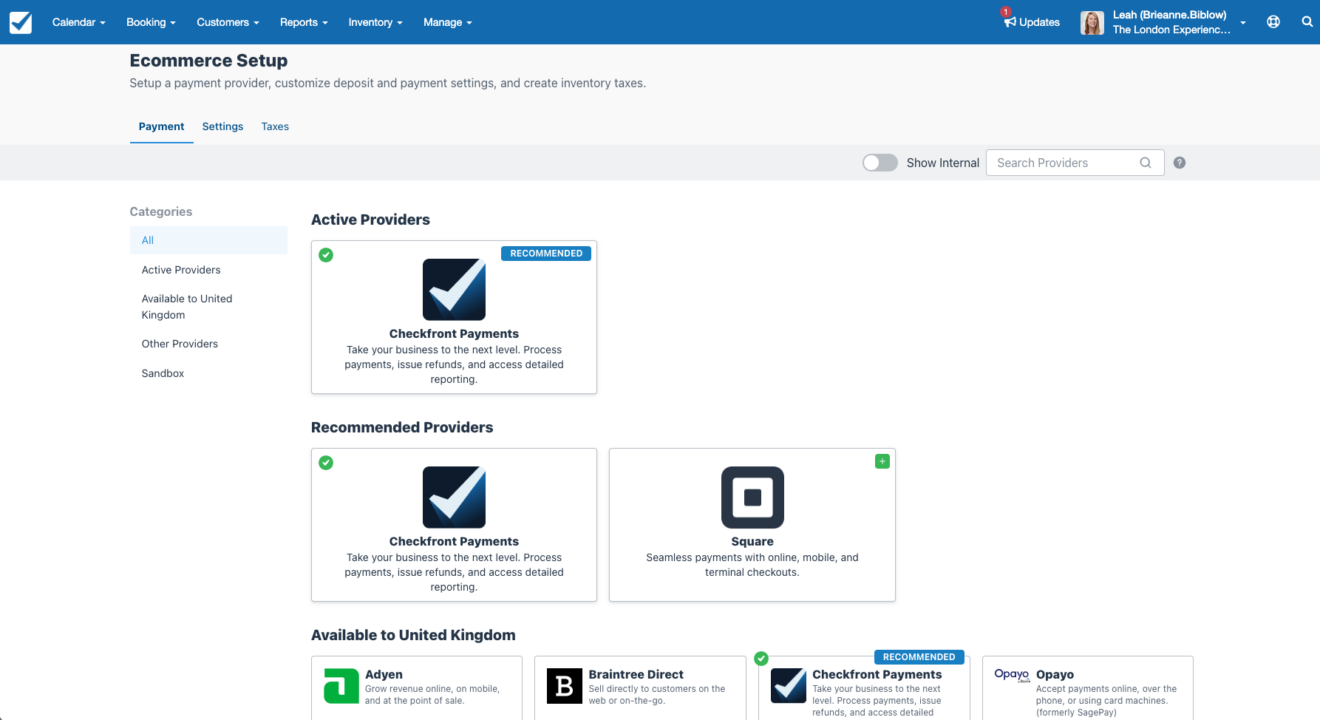
To accept a partial payment at the time of booking, Leah must set up an online payment flow using a supported payment gateway such as Checkfront Payments, Stripe, Square, or PayPal .
In Checkfront, there are more than 32 options available in 230 countries, but since you already use Stripe Terminal for your point-of-sale (POS) system, you integrate Checkfront Payments by going to Manage, then Ecommerce Settings, and following the required steps.
Under Settings and Taxes, Leah also adds a 25% deposit and a 7% Value Added Tax (VAT) for tourism products and 10% for accommodations.
5. Connect your booking system to your website
Everything seems fine after a quick test! So Leah goes ahead and adds the rest of her products in the Item Builder and embeds the Booking Widget on her website by generating a plugin code found on Integrations.

6. Automate Booking Notifications
Instead of calling or messaging each guest individually, Leah sets up automatic email and text notifications at Checkfront.Depending on the reservation status, each notification will be triggered for a different purpose:
- Reservation Confirmation – Once a guest completes a reservation, they will receive a confirmation via email with your booking ID for future reference
- Reservation Receipt: after payment, either partial or full, the guest will receive the invoice in their inbox
- Reservation Reminder: One day before check-in, the guest will receive a reminder about their next reservation, with everything they need to know about the tour, in case they need it. forget
- Thank you: One day after the experience, you will receive a message thanking you for joining the tour, along with a friendly request to write an online review
- Staff Assignment: Notifications aren’t just for guests! Leah sets up one more specifically for her operations manager to inform her of new reservations that need a scheduled tour guide
Next, we’ll see how to create push notifications using Email Reservation Reminder as an example:
- Leah goes to Manage > Notifications and clicks + New Notification
- Using email variables for the Subject line, type Reminder: {$BOOKING_ITEMS} on {$BOOKING_DATE}, which will resemble Reminder: The Must-See Bus Tour of London on Mon Oct 12, 2020
- Select the Reservation Status as Deposit and set the Reservation Reminder for one day before the reservation start date
- Leah adds the reservation email reception, info@thelondonexperience.com, as the From address and Reply To
- She selects Customer c as the Recipient and applies the notification to all of your Tours, Activities, Rentals, and Accommodations
- In the email editor, Leah types a personalized message that includes the guest’s name, date, and time of reservation , an embedded map of the venue, and {$BOOKING_EXTRA_DETAILS} of the preset

7. Create waivers and digital documents
The London Experience requires guests to sign waivers of liability and damages for select products But Like the guest form, Leah doesn’t like to print and submit paper waivers all the time, so she turns on waiver integration and creates digital waivers for them to sign online before checking in:
- She goes to Bookings > Waivers & Documents and clicks Create Template
- In the popup, Leah names the form Disclaimer
- After copying and pasting her current Disclaimer Form, saved in Microsoft Word, she adds editable fields for the guest to fill out, including Name, Date, Signature and Section of the minor
- By clicking Settings, Leah applies the Disclaimer to all tours and activities, writes a short explanation for the guest, sets the Expiration Date as one day before the start date and set a reminder to check out two days before the due date
Preview the document, press Save, and repeat the steps for the Damage Waiver, which applies to your rentals and accommodations

8. Assign users and commissions
Of course, Leah won. You won’t be the only person using your company’s reservation system. Front desk staff, head tour guide, and COO all need access too. Not to mention, you have a few hotel partners who make reservations on your behalf.
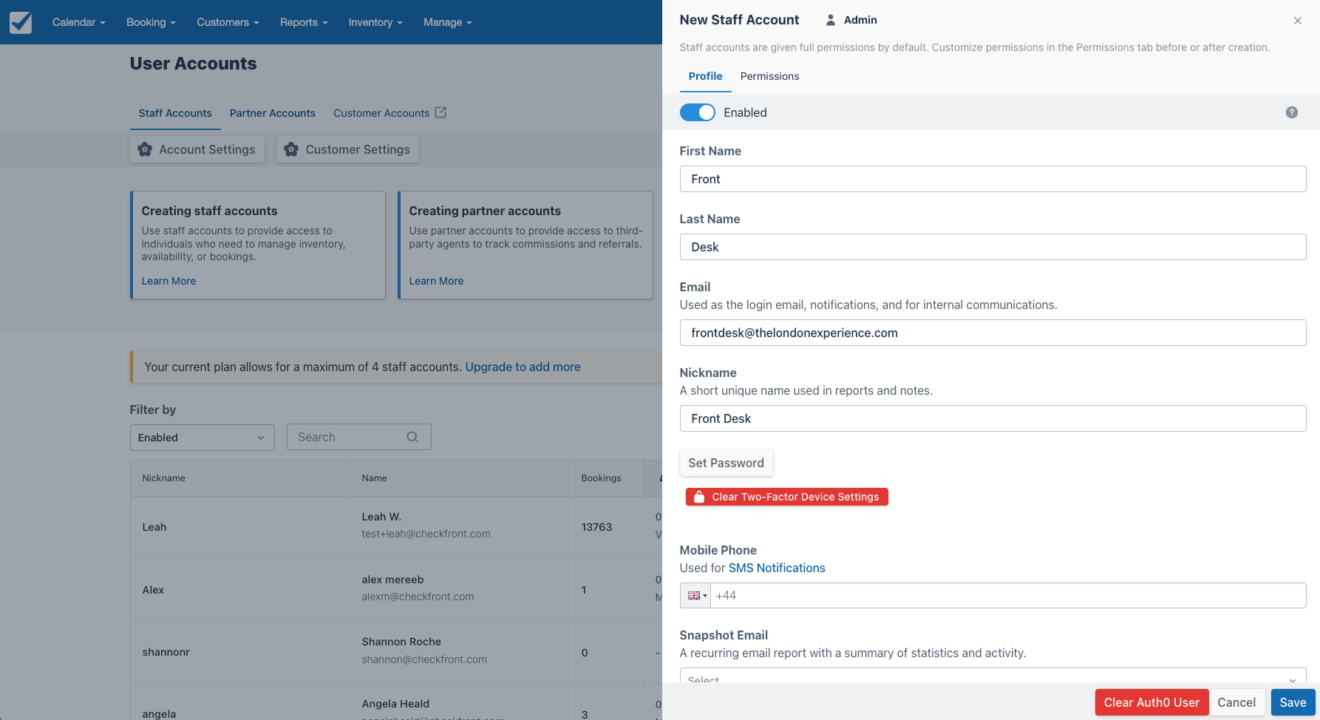
In her Checkfront Plan, Leah gets ten Staff Accounts and twenty Partner Accounts, to add them to the system, she goes to Manage > Accounts Username , and start with Front Desk Staff by clicking New Staff.
Staff Accounts
Although there are three guest service agents manning the front desk, they all share the same email, info@thelondonexperien ce.com. That means Leah only needs to create one staff account, called Front Desk. Name: Reception. Last name: Reception. Great, we know. . But since she doesn’t want to give them full access, she goes to Permissions , turns off the Admin button, and manually deselects the views she doesn’t want them to see, like Reports.
Member Accounts
For custodians, follow the same steps in Member Accounts but create a separate account for each hotel and enable permissions to process payments for any of their bookable products.
Then, under Manage and Commissions strong>, set up a New Commission Group specifically for hotel associations.She tags the concierges in the group, assigns them to the partner accounts she just created, and finally enters the agreed upon commission rates for each product in the table. Now one of the vendors wants to sell The London Experience products on their website as well. So Leah tells them they can log in to their account, go to Manage > Integrations and follow the steps for embedding the reservation widget, in the same way. before she initially did.

9. Start reporting and analytics
Since Leah hasn’t launched yet, we don’t There are reservations in the system for reporting and analysis, but you can still customize the Daily Manifest, which will display all reservations each day, including guest details, which you can print out for your tour guides and drivers to cross-reference.
Other reports include:
- Sales report
- Transaction report
- Revenue report
- Volume Reservations
- Withdrawal Report
- Occupancy Report
- Reservations Traffic
- Commissions Report
- ¡ and more!
Look, if Leah still had a spreadsheet booking system, she’d have to export the information or bounce between sheets constantly, instead all her data is centralized in Checkfront!
10. Integrate other business tools
We’re not done yet! Because Checkfront acts as an ecosystem where Leah can host all of her other business tools, she heads to Manage, then Integrations to begin the process of connecting each of them.
Here are the Checkfront integrations you set up, to name a few (or more):
- Google Analytics: to track bookings in the report so you can better analyze purchase activity and conversions
- GetYourGuide: to sell your products on the travel agent platform at online (OTA) in real time (not this also for Viator, Booking.com and Expedia)
- MyAllocator: to automatically manage inventory and availability on OTA channels
- Xero: to sync booking invoices, guest records and other transactions with your accounting software
- Facebook Advertising: to retarget near-bookers with Facebook ads highlighting the products they showed interest in
- MailChimp: to enable guests to subscribe to your newsletter mailing list during the booking process
- Zapier: to connect all your different email apps tour operators and automate repetitive booking tasks
- Zoho CRM: to keep guest records up-to-date for each new reservation that comes in
- Show currency: to display the prices of the products on the reservation page in the local currency of a guest

Ready to launch!
That’s it! Leah is ready to go with online reservations for The London Experience To see the reservation process in action, see the next chapter.
Want to know more about what you can do with an online reservation system?
Next chapter: Steps in the booking process
Previous chapter: How online booking works
Home: Everything you need to know about a website reservation system
.