Dreamweaver is an application that allows you to design, code, and manage websites. What’s interesting about the software is that it offers both the ability to write code and create a website using a visual interface.
In this Dreamweaver tutorial, you’ll learn how to use the platform to create any website. We’ll cover the basics of Dreamweaver and what it can do, featured features, and show you how to set it up.
In addition, we’ll show you step-by-step how to create a simple website with Dreamweaver, make it mobile-friendly, and finally upload it to your server.
While building a website with Dreamweaver may not be as easy as WordPress, we’re sure you’ll be surprised how quickly you’ll jump into this intuitive program.
Ready? Let’s dig deeper.
What is Dreamweaver and what can it do?
On the surface, Dreamweaver is an IDE (integrated development environment). That means it’s a piece of software that combines different tools to make web design and development easier.
What makes it special is that it sits somewhere between a CMS and a WYSIWYG editor (where you control everything). on your website through a visual interface) and a pure code editor. Here’s how the different parts work.
Create Websites Through a Visual Design Interface
The Visual Design Toolbox basically lets you create websites with your mouse. It allows you to place website elements in the same way that you create a layout in Word. It basically sees your website as you would in a browser, but also has the ability to manipulate it.
This is very useful because it allows you to build the skeleton of a website (including Bootstrap sites) quickly and without the need to write a single line of code. Instead, as you’ll see in the tutorial below, Dreamweaver will automatically create the necessary markup for you. That way, theoretically, you can build an entire website by hand and upload it to your server.
This could also be why the big names trust Dreamweaver. According to BuiltWith, it has a number of high-profile users. From the official website for the city of Phoenix, Arizona to the FCC to Goodwill, big names trust the software to build their websites.
Works like a full code editor
On the other hand, if you are capable of coding, Dreamweaver has all the necessary tools for that as well. The second part of Dreamweaver is a fully featured code editor. It comes equipped with all the standard features, including:
- Syntax highlighting – This means that Dreamweaver displays different elements (such as operators, variables, etc.) in different colors . to make the code easier to read and correct.
- Code Completion: Code completion works similar to auto-completion on your phone. Start typing and the editor will make suggestions for what you’re trying to write. That way, you don’t have to type everything completely.
- Code Collapse: Code Collapse is another feature to make code easier to read. It allows you to visually reduce parts of your code when you don’t need them. That way, you don’t have to scroll through the entire file, but can only deal with the parts you need to work on.
Dreamweaver supports the most important languages for web design (CSS, JavaScript, PHP) and much more.
The best part: If you change something in your code, Dreamweaver will automatically display it on the visual side as well. That way, you can see it without having to upload your files to a server or launch your browser.
There are many more features, and you’ll see many of them in action in the next Dreamweaver for Beginners tutorial.
Dreamweaver setup and website design process (step by step)
As a first step, you need to purchase Dreamweaver from the Adobe official website.
Step 1. Download and Install
You can use the Free Trial option to test the software. Please note that you may need to install Adobe Creative Cloud to get started. That’s the central program that Adobe uses to manage all of its products, whether you subscribe to Dreamweaver, Photoshop, or any of their other offerings. Just follow the provider’s instructions and you should be fine.
If you’re already using Creative Cloud, you can simply click Try within the client next to Dreamweaver CC. Then, when the program finishes installing, click Start Trial.
Step 2. First Start
When you start Dreamweaver for the first time, you’ll see this screen.
If you’ve never used the program before, choose No, I’m new. When you do, Dreamweaver will guide you through a setup wizard. The first step is to choose whether to use the developer workspace or a standard workspace.
Since this is a beginner’s tutorial for Dreamweaver, select the standard version. After that, you can choose a color theme for your workspace from four different options.
The last step is to choose whether you want to start with a sample file, a new or existing project, or watch a tutorial .
Choose to start with a sample file and you are done with the setup process. Good job! Now let’s start a project and learn how to use Dreamweaver to create a website.
Step 3. Start a new site
The first step is to start a new site. To do this, go to Site > New Site. It will take you to this screen:
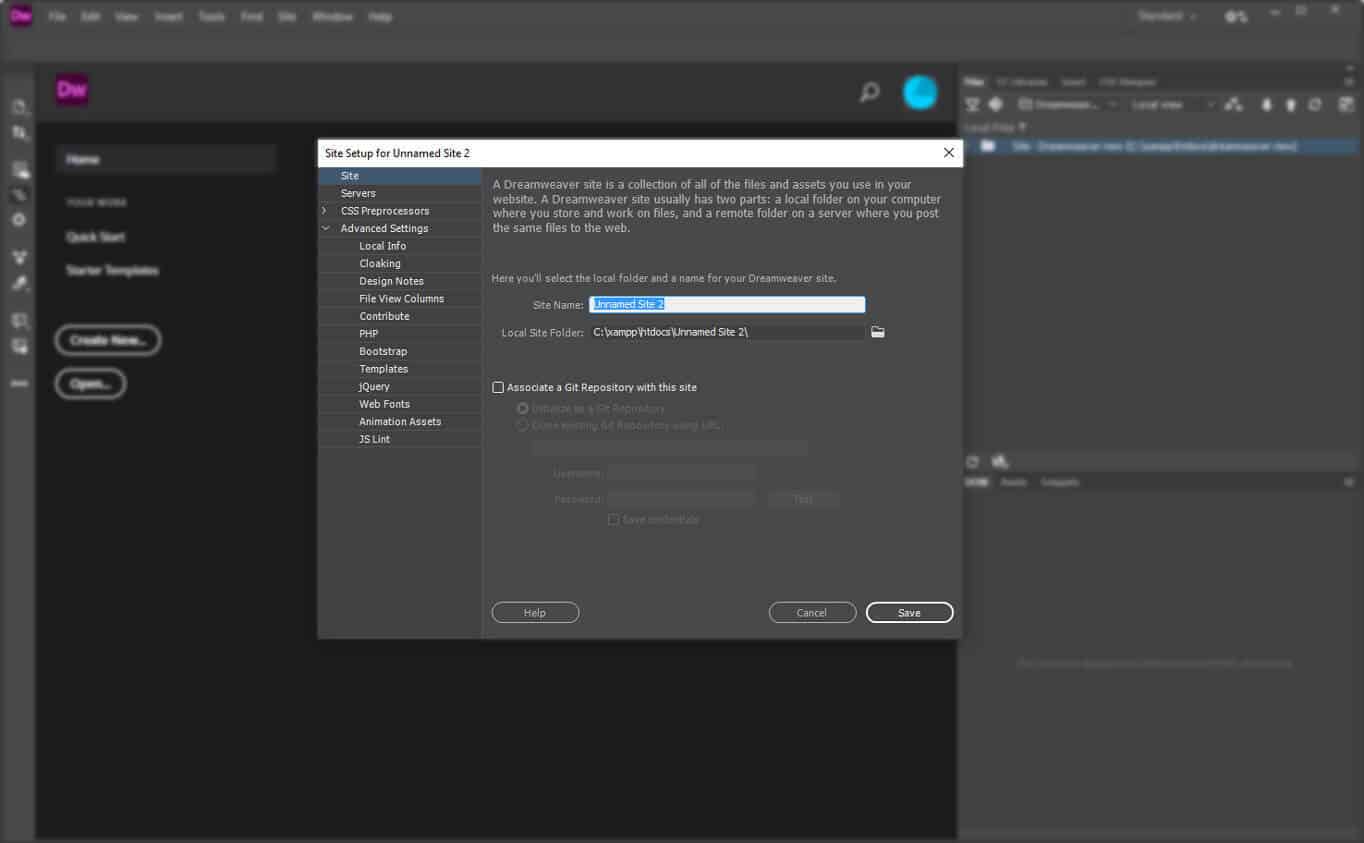
The first step is to give your site a name. Then you have to choose where to save it. This is up to you, but it usually makes sense to keep all your projects in one place for simplicity.
You also have the ability to associate your new project with a Git repository. This might be a good idea as it gives you version control, but you can skip it for now.
We’ll cover everything later under Servers on the left hand side. Same thing with CSS preprocessors, which is only important when you’re using that sort of thing.
What’s important to us is the local information in Advanced Settings. Make sure to click the folder icon to the right where it says Default Image Folder.

Then go to the newly created site folder, open it, create a new folder called images and select it as your default folder. That way, Dreamweaver will automatically save the images associated with your site here.
That’s all for now, click Save to return to your workspace.
Step 4. Create Your Home Page Archive
Now that you’ve created a project site, it’s time for the first archive. We’ll start with the home page.
If Dreamweaver doesn’t give you the option itself, go to File > New. You can create a completely new file or use an existing template. The program comes with some of them (see Startup Templates). Right now, however, we want to create a new, blank HTML document.

HTML is set by default and you can leave it as is. Choose index.html as your file name and choose Create. This will take you to the following screen.

This is what we mentioned at the beginning: a live view of what your site looks like (blank, right now) and the code behind of the. You’ll also notice that Dreamweaver has automatically created some basic HTML markup that you can build on. Let’s do it now, shall we?
Step 5. Create a header
To insert an element on the page, you must first choose its location. Click on the empty page (Dreamweaver will automatically choose the element, if it does) or place the cursor in the same place in the code part of the screen.
After that, you need to go to the Insert tab in the upper right corner. This gives you a list of common HTML and site elements that you can add to your page. Scroll down until you can see Header as an option.

Click on it and a menu will appear to assign it an HTML class or id.
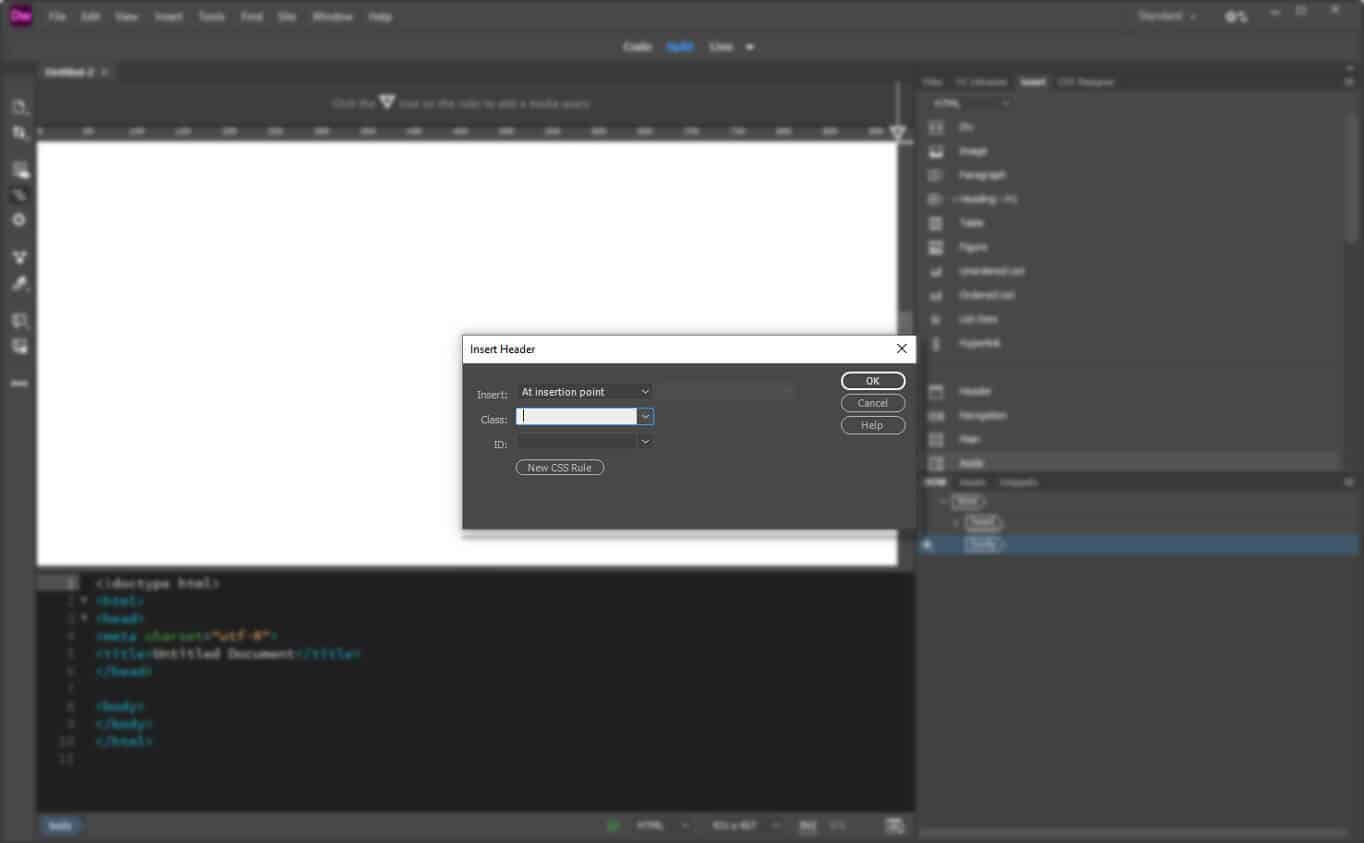
In case you’re not familiar with CSS classes and IDs, they’re just like names you can give your HTML elements to give them CSS styling. You’ll soon understand what this means.
In this case, we’ll use the class called site header. After typing it in the field, click OK to insert the header on the page. You’ll also see it appear inside the HTML document.

Simple, right?
As the next step in this Dreamweaver tutorial, you’ll change the text inside the header and make it a header as well. . For both: first mark up the text in the code editor at the bottom.
After that, go back to Insert, click the arrow next to Heading, and choose H1. This wraps the page title in an HTML H1 tag, which is an important placeholder for search engines. To learn more about header tags, please read this article.
After that, you can also write a title for your page. On your actual website, I would choose something descriptive with keywords and not just the Dreamweaver test site as in the example.

Okay, you’ve just created a page header. It still looks a bit crude at the moment, so let’s change that via CSS next.
Step 6. Create a CSS File
In case you’re not familiar with For him, CSS is the part that provides all the styling on a web page. It allows you to define colors, element dimensions, font types and sizes, and much more. We want to use markup to enhance our page title, and also learn how to change CSS in Dreamweaver.
Theoretically, you can add CSS directly within the HTML document. However, that’s a much less elegant option than what we’ll be doing, which is creating a dedicated file for all the CSS styling for the entire site. You can do this via Tools > CSS > Attach Stylesheet.

Click Browse… next to the File/URL field, navigate to your site’s directory if necessary, and select style. css as its name (which is the standard for style sheets). Leave the rest as is.
When you now select OK, a new file will appear at the top of your live view. You can view and edit it from there. It will also be linked to the section of the HTML part of your page.

Awesome possum! You are now ready to change the style of your page.
Step 7. Create a CSS Selector for the Page Title
The first thing you need to do is change the font of your page. header and also center it. For that, you must first create a new CSS selector. A selector is the name of an element on your page to which you can assign properties, such as color, size, and more. This is also why Dreamweaver asked you for a CSS class for the header earlier in the tutorial.
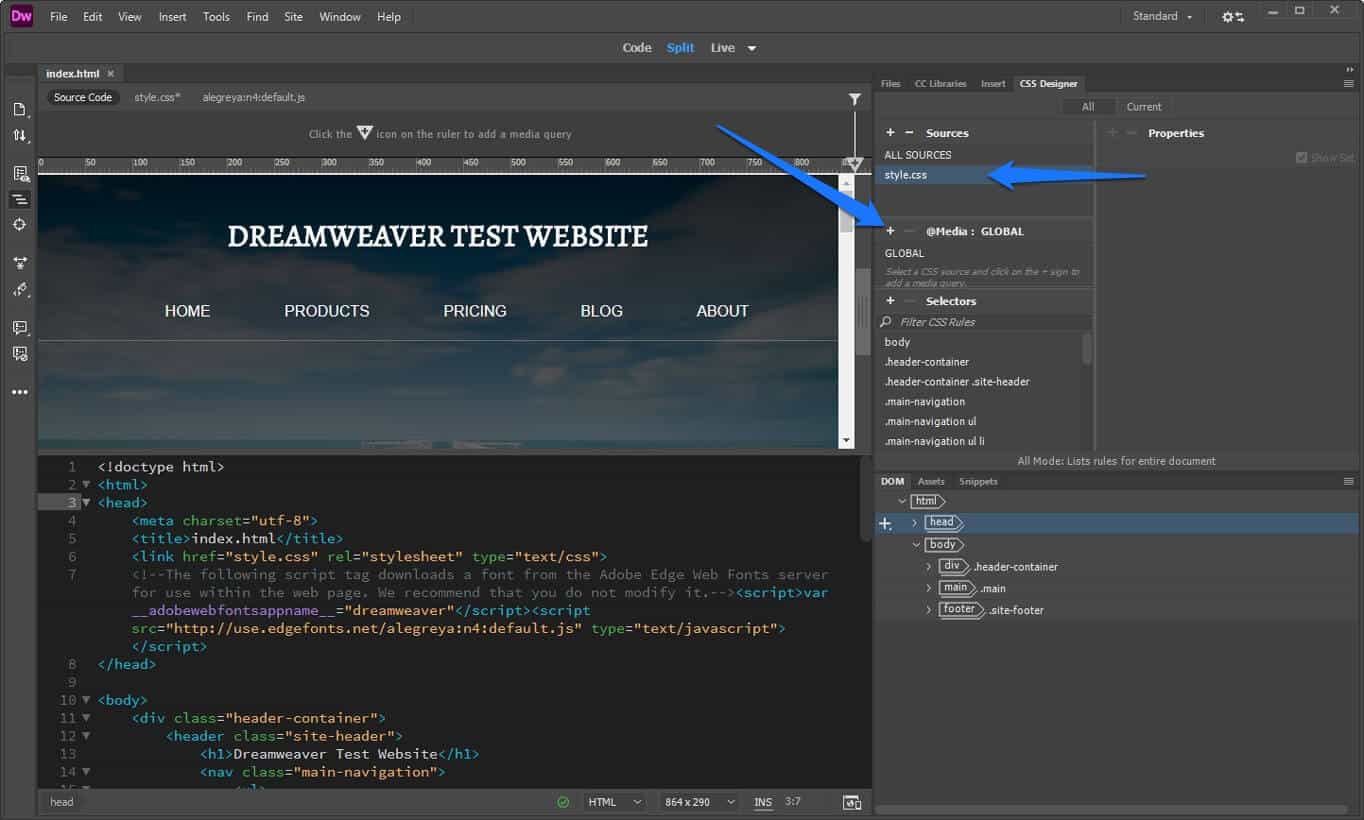
Mark your H1 header in the DOM view at the bottom right. Then, on top of that, choose CSS Designer.
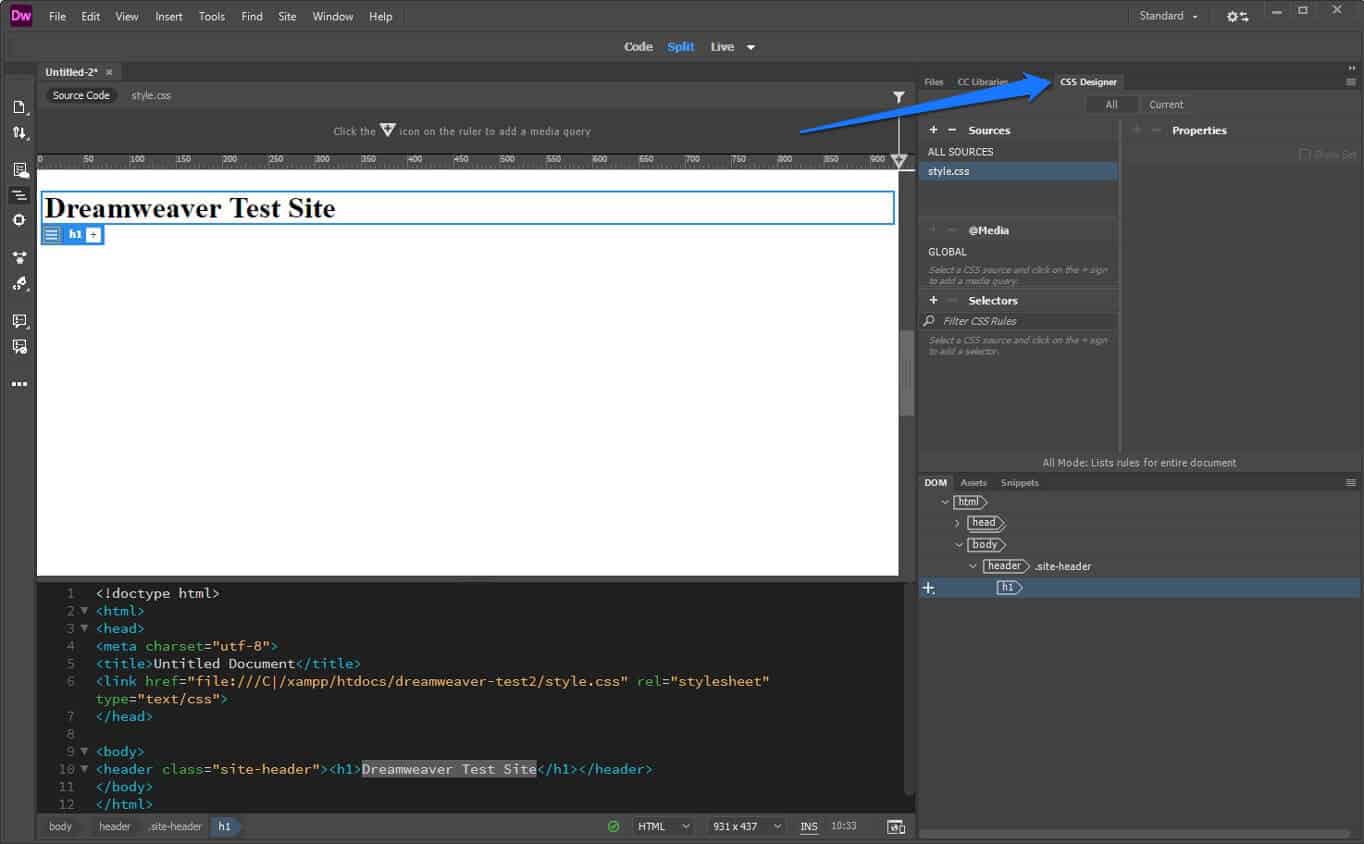
To create a CSS selector, click on the line where it says Selectors, and then click the plus symbol. This should automatically propose a selector called .site-header h1. Press enter to create it. Done!

Quick Note: For all of you who are new to CSS, this selector means that you are pointing to the element named h1 within the element named .site- header. That way, anything you enter as CSS applies only to the typed text and not to the header element in general.
Step 8. Change the title font
Now that you have a selector, you can assign properties to it. If you know CSS, you can simply write markup to style.css and the program will use it automatically.
For less experienced users, Dreamweaver helps you along the way. Stay in the CSS Designer menu and uncheck the box where it says Show Set. When you do, you’ll unlock many additional options.

With the new buttons, you can choose many CSS properties of the layout, text, border and background areas. The More button gives you options to enter your own rules.
To change the font type, click the Text option at the top (alternatively, scroll down). In the next few options, hover over the font family and click the default font.

This will give you a number of options for common fonts, including its alternatives (in case the user’s browser cannot display the main source). You may want to click Manage Fonts at the bottom to access this menu:

Here, you can choose free fonts from Adobe Fonts. Search for them by name, or use the many filter options on the left to narrow your choices until you find something.
A click on any of the fonts marks it for inclusion in Dreamweaver. Once you’ve done that, you can use them directly or go to Custom Font Stacks to define your own alternate fonts.
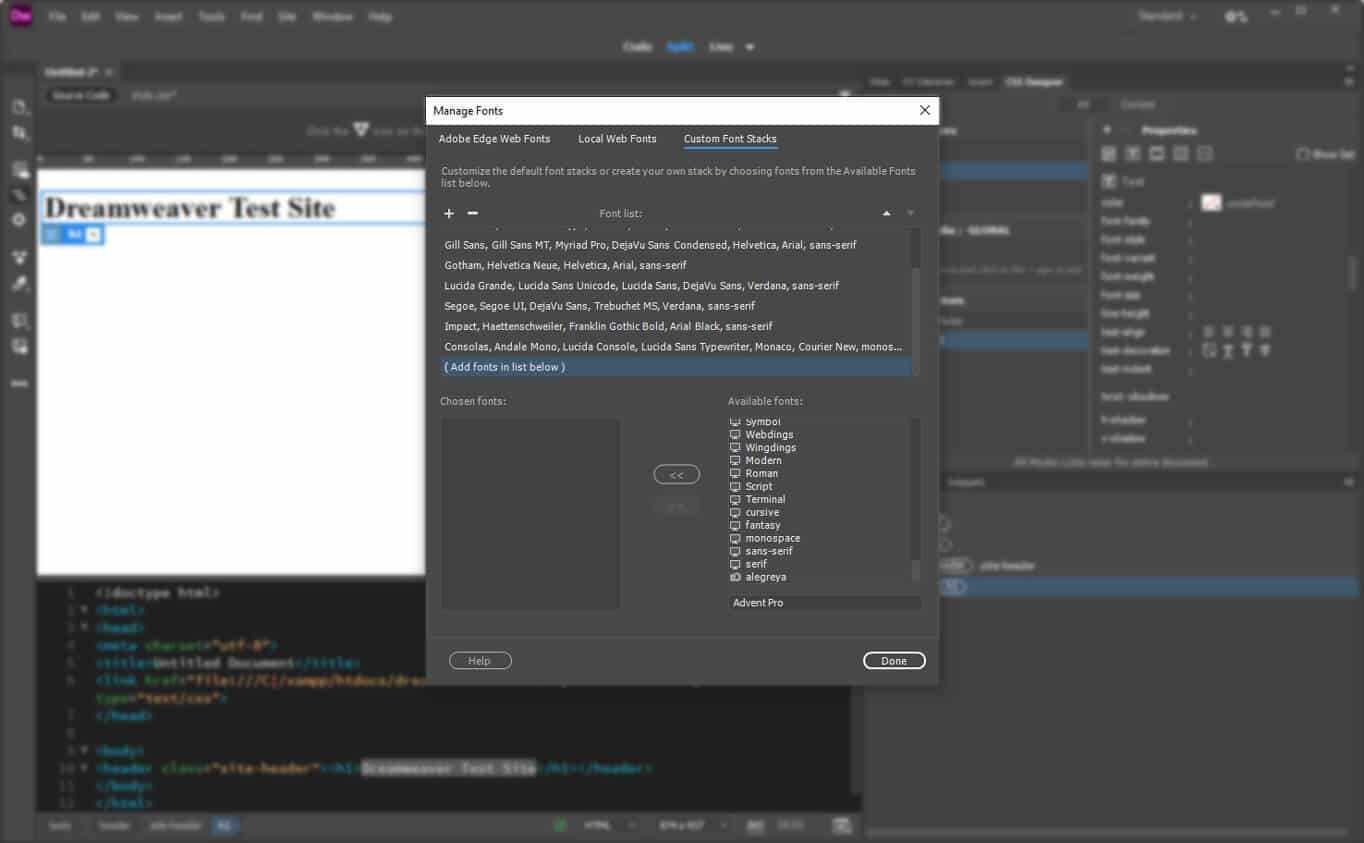
For now, just hit Done and then click Default Fonts again. This time, choose your chosen custom font and voila: the change is made, including all the necessary coding.

If you click on your style.css file at the top, you will see that all markups have also been added.

Step 9. Center the title and resize it
The text could still look better. The next task in our tutorial is to get Dreamweaver to center it and make it all uppercase. For that, the program also offers another feature called Quick Edit.
To use it, go to code view and right-click the part you want to edit. In this case, it’s in class=”site-header”

Here, select Quick edit at the top. This will open the CSS associated with this element below it. If there’s nothing yet, you’ll find a New Rule button to create some.
Either way, you can enter additional properties here without digging through the entire style sheet file (which can be very long). ). To center the text and make it all caps, add the following code:
text-align: center; text-transform: uppercase;
As you type, Dreamweaver will also make suggestions for what you’re trying to input, making it even easier. That’s the code completion function mentioned above.
When done, it will look like this:

Note that the text has already changed in live view. Now press Esc to exit quick edit and go to the style sheet. You’ll find that the new CSS has been added in the appropriate place.
Nice, right?
By the way, if you’re ever unsure what a CSS property means, just right-click and select Quick Docs (or press Ctrl+K). Dreamweaver will then explain it to you.

Step 10. Add more content
Using what you’ve learned so far now, you can now create a rudimentary site. Just use the Insert function to add more elements, then style them with CSS. To create a sample page for this Dreamweaver tutorial, we did the following:
- Set the background color of the body element and set some standards for typography
- Wrapping a container element around the end of the header added a background image with an overlay
- Included the navigation bar and created links to other parts of our website (used a second font here)
- Included a page title and description
- Created a .main element with another div inside containing some typed content, a header, and a contact form
- Put a footer of page at the bottom with another menu containing links to social accounts and copyright credits
- Added space around elements via margins and CSS padding
- Included colors and some box shadows
Here is the result :

Code for t Example:
Given Since this is a bit advanced and not everyone will know how to do what we’ve done in this tutorial within Dreamweaver, you can find the HTML and CSS below so you can rebuild it yourself. First the HTML:
Dreamweaver test website
Page title goes here
Lorem ipsum dolor sit amet, consectetur adipiscing elit. ut quam id massa fermentum mattis. Phasellus ultricies eros id dictum placerat.
Call to Action
Donec luctus lorem eget tortor facilisis, id finibus velit lacinia. Aliquam sagittis odio at enim vulputate, sed varius dui auctor. Nulla dignissim Gravida auctor Proin a porttitor sem , vel vestibulum lectus.In sollici tudin, risus vel imperdiet consequat, lectus est venenatis nulla, sit amet viverra orci nibh sagittis lectus.
Donec luctus lorem eget tortor facilisis, id finibus velit lacinia. Aliquam sagittis odio at enim vulputate, sed varius dui auctor. Nulla dignissim gravida auctor. Proin a porttitor sem, vel vestibulum lectus. In solicitudin, risus vel imperdiet consequat, lectus est venenatis nulla, sit amet viverra orci nibh sagittis lectus.
And then the CSS:
@charset “utf-8″; body { font family: alegreya, sans-serif; font style: normal; font weight: 400; margin: 0; line height: 1,625; background color: #f4f4f4; } .header-container { background-size: cover; bottom position: center center; color: #FFFFFF; padded bottom: 10vw; backgroundimage: linear gradient(0 degrees, rgba(0,0,0,0.5) 50%, rgba(0,0,0,0.85) 100%), url(images/background.jpg); text alignment: center; } .header-container .site-header { padding: 20px 0; margin: 0 auto; max width: 1200px; text transformation: uppercase; } .main navigation { font-size: 16px; font weight: 400; bottom border: 1px solid rgba(255, 255, 255, 0.25); font family: sans-serif; } .main-navigation ul { margin: 0; } .main navigation ul li { display: inline block; } .main navigation ul li a { padding: 17px 37px; text-decoration: none; screen: online block; color: #fff; } .main navigation ul li a:hover { text decoration: underline; } .header-container .page-title { padding: 8vw 180px 0 180px; } .header-container .page-title h2 { font-size: 4.5em; bottom margin: 0; } .page-description { max-width: 600px; left margin: automatic; right margin: automatic; font size: 1.5em; } .page-content { background-color: #fff; margin: -50px auto 0; max width: 1000px; upper padding: 2em; space between columns: 2em; -webkit-shadow-box: 0 25px 40px 0 rgba(0, 0, 0, 0.05); boxshadow: 0 25px 40px 0 rgba(0, 0, 0, 0.05); padded bottom: 2em; right padding: 3em; padding-left: 3em; -webkit box size: border box; -moz-box-sizing: border-box; box size: border box; text alignment: center; } .entry-content h2 { font-size: 3em; } form .cta-form { max width: 490px; left margin: automatic; right margin: automatic; text alignment: left; } Form input .cta-form { display: inline-block; width: 100%; padding: 18px 24px 14px; min height: 35px; bottom margin: 15px; -webkit box size: border box; -moz-box-sizing: border-box; box size: border box; font size: 14px; } .cta-form input form[type=”submit”] { border: none; background color: #A86500; text shadow: 0px 0px; color: #FFFFFF; text transformation: uppercase; } Form input .cta-form[type=”submit”]:hover { background color: #333333; } .site-footer { padding-top: 60px; padding bottom: 60px; text alignment: center; font size: 16px; line height: 1; font family: sans-serif; } .social.menu ul { text transform: uppercase; list-style-type: none; padding: 0; screen: online block; } .social.menu ul li { display: block online; } .social.menu ul li a { padding-top: 20px; right padding: 20px; padding bottom: 20px; padding-left: 20px; text-decoration: none; color: rgba(168,101,0,1.00); font weight: 500; } .social.menu ul li a: hover { color: #333333; } @media (max-width: 375px){ .header-container .page-title { padding-left: 0px; right padding: 0px; } .header-container .page-title h2 { font-size: 2.5em; } }
Step 11. Preview in Browser and Mobile
We want to use the above as an example to show you the next steps. How did we do all this? Well, first of all, we have a little more experience building websites than you probably have. So, we already have the steps to create a proper web page in mind.
Secondly, we take advantage of a very useful feature that helps to speed up the process: the browser preview. Dreamweaver allows you to view your web pages in real time in a browser and even on mobile devices.
To use it, click the real-time preview button in the lower right corner.

This will open the preview options.
Clicking on the name of one of the web browsers will open your website project in it. You can also scan the QR code with your phone or tablet or type the address displayed in your browser to start the live preview on your device.
Just keep in mind that you need to enter your Adobe ID and password for that. You should have that since you signed up for Dreamweaver at the beginning of the tutorial.
The best part: Any changes you make in Dreamweaver will automatically appear in the browser at the same time. time you make them.
How did this help get the site up faster? First, depending on the size of your screen, the view in the browser will probably be closer to the actual final product than what you see in Dreamweaver.
Second, checking the site in the browser allows you to to use the developer tools to test the changes.

These are very similar to what you see in Dreamweaver, but if you’re familiar with them, you can make more changes quick and simply copy and paste the code into your stylesheet.
A look at the phone version shows that there is still a lot of work to be done.

This takes us directly to the following period.
Step 12. Add media queries
To make your website work on all developer ices, you need to add so-called media queries. These are conditional CSS statements that tell browsers to style only above or below certain screen sizes or on particular devices. That way, you can change the layout for smaller screens.
So far, you’ve only defined global styles. That means the styles that apply to the entire site. Now you’ll learn how to add conditional styles for smaller screens.
First, go to the CSS Designer. Make sure the file you want to add code to is selected under Sources. Press the plus sign below @media.
Gives you this options panel:

You can define conditions for media queries, such as the devices they apply to, orientation, resolution and much more. You can also add multiple conditions with the plus sign.
What is most important for our example is the max-width setting. With that, you can define custom CSS that will only apply to a given maximum screen size.
Let’s say you want to fix things on the phone first, so you type a maximum width of 375px when you do. , you can see the CSS code at the bottom.

What will also happen when you click OK is that a green line will appear at the top of the screen. This visually represents the media query. Double click on it and the screen will automatically jump to that size.

Step 13. Add Conditional CSS
To fix the layout for mobile devices, the first thing we need to do is reduce the page title. There is clearly not enough space for it at the moment. You can do this the same way you handled CSS before, only this time you have the media query turned on while you do it.
First, navigate to the element in your DOM view. From there, create a new CSS selector for it. Set the font size smaller than what you currently have, and remove the padding from the parent element. Immediately looks better, doesn’t it?

In the same way, you can change the CSS of all the other elements on the page to make them look good. You can use the same method to adjust the layout for tablets and other sizes. That’s basically for media queries.
Pro tip: don’t optimize for certain devices and their sizes, instead build media queries based on your design. That means playing around with the screen size and adding queries at those points where the layout doesn’t look right anymore.
One more thing: you can also create media queries a bit more easily using the preset device sizes in the bottom corner and/or by clicking the plus symbol at the top when you’ve found a spot where you want to add one.

Step 14. Upload your site on Server
For your site to be public, you need a web server, which you usually get by signing up for a hosting account. If you don’t already have web hosting, check out our recommendations for the best web hosts.
Once you’re done with the design part, you’re pretty much ready to upload the site to your server. As mentioned at the beginning of this tutorial, Dreamweaver makes it very easy too.
In the upper right corner, go to Files. Make sure you have chosen the correct site from the dropdown menu. Then click Define Servers.
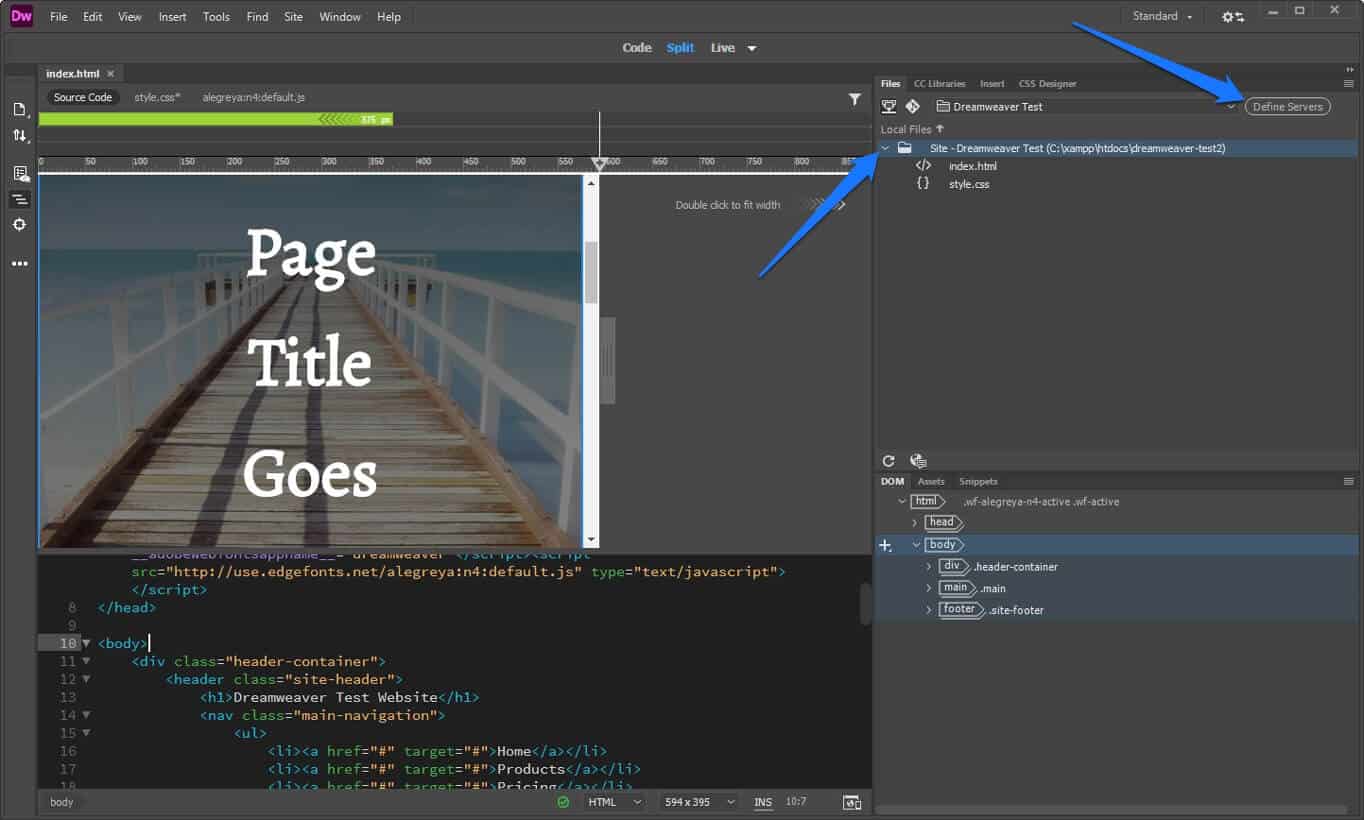
On the next screen, press the little + sign to get here:

Enter all the important data to connect to your FTP server. The name is up to you, the rest (FTP address, username, password) comes from your hosting provider. Don’t forget to specify in which directory to put the files and the web address of your live site! The last part is important so that Dreamweaver can create internal links relative to the site.
In Advanced, you have more options. You can usually keep things as they are. Hit Save twice and you’re done.
Now go back to the Files panel and click on the symbol to connect to your server. Once the connection is established, select the files you want to upload and click the up arrow to upload. When finished, your site should be available from your web address.

Well done! You’ve just created and uploaded a simple site with Dreamweaver!
Dreamweaver Tutorial – Final Remarks
Dreamweaver is a fantastic program for building websites. It combines an intuitive user interface with a complete code editor. Through this combination, it makes it easy for beginners, intermediate, and advanced users to create high-quality websites.
In this Dreamweaver for Beginners tutorial, we introduce you to Dreamweaver and its capabilities. We show you how to set up the program and get started with your first website. You have learned how to create a basic HTML structure and style it with CSS. We also covered how to make your website mobile responsive and upload it to your server.
By now, you have a solid understanding of how to use Dreamweaver to create a website. Now it’s up to you to dig deeper and figure out the next steps.
Don’t forget: Dreamweaver is just one way to build a website. There are many more and you can find a lot of information from here.
.