5 Methods to Connect Your Security IP Camera to PC/Mac:
To make it easier for you to find the right solution, you can click and jump directly to the section you want.
For example, if your camera is a PoE camera, then you can choose option 3 or 4.
- 1. Connect directly to PC/Mac (without Internet)
- 2. Connect via router (with Internet)
- 3. PoE (wired) camera without injector/switch
- 4. PoE (wired) camera with injector/switch
- 5. Connect a CCTV Camera System to a PC/Mac
Important Note: The following recommended methods may NOT apply to security cameras. battery-powered security cameras, which require initial setup on your phones.
Connect a Wi-Fi or PoE camera directly to a PC/Mac (without Internet)
Here Here’s how to connect your security IP camera directly to a PC/Mac without NVR or DVR, no router network, no WiFi, and no cost or complicated setup.
You need to prepare the camera’s power adapter and a network cable.
1. Charge your security camera.
Use the power adapter to plug in and charge the camera. Normally, when you buy a WiFi IP camera, it comes with a power adapter. For a PoE camera, ask the provider and buy one that works for the camera.
2. Please use the network cable to connect the camera and the computer.
Normally, there would be a 2-in-1 or 3-in-1 cable connected from the camera. Find the network connector for that cable and use the network cable to connect to it. Then connect the other end of the network cable to the computer. If your computer already has a network, disable it; make sure your computer is offline. 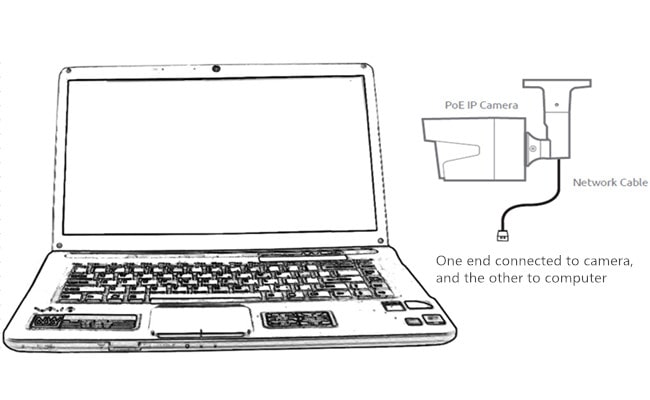
3. Scan and find out the IP address of the security camera on the computer.
Now the security camera is connecting to your computer basically and physically. But still can’t see the camera on the computer. What you need to do now is to scan and find out the IP address of the camera. There must be surveillance software from the same vendor with the camera. Take our test as an example. We have Reolink Client on the computer. Start it and it will automatically scan all cameras on the same local LAN and display the default IP address (each camera has a unique and default IP address when it leaves the factory). Easy peasy! 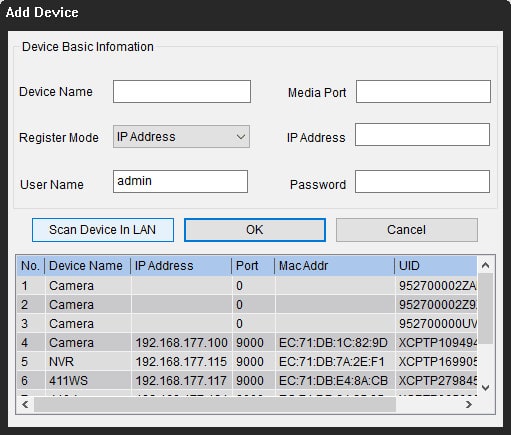
4. Change the computer’s IP address to the same network prefix as the IP camera.
So, in Step 3, you get the default IP address of your security camera. In our test, the default IP address of the camera we used is 192.168.177.100, and now you need to change your computer’s IP address to 192.168.177.x, where x identifies the node/host and is the number between 2 and 254 . So, let’s say the computer’s IP address is 192.168.177.12.
IP address 101: An IP address consists of two parts: one belongs to the address of network and another belongs to the address of the node. All nodes on a given network share the same network prefix but have a unique host number.
Now, to change the computer’s IP address (we take Windows 10 as an example):
-
Press the Windows R keyboard shortcut to bring up the Run box.
-
Enter “ncpa.cpl” and open the “Network Connections” window .

- Right-click your computer’s network adapter and select “Properties”.

- Select your computer’s Internet Protocol version and click “Properties”.

- Select “Use the following IP address” and change Enter IP address to 192.168.177.12.

And you’re done. Now your IP camera connects directly and communicates with your PC, because they are now on the same little LAN. You can view your IP camera with Reolink Client on your computer.
Important: Since there is no router network, the IP camera would not transmit data or send alarm to your phone. Still, you can record and save all the footage on your computer.
If you are going to use your IP camera with computer all the time in this way (no router network), you’d better change your IP camera’s IP address default state to the static to keep it the same all the time, because every time you restart the IP camera, its IP address will change and you need to do all the above steps again. To keep the same IP address of the IP camera all the time, please go to “Device Settings” and “General Network” in the Client (Reolink Client in our test), and choose “Static” for “Network Access”. And done. 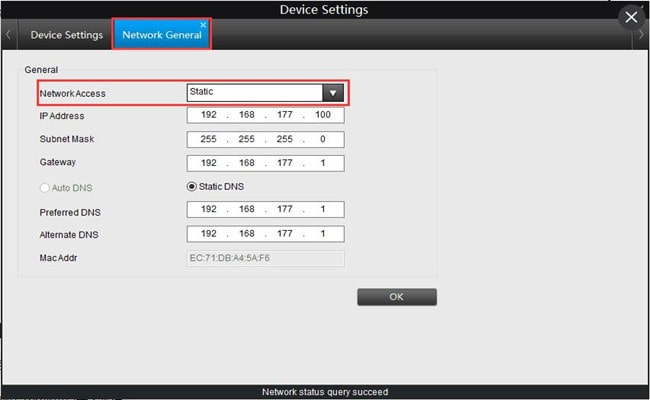
Connect a wireless/WiFi camera to computer via router (with Internet)
If you have a WiFi network and need to view the IP camera remotely when you are not there, you can connect your wireless or WiFi camera to the computer wirelessly through your router. Please note that you must have at least one power adapter for the camera, one network cable, and one router.
1. Charge your WiFi security camera.
Use the power adapter to plug in and charge the camera.
2. Use the network cable to connect to the camera and router.
A WiF camera needs to connect to the router with a network cable for initial setup, because the new camera itself would not automatically recognize and select a network you never use. Only after successful WiFi setup can you unplug the cable from the camera and the router. And yes, again, there would normally be a 2-in-1 or 3-in-1 cable connected from the WiFi camera. Find the network connector for that cable and use the network cable to connect to it. Then connect the other end of the network cable to the router. 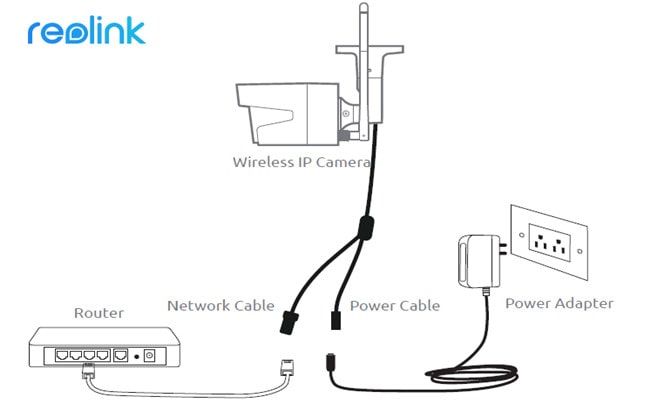
3. Watch the IP camera on PC/Mac
On the computer, launch the surveillance software to add the camera and see the live view directly. In our test, we open Reolink Client. Since the computer and the camera are on the same network (using the same router network), Reolink Client automatically searches and displays the camera directly. Click “Start” and you can see the camera on PC. And you can configure the settings for all the features you want the camera to have.
4. Set the WiFi settings and remove the network cable.
Remember to do the WiFi settings for the camera. In the software, go to “Device Settings” and “Network”. Choose the WiFi network and enter the password, and that’s it. Cameras from different brands would have different WiFi settings. Consult the guides you receive from your provider. After that, remove the network cable, and then the security CCTV IP camera connects to the computer wirelessly.
Important: If you need to see the camera IP of another computer that is not on the same network, you need to enter the camera’s UID in the software to remotely access the camera.
Connect a PoE (wired) IP camera ) to Computer without PoE Injector/Switch
Connecting a PoE wired IP camera to a computer via router is similar to connecting a WiFi camera, and even much easier: you don’t need to use a power adapter, configure the WiFi and remove the network cable. And you need at least a network cable and a PoE-enabled router to complete the setup.
1. Use the network cable to connect to the camera and the router.
PoE (Power over Ethernet) means that you can use a single network cable for video transmission and power. Just connect the camera to the router via the network cable and the camera will get power and access to the network. 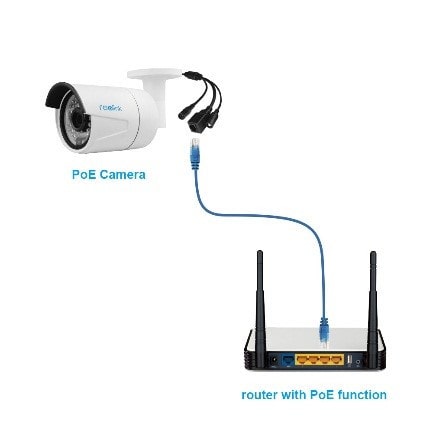 Make sure your router has the PoE function. If not, try the next method.
2. Watch the IP camera on the computer.
On the computer, launch the surveillance software to add the camera and see the live view directly. In our test, we open Reolink Client. Since the computer and the camera are in the same network, Reolink Client automatically searches and displays the camera directly. Click “Start” and you can see the camera on PC. And you can configure the settings for all the functions you want the camera to have.
Important: If you need to view the IP camera from another computer that is not on the same network, you need to enter the UID of the camera in the software to remotely access the camera.
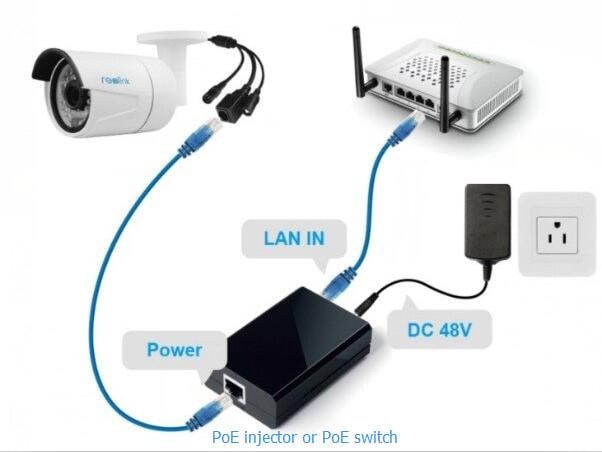
Connect a PoE (wired) IP camera to the computer with an injector/switch PoE
If your router does not support PoE, you need a PoE injector or PoE switch to help connect your IP camera to PC. To complete the setup, you need at least a network cable, a router, and a PoE injector or PoE switch.Since the steps on how to connect a PoE IP camera to PC via a PoE injector/switch are quite similar to those for connecting without a PoE injector/switch, we would like to make it easier to understand here.
1.Connect the security camera, router and PoE injector
Connect all the devices as shown in the picture below, make sure your wireless IP camera is connected to a source of feeding.