If you’re wondering how to start a blog in 2023 and make money online, this detailed post can walk you through the setup process step-by-step so you can have your new blog up and running in no time.
Over 9 years ago, I decided to start a blog on a whim. I really didn’t think much would come of it. (In fact, she was so nervous about publishing it that she hoped no one would ever read it.) But what started out as my little “secret project” has become my absolute dream job that my husband Donnie and I feel great about. -blessed to be able to do it full time. (Pinch me!)
Over the years, one of the most common emails Abby and I have received is one asking us how to start a blog. It’s something a lot of people think about doing, but most just don’t know where to start. Knowing that starting a blog has been a game changer for our family, Abby and I are passionate about helping others blog in hopes that they can be successful and change their own lives as well.
This page contains affiliate links, which means we earn a commission if you use those links. We only recommend brands that we use and trust. Check out our disclosures.
This guide was created to show you how to start a blog in 2023. It’s possible to have a blog up and running in just a few minutes, but we wanted to take things a step further and show you some of the important details behind starting a successful blog.
Things have changed over the years, and it’s more important than ever to start your blog the right way and lay a solid foundation for the future . blogging success. But remember that the last key to the success of your blog is action. The most successful bloggers are those who do a lot more than research.
I hope this extensive guide helps you. If you have something to share with the world and have always wanted to start a blog, you’re in the right place.
Let’s get started!
Step 1: Choose a blog Name
Step 2: Choose a blog host
Step 3: Customize your blog
Step 4: Protect your blog
Step 5: Add blog pages Standard Blog
Step 6: Set Up a Custom Blog Email Address
Step 7: Register Social Media Accounts
Step 8: Decide on a Blog Post Blog Calendar
Step 9: Promote Your Blog
Step 10: Make Money Blogging
Before you follow the steps to start your blog, there are two questions which I need to answer.
Why should you trust our blogging advice?
Great question. In January 2013 my wife Abby started this blog. She worked like crazy for her first year, constantly posting new articles and connecting with other bloggers and the blog grew as a result.
In February 2014, Abby asked me to join her (while still working my full-time job) and help with the technical and strategic aspects of her blog. The blog grew a little more. Then, in January 2015, I quit my full-time job to help Abby with the blog full-time. Now we are in 2023 and still going strong!
We now receive over 500,000 page views each month and earn a six figure income from the blog. We are not special, but we sure have learned a lot in recent years. We have been where you are now and have had the same questions that you have. We’re here to help you start your blog the right way.
Related: From Hobby Blogging to Thriving Business: Our Blogging Story
Let’s get started! Here are my step-by-step instructions (and tips) on how to start a blog in 10 easy steps…
Step 1: Choose a blog name
Before you choose a name for your blog and register the domain name (URL), there’s something we need to talk about…
Can I start a blog for free? (Choosing the Best Blogging Platform)
You have an idea, a topic, or just want a place to share your thoughts, but what’s the best way to start? Before getting into a discussion of which platform is best, it’s important to note that a WordPress.com-hosted blog is a very different thing than a WordPress.org self-hosted blog. Yes, the names look very similar, but the options and limitations that come with each are very different, so be sure to note which one we’re talking about as we discuss them below.
It’s tempting to choose one of the many free blogging platforms like WordPress.com or Blogger. Everyone likes free, right? But in this case, “free” definitely has some downsides. With Blogger and WordPress.com blogs, you give up a great deal of control and future flexibility by using a free blogging platform.
WordPress.com inhibits your ability to use display ads and various widgets, such as those used for raffles and wedding parties. Blogger is owned by Google and therefore Google can shut down your blog at any time it sees fit. Blogger blogs can run ads, but they tend to earn less ad revenue than blogs of the same size hosted on WordPress.org.Some of these drawbacks may not seem like a big deal when you’re just starting out, but they’ll definitely hinder your blog in the future, and switching platforms once your blog is established isn’t always an easy process.
If you think If you’re either going to be in blogging for the long haul or would like to monetize your site at some point, we recommend starting with a self-hosted WordPress.org blog from scratch. WordPress.org is the industry standard, and that’s not likely to change anytime soon. The number of tools, themes, plugins, eCommerce solutions, layouts, and marketing software options that are powered by WordPress.org are endless, allowing you to create a site that looks exactly the way you want and is fully featured. you need.
Related: Should I use WordPress or Squarespace for my blog?
Choose a blog name.
Choose a domain name for your new blogging can be a challenge. You want to choose something unique that reflects what your blog will be about, and something you’ll still love in the future. When brainstorming domain names, I like to use a simple and free tool called Bust A Name. With Bust A Name, you can type in some keywords you’re thinking of using, and the available combinations with those words will appear. You can read about other domain selection tools in this Digital.com article.
When brainstorming a domain name, here are some best practices:
- Use a “.com” domain when possible. There are quite a few successful “.net” and “.co” blogs, but “.com” is more the standard for blogs and is easier for people to remember.
- Avoid numbers and hyphens. in your domain name. Numbers confuse people because they never know if the number is written when they hear the domain. The same goes for hyphens – it’s hard for people to remember.
- It’s better to keep them short and easy to remember than long and descriptive. I know it’s tempting to try to use a bunch of words in your URL and explain exactly what your blog is about, but it’s really not necessary.
- For many people, your name will make a great domain name.
Before making your final decision, it’s a good idea to use a social media profile checker app like KnowEm. This will give you an idea of what social media profiles are available under a particular name. Most likely, your preferred name is not available on many social networks. Don’t worry! You will be able to create a profile with a slightly modified name.
A quick story on domain research: When Abby decided on the URL for JustaGirlandHerBlog.com, she didn’t. t do a lot of research. Many months after she started her blog, she found another successful blogger in the same home decor/DIY niche with a similar blog name. Oh! It hasn’t caused too much trouble, but I know Abby felt bad about it and reached out to the other site owner. If she had done a little more research, Abby probably would have settled on another name.
Note: If you don’t already have the perfect URL or domain name in mind, don’t worry, you can still go ahead and fill out the step two.
Step 2: Choose a blog host
In this step, I’m going to show you how to set up blog hosting and understand the WordPress control panel (the blog center! check your blog!). .
This page contains affiliate links, which means we earn a commission if you use those links. We only recommend brands that we use and trust. Check out our disclosures.
Buy blog hosting and install WordPress.
It’s time to buy hosting for your blog. Your new hosting company is where all the files and content associated with your blog will live. When readers type your new domain name into their browser, they will be shown the content, articles, and images found on servers owned by your hosting company.
A good hosting company is an important part of your new blog. . Your host is where your blog “lives”, where all the important files for your blog are kept. If your host has problems, you have problems, so you want to make sure you choose a host that has fantastic service and helpful customer support.
I’ve written a lot about hosting companies that I love. and recommend, so be sure to check out that article if you want to weigh multiple options. My conclusion (based on my first-hand experience) is that for most people, Bluehost is the perfect place to start.
Bluehost is one of the few hosting companies that recommends WordPress, and costing just $3.49/mo (in fact, we have a special deal with Bluehost right now where you can get hosting for $2.75/mo), it’s almost impossible to beat their level of hosting, customer support, and uptime reliability. activity for the same economic price. And, if you cancel within 30 days, Bluehost will give you a full refund.
Bluehost Hosting Setup
We’ll walk you through the steps to get started with bluehost.Don’t be intimidated by the fact that there are 20 steps, that just means we’ve broken it down to make it really easy for you! Here we go!
1) Go to justagirlandherblog.com/bluehost. You will be redirected to Bluehost through our affiliate link, and you can get some extra benefits for signing up through of our code. (Thanks for your support!) Click the big green “Get started now” button.
2) Choose the plan that’s best for you. The basic plan should be well for most people just getting started. If your blog grows, you can always upgrade your plan without changing hosts.
3) You’ve already decided on a domain name at this point. To register your free domain name with Bluehost (this is a nice benefit for new Bluehost accounts!), enter it in the “new domain” box and click “next”. If you already have an existing domain name with another service, you can type it in the “I have a domain name” field.
Note: If you couldn’t find it with a blog name and an available URL in step one, don’t worry! If you move your mouse cursor as if you’re leaving the page (don’t actually leave it!), you should get a popup that says, “Can’t decide on a domain name? Please choose later. If you choose this option , Bluehost will add a credit to your account to choose your domain name at a later time.
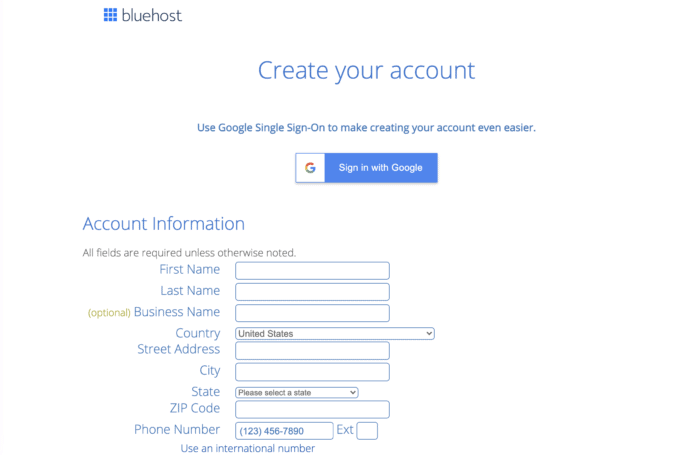
4) Enter all your account and contact information.
5) Proceed to the “Package Information” section. You get the lowest monthly rate by selecting 36 months. It’s It’s important to note that Bluehost charges you upfront for the full 36 months.You’re paying upfront for the hosting.That’s one of the reasons they can offer great hosting at a pre cio so low If you change your mind, you can cancel within 30 days for a full refund. If the initial cost is too much, you can always consider paying 12 months upfront. And if it’s still too much and you’re not sure, take a look at our other hosting recommendations that don’t require prepayment to get the best deal.
There are other services available on this screen. The only one I recommend is “Domain Privacy Protection”. This protects your personal information, such as name, address, and phone number, from being publicly accessible.
If you later decide you want some of the other services, you can always add them to your account .
We recommend setting up some sort of backup system for your blog somewhere other than your host so you don’t lose all your hard work if your site crashes or your host has a problem. When Abby started out, we backed up her site to Dropbox using a plugin called WordPress Backup to Dropbox. When we got past that, we moved to Vaultpress for a while and were happy with them. Their packages start at $5 per month. But don’t worry about this just yet.
6) Enter your billing information, accept the service agreements, and then click “submit”.
7) Again, there are some additional options you can buy here, but I wouldn’t. These could be added later if you need them. Click “no thanks”.
8) Congratulations! You officially have a Bluehost account. Next, you need to create your password.
9) On this screen, you will create your Bluehost account password. Don’t forget it! (And of course, make it a strong password so no one can hack your site!) Agree to the Privacy Policy and Terms of Service, and then hit “Next.”
10 ) Now that your password has been created, you can log into your account for the first time! Click the blue “log in” button. It should automatically take you to the Bluehost Portal, but if not, go ahead and log in using the “hosting” tab and not “webmail”.
10) When your account first opens, you will have the option to choose a theme. You can do this later if you want, so click “Skip This Step” under the offered themes.
11 ) Bluehost then it will install WordPress for you. You will see this screen when finished.
12) Go ahead and click the blue “Start Building” button. You will be taken to this screen.
13) In the lower left corner of the screen you will see the word “Users”. Hover your mouse over the word “Users” and select the option “Add New”.
14) Fill in all the information on the next screen (Username, Email, etc.) and make sure to change the Role to “Admin.” You do NOT want to keep the name username “Manage dor” as it is not so safe.
15) Click on “show pas sword button”. Be sure to copy and paste and/or take a screenshot and save it somewhere safe. You will need this password to log into your WordPress site. You can always go back to your User Settings and change your password later. Once you have filled out all the information and have your password, click the “Add New User” button at the bottom of your screen.
16) To login to your site WordPress, go to http://yourURLhere.com/wp-login.php). It will take you to a login screen similar to the following. Enter your username and password you just saved.
17) Now that you’re logged into WordPress, you’ll be presented with your WordPress dashboard. You’ll learn to love this one. Spend some time reviewing the various settings. It can be confusing at first, but before long it will all be second nature.

You did it! Congratulations on choosing hosting, installing WordPress, and logging into your dashboard for the first time.
Note: Bluehost will occasionally change the order or appearance of its setup screens. If you see a screen that doesn’t look exactly like the one you see above, don’t worry, the process remains the same.
Understand the WordPress dashboard.
Getting started writing and publishing posts, you will spend a lot of time in the WordPress dashboard. At first, all the settings and buttons can seem a bit intimidating, but after a few days or weeks, you’ll be a pro navigating the interface. To get started, I want to briefly point out some important parts of the WordPress dashboard.
This is the home screen of the dashboard. You can customize this page by clicking the “Screen Options” button in the upper right corner of the screen.
One of the first settings I recommend you change is the permalink structure. Click “Settings” and then “Permalinks”.

Then select the “Post Name” option. It’s important to make this change before you start publishing posts. Once you publish and have inbound links to your posts, it’s more complicated to change the URL structure.
Familiarize yourself with the “Plugins” section. We’ll talk more about essential plugins later in this article.

The “Posts” tab is where you compose and format your new posts blog.

The “Pages” tab is where you compose your site’s static and permanent pages as your “page” policy about” and “disclosure”. With WordPress, the main difference between posts and pages is that posts are dated articles and pages are undated. Posts will appear in your blog feed and Pages will not.

WordPress.tv has posted a comprehensive video tutorial on the WordPress dashboard. If you want a great tour of the WP Dashboard, you can take a few minutes and watch the video.
Step 3: Customize Your Blog
Next, we need to customize the look of your blog and add some useful features with WordPress plugins.
Choose a responsive WordPress theme.
Note: Genesis, my recommended WordPress theme framework is now free! ! Read more about Genesis below.
After blog hosting, the next money you spend on your blogging journey should be on a custom WordPress theme. There are thousands of free WordPress themes out there; WordPress even comes with the official 2023 theme pre-installed. However, as soon as you can break it financially, I recommend starting with a premium theme that looks great out of the box with minimal customization. With more and more blogs starting every day, quality design is increasingly important to blogging success, and a premium WordPress theme will help you get that professional look even as a new blogger.
If you use a bit of WordPress theme research, you’ll find plenty of articles and tips that point to the Genesis Framework. Genesis is not a theme per se, but rather a theme framework that developers and designers can use as the foundation for their custom child themes.
Having a framework + child theme combination ensures that you won’t lose your custom settings during site updates. When you have the Genesis Framework, you also have access to some really important plugins that are only available to sites running Genesis. Abby and I use the Genesis Framework + child theme strategy for all of our sites.
The first step is to purchase the Genesis Framework (now free!) directly from the creators at StudioPress. (It’s easy to find pirated copies of Genesis floating around the internet and on Etsy, but we don’t recommend it. There’s no guarantee you’ll get a clean copy without malicious code embedded in the theme that can wreak havoc on your site in the future. Best option is to buy it directly from the source.) Updates are free forever. Once purchased, you can watch the video below to learn how to install the framework.
Now that you have Genesis installed, it’s time to purchase a custom child theme. You can run the Genesis Framework on its own, but your site will look pretty plain and won’t have any of the nice elements and customizations you may have seen on other sites. Those elements are added by the child theme.
There are literally hundreds of theme stores that advertise custom Genesis child themes. If you decide to buy a child theme on Etsy, make sure the seller has an excellent reputation and double and triple check the type of support they offer. I know bloggers who have bought beautiful children’s themes from relatively unknown designers on Etsy. Some of these child themes were poorly coded and the developer provided little to no support for the theme. We always recommend purchasing from a known and trusted source such as these:
1. StudioPress. If StudioPress (the makers of Genesis) is selling a child theme in their store, you can be sure it’s a well-coded and compatible theme.
2 . Restored 316. Lauren creates beautiful, well-coded Genesis girly child themes. Abby used one of her designs for many years and was very pleased with the theme and the support provided by Restored 316.
3. Feast Design Co. Shay is the designer behind the incredibly popular and flexible Foodie Pro theme, a rock-solid theme with tons of customization options. We currently use Shay’s Brunch Pro theme for this site. Once again, we are delighted with the quality of the theme and the support provided by the Shay team.
When deciding on a child theme, take a close look at the design and overall structure of the theme of it. Colors can be changed, logos can be changed, and typography can be changed. It’s more difficult to change the overall layout and structure of the theme.
Once you’ve purchased your child theme, you’ll want to install it the same way you did the Genesis Framework: upload and install the zip from your dashboard WordPress control.
Install the necessary WordPress plugins.
Now that you have your custom child theme, it’s time to install some important WordPress plugins. Plugins are great because they allow you to add certain features to your blog without having to mess with any code. On the downside though, the more plugins you have, the more potential problems (site speed, security, etc.) you may face. So while plugins bring great functionality to your blog, you’ll only want to install the ones you really need. Here are a few I use with every new blog setup:
1. Akismet. This is a plugin to reduce/eliminate spam comments.
2. Yoast SEO. The standard when it comes to a WordPress SEO plugin. It will help you easily structure your blog posts so that they rank high in search results.
3. W3 Total Cache. This is a “caching” plugin that will speed up your site. Configuring this plugin is very complicated, so if you use this plugin, be sure to ask your host what configuration they recommend instead of trying to configure it yourself.
4. Genesis eNews Extended. This is a handy little plugin that allows you to add an email signup form to any widget area on your site. This plugin is only for blogs using the Genesis Framework. The best thing about this plugin is that the registration form automatically pulls the styling from your child theme so everything matches. This plugin can be configured with most email marketing services like MailChimp and ConvertKit.
5. Genesis Simple Hooks. As your blog grows, you will need to add various code snippets to different places on your blog. For example, Google Analytics requires a tracking code and Pinterest verification requires some code. This plugin makes it easy to add code snippets (either Javascript or HTML) to various places on your site without accessing and editing your theme files directly. Genesis Simple Hooks will save you a lot of time. Again, this plugin is designed to be used with the Genesis Framework.
6.Genesis Simple Share. A nice, lightweight plugin that adds social sharing buttons to your posts and pages. Also designed to work with the Genesis Framework.
7. Pretty Link Lite. This is a plugin that allows you to turn ugly long links into small links that redirect to the final destination. This is particularly useful if you have a long affiliate link with a lot of crazy characters at the end. You can use Pretty Like Lite to make links like justagirlandherblog.com/bluehost (pretty!) redirect to the longer, not-so-pretty affiliate link.
You can find and install all these plugins directly from the tab “Plugins” within your WordPress dashboard.
Note: For a longer list of my favorite WordPress plugins, check out this section of my blog resource article.
Step 4: Protect your blog
In this step we will cover some tasks related to security and analysis. Don’t skip this step! Your future self will thank you.
Set Up Google Analytics and Webmaster Tools
There are a couple of boring but necessary Google-related tasks to take care of when setting up your blog. The first is to create a Google Analytics account.
Google Analytics is the industry standard for website and blog traffic reporting. It has the potential to give you incredibly powerful insights into your blog traffic and site activity. I don’t recommend spending a lot of time learning the ins and outs of Google Analytics when you start blogging (you have more important things to do!), but you do need to create your account and start tracking page views. Don’t skip this: Brands and potential ad partners will routinely request your stats and want to see data specifically from Google Analytics.
If you have a custom email address with Google Apps, I recommend using that one. It has Google Analytics. Otherwise, you can create a Google Analytics account using your Gmail login information.
Once you set up your free account, you’ll receive a tracking code that you insert on your website. This is super easy, so don’t worry! Since you have Genesis Simple Hooks installed, you can simply paste the Google Analytics tracking code into the “genesis_after” section of your site. Click “save” and you’re done!
The second boring Google task to take care of is creating a Google Webmaster Tools account and adding your site. This will signal Google to start paying attention to the content you post on your site and, over time, can help you rank in Google for specific search terms.
No need to mess around with all the settings in webmaster tools, but you’ll want to add a sitemap to your account. A sitemap is an .xml file that makes it easy for Google to index your content. The best way to create a sitemap is from the Yoast SEO plugin that you already installed. Once you have your sitemap URL (for example: justagirlandherblog.com/sitemap_index.xml), you can add that URL to the sitemap section of your Google Webmaster Tools account.
Pay attention to blog security.
New bloggers often overlook basic site security and backup needs. To be honest, Abby and I didn’t pay much attention to this until several months into our blogging adventure. It’s best to take care of site backup and security from the start so you don’t have to worry about “worst case scenarios”.
Why you need to backup your WordPress blog
Let’s start with the backup. It is absolutely critical to have a daily backup of your site. You may be thinking that it would be rare for your hosting servers to completely lose your site or for your blog to get taken down somehow. You’re right, it’s weird. What’s more common are hacking attempts and malicious code infecting your site and all the thousands of different files. Your site isn’t technically lost, but it might as well be if you don’t have a backup or a good restore point.
This same scenario happened to Abby and me: JustAGirlandHerBlog.com got infected somehow . . All .php files associated with the site (thousands of files!) were somehow infected with malicious code. The site was throwing all kinds of server errors, everything was slowing down to a crawl, and we were having trouble even logging into WordPress. Our host scanned the site and revealed the malware infection.
At that point, I had two options: 1) review each file manually and remove the malware. This would have been a few weeks of full-time manual labor. Who can afford that!?, or 2) Restore the site from a “clean” or “virus-free” point.
Obviously we chose the second option. I downloaded a backup file from the site from a week earlier and manually viewed the .php files. The files were clean and we were able to use the backup to restore the entire site.
If we didn’t have a rock-solid backup plan, our site could have been completely lost.I share this story to scare you. Do not think that it is almost impossible for your site to be completely lost. In our example, it was not deleted but infected. The need for a backup was the same.
When I talk to seasoned bloggers, almost everyone has a similar story of when they needed a backup. I also spoke to bloggers who gave up after their site got infected and they had no backup. How sad! It’s easy to prevent!
There are several good backup solutions. JustAGirlandHerBlog.com’s current host (Flywheel) has a built-in feature where the entire site is automatically backed up once a day. I can download (which I do about once a month) these backups at any time. I then store a copy of this backup on a Synology local network attached storage device, as well as a copy on one of my Google Drive accounts.
Flywheel has another cool feature where I can restore our site to one of our previous backup points with a single click. This feature is included with all Flywheel accounts.
If none of those options work for you, I highly recommend creating a paid account with VaultPress.
Don’t ignore WordPress security .
After the aforementioned hacking incident, I decided to invest in a CloudFlare account.
CloudFlare will improve your site in more ways than I can mention here, but one of its features main ones is to improve the security of the site. They bring together the collective knowledge and analysis of all of their clients to prevent automated hacking attempts and other malicious behavior that could ruin your site. You can learn more about CloudFlare’s security features in this article.
We paid $20 a month for a CloudFlare pro account, but they also have a free account with almost all the same security features. I recommend that you start with this free account from the first day of your blog. I can say that since using CloudFlare we haven’t had any substantial security issues with any of our sites.
More than just security, CloudFlare can make your site blazing fast! You can read more about how to improve site speed in my article here.
Step 5: Add Standard Blog Pages
Before you start posting regularly and before you “launch” official needs to create some specific pages on his site. These are the pages that everyone expects to see when they visit your site. As a new blog, it’s important to convey a sense of legitimacy and trust. These pages can help you with that.
Disclosure, Privacy, and Comment Policy
If you ever want to make money from your blog, you’ll need some of these standard policies. In fact, Google requires that they be part of their Adsense program. Don’t overthink it, but make sure you follow the law. As an example, take a look at Abby’s “disclosure” page here: justagirlandherblog.com/disclosure
An awesome “About” or “About Me” page
It is has proven time and time again. Again, one of the most visited pages on your site by new visitors is your About page. People want to meet you! They want to meet the person behind the blog. Take some time to make this a fun, interesting, and engaging page on your site and then link to it directly in your menu.
For an example of an engaging about page, see Abby’s and then read this article on creating a compelling Lauren page on The Thinking Closet.
Contact Page
You want your readers (and eventually other businesses) to have an easy way to contact you. I recommend that you set up a dedicated “contact” page, either with an embedded form or just simple instructions on how to get in touch with you. Take a look at Abby’s contact page.
If you want to use an embeddable form for your “contact” page, consider using the free Typeform tool.
Step 6: Configure a custom form Blog Email Address
In this step, you’ll learn how to set up a custom email address to match your business name, as well as the best services for collecting email addresses and build your list.
Create a personalized email address with Google Apps.
Email is an important but often overlooked part of your new blog. You will soon want to email with other bloggers, brands and companies, and it is important to have a dedicated professional email address.
There are two options:
The easiest solution is to create a free gmail account with the name of your blog. For example: justagirlandherblog@gmail.com.
That’s not a bad solution, and many people can survive for years without a truly personalized email address. But remember, when you start building an email list and sending emails, you may want to have a professional, personalized address that matches your name.
The second option is to create an address email address that matches your domain. An example would be hello@justagirlandherblog.com.
The good news is that you can have a personalized email address and still use the familiar interface of Gmail… it’s called Google Apps for Business. I use it and I love it! The only downside is that it’s not a free option, but it’s worth paying $5 a month.
To get your personalized email address, go to google.com/apps and start from there. It walks you through the setup process.
The only confusing part is verifying your domain and adding the MX records. My favorite method of verifying the domain is to add a text record to your DNS (Google will show you how). For us that means changing a few things in our CloudFlare account. For others, that means logging into your hosting account and editing the DNS zone file. While you’re there, you’ll also want to add some MX records to your DNS zone file.
It’s not as hard as it sounds! Your domain registrar may have already created a tutorial to guide you through the process.
Related: How to Set Up a Custom Domain Email Address with Gmail
Start Collecting email addresses.
One of the biggest blogging mistakes Abby and I made was not collecting email addresses sooner. It wasn’t until a year after Abby started blogging that we got serious about building an email list.
Why do I need an email list?
1. Traffic. Email is a very reliable way to drive traffic to your site. You can use email to let new readers know about your best old posts and encourage your subscribers to read your new posts. If you can get a reader’s email address, you’re much more likely to convert them from a one-time visitor to a regular, loyal reader. Pinterest and Google are important sources of traffic, but they are sources that you do not control. Your email list is yours.
2. Marketing. Email simply drives better conversions than any other type of marketing (including social media). You may not have any plans to sell anything right now, but that day will eventually come and you’ll be so thankful you have an email list.
Set up your email list.
Instead of the WordPress Jetpack plugin that has an email subscriber option, I recommend opening a MailChimp account (free up to your first 2000 subscribers!) and integrating it with the Genesis eNews Extended plugin to create a subscription form that is designed automatically to match your blog layout.
If you have big plans for email or want to start using email courses and automation series right away, I recommend starting ConvertKit from scratch. beginning with his new blog. ConvertKit has been described as “the power of Infusionsoft with the simplicity of MailChimp”, and I totally agree with that statement! Abby and I both use and love ConvertKit.
An important principle to use when growing your email list is to offer your readers some sort of incentive to give up their email address. You want the offer to be so good and compelling that they can’t resist! With millions of bloggers, website owners, and retailers vying for people’s email addresses, “Join my free newsletter” is no longer a good enough incentive. However, if you offer your readers something that will fill a need in their life or solve a problem for them, you will see your list grow rapidly. Take a look at some of the posts on this site to get an idea of some of the forms and incentives we use on various posts and pages to get email subscribers. Those incentives have helped us grow our list to over 150,000 subscribers!
Step 7: Sign Up Social Media Accounts
In the early days of your blog, social media they can be a huge distraction. I recommend that you focus on building one or two social channels at a time before spending time growing your presence elsewhere.
Create key social media accounts.
Even if no If you don’t have time to focus on all your social media channels at once, it’s a good idea to register their names. I use a tool called Namechk to quickly search and find open usernames on the most popular social networks.
Note: For some of our favorite social media marketing tools and strategies, check out our tips article for blogs.
Step 8: Decide on a blog posting schedule
If all the other steps up to this point were of normal importance, this step is of the utmost importance! You simply won’t have a successful blog if you don’t spend at least 75% of your blogging time writing and posting high-quality content, especially when you’re just starting out. This is crucial, but it is also the hardest part. It’s hard to get into that creative mindset and write and post even when you don’t feel like it.
She posts great content on a regular schedule.
One of the things that made Abby’s success as a blogging was her relentless publishing schedule. She wrote even when she didn’t feel like it. She made a schedule and never missed a post no matter what.It didn’t matter if it was 10 p.m. m. and it hadn’t started, it just wouldn’t miss any posts. If you want to be successful, you need the same attitude.
Let’s talk about the ideal blog posting schedule.
When you first start your blog, you’ll want to build a library of posts with plenty of quickly so that readers have something to navigate when they arrive at your site. Once you have 10-15 strong posts, it’s a good time to develop a consistent posting schedule. I would say that being consistent with your posts is much more important than the number of times you post per week. When you post on the same days and times each week, you become part of your readers’ routines and they look forward to your new posts, making it easy to build a loyal following. The number of times per week you post is up to you. Think about how many useful, high-quality blog posts you can consistently produce, and make that number work for you.
The high-quality part is key! People are looking for posts that are useful and relatable. Make sure you add tons of value for your readers in every post you write. That being said, don’t be discouraged if your posts aren’t as pretty or polished as you’d like them to be from the start. Blogging is one of those things that takes practice – bloggers get better with time!
If you have a moment, you should go back and look at the first few posts from your favorite bloggers. They are most likely terrible! The difference between successful bloggers and unsuccessful bloggers is that successful bloggers stick with it. They spend hours upon hours honing their craft and getting a little better every day. They show up and continue to hit “publish” as they learn of their numerous failures. We have to stick with it and keep learning and improving to have that kind of success.
So what makes a quality blog post that others will love to read and share? There are many nuances to that question, but here are some ideas:
What makes a quality blog post?
Be helpful. Okay interpose. and your story in your posts, but you’re mostly writing for someone else. Is what you wrote useful? Will what you wrote make someone’s life a little better?
Answer questions. Answer specific burning questions in your niche and provide your perspective. You’ll be seen as a helpful resource to your readers.
Long posts are great. I’m always disappointed when a Pinterest image or post title catches my attention just to find out that it is a 250 word post with no depth. It’s okay to write long posts! Fluff is not good, but if your message needs 2000 words, that’s fine! Don’t be afraid of long posts.
Headlines are key. Plan to spend at least 20 uninterrupted minutes brainstorming headlines and headlines. People decide to click or not click on your posts mainly based on its title. That said, be careful not to fall into the trap of writing nothing more than click-bait articles with headlines that promise the world with content that doesn’t deliver.
Great post images are needed . for social traffic. Spend time creating eye-catching, Pinterest-sized images for each post. You don’t have to have Photoshop to do this! Look at free options like Canva and Pixlr. Original photography is great in certain niches, but you can also use free stock photos as a starting point for creating great post images. This Fizzle article has over 50 resources for finding free stock photography.
Tell stories. If it relates to the message you’re trying to get across, share a personal story. If you do this, over time, your readers will feel like they know you. They will have a personal connection to you and this will help you gain loyal readers.
Create helpful resources. Think about the posts you’ve bookmarked and saved over the years. … Most likely they were long guides or detailed resources on a specific topic. Think about creating something like this in your niche. Think about the type of posts readers will come back to again and again. These are the posts that keep getting traffic month after month.
Solve your readers’ problems. Pay attention to the problems facing readers in your niche. Observe what kind of comments they are leaving on social media. Is there a common problem that many of them face? Work hard to solve those problems and the traffic will come.
From the start I recommend that you keep a list of post ideas. You can do this in Evernote, a regular notebook, a Google doc or spreadsheet, or anywhere else. If a post idea catches your eye, take a minute to write it down. You want to have a bank of post ideas to fall back on when you’re not feeling creative.
Related: What Should I Blog About: 10 Ways to Discover Your Perfect Niche
Step 9: Promote Your Blog
As a new blogger, you need to find a good balance between content creation and content promotion. In the early days, it can feel like 75% content creation and 25% content promotion. Over time, as you build a library of 100+ posts, you may end up promoting your content close to 50% of the time.
Promote your content.
Remember that the La The world’s best promotional strategy won’t get you significant traffic if the underlying content isn’t useful and interesting. Promotion is great for drawing attention to your site, but great content is what will turn a casual visitor into a loyal reader.
Here are some effective promotion strategies that have worked for us. These strategies are particularly important in the early days of your blog.
1. Build relationships with other bloggers.
Make a list of 5-10 other bloggers who are a little more established than you. Commit to reading their posts and provide helpful feedback. You can’t just say “great post!” and hopes to attract attention. But over time, the blogger will notice you if you leave kind and helpful comments.
In addition to reading and commenting, commit to sharing their content on your social media accounts. Nothing says “thank you” like sharing a post on Facebook or Twitter. Over time, some of the bloggers on your list will start to take notice of you and may even promote some of your posts to their audience.
During Abby’s first year of blogging, she committed to commenting on 5 blogs each day, for a total of about 35 blogs per week. Many of those bloggers are now some of her closest friends on her blog. She has guest posted for some top bloggers and was even a contributor to another blogger, simply because she took the time to constantly interact with bloggers she admired both on her blog and on social media.
2. Join a community.
One of the best strategies for getting your name and her blog out there is to join a Facebook or Slack group of like-minded bloggers. It takes a bit of effort, but eventually you will find your “tribe”. These are bloggers you resonate with and enjoy interacting with. Over time, you’ll become friends with them, and when there’s an opportunity to collaborate, they may ask you to join.
Please remember that the way to get noticed in these communities is to be as useful as possible. possible. Don’t join a Facebook group and start posting links to all your content. Instead, answer questions and join existing conversations. Posting links to your posts right away is like walking into a party and yelling, “Look at me! Look at me!”
Related: Why it’s better to blog as a community
3. Pinterest
For many bloggers, Pinterest is by far the biggest source of traffic on a day-to-day basis. You’ll want to set up a Pinterest account for your blog as soon as possible and start pinning high-quality pins that are relevant to your blog’s niche.
When Abby started growing her following on Pinterest, she was going to larger blogger accounts in your niche and check out a couple of things. First, it would look at who they were following and who was following them, and it would follow those people as well. Not everyone followed her, but many did, and her following began to grow.
While visiting the Pinterest profiles of the biggest bloggers in her niche, Abby also looked at the boards of group they were a part of. Group boards allow you to display your posts to an audience larger than your own, so you’ll want to find several to join in your niche. When Abby found group boards in her niche (through other bloggers’ profiles), she clicked on them, and there were usually instructions to join in the board description if they accepted new pinners. You would request to join, and eventually you had a plethora of group boards that you could use to share your content.
Understand the basics of SEO.
SEO (Search Engine Optimization) is an interesting topic. The idea is to heavily optimize your posts so that they show up near the top of Google search results for various keywords and phrases.
There is legitimate SEO out there in my opinion and also not legit SEO. Non-legitimate SEO attempts to find loopholes in Google’s search algorithm and then exploit those loopholes. Many times these strategies work for a while, but then Google catches on and updates their algorithm and penalizes sites that use these strategies.
Legitimate SEO strategies, on the other hand, are only the best. practices for the format of publications. , use of keywords and title tags. If you’re focusing on creating quality content and writing easy-to-read posts that are helpful to people, SEO will fall into place. All your SEO needs can be achieved with the amazing and free Yoast SEO plugin for WordPress.Install it, understand it and use it. That’s it!
Step 10: Make Money Blogging
For the first few months you’re blogging, your main focus should be creating amazing content and building relationships with other bloggers. Once you’ve settled into a routine and feel like you have this blogging thing under control, you can consider making some money or “monetizing” your blog.
How to make money with your blog (monetize)
1. Ad Revenue
Use Google Adsense or other ad networks to display ads on your site. To earn significant revenue, your traffic numbers must be high.
2. Affiliate Links
Promote various products on your site and earn revenue if a reader clicks on one of your links and makes a purchase.
3. Sponsored Posts
Team up with a company and earn money to promote their products. You’re typically paid “per post,” unlike affiliate links, which require you to make a sale to get paid.
4. Digital Products
This is potentially the most lucrative income category. It is also the most time consuming to create and sell your own digital products. Digital products include eBooks, courses, printable webinars, and email courses and payments.
Abby and I have taken the “diversify” approach when it comes to blog revenue. We started with Google Adsense, then added some affiliate links to the site, tested some sponsored posts, and finally created our own products.
If you want to learn more about blog monetization strategies or turn your blog into a business, you can read our in-depth article.
To see firsthand the exact monetization strategies that Abby and I use, you can read some of our previous revenue reports.
Conclusion
Whew! That was a lot! Starting a blog may seem pretty straightforward from the outside, but when you get into it, there’s a ton of work that goes into setting up, promoting, and managing a blog. However, it is not impossible. Donnie and I are completely normal people. None of us have business or marketing degrees; mine is in english and yours is in political science. But we were both willing to jump in with both feet, learn all we could, and work harder than ever in our lives. And today we get to do our dream job, work together at home while spending a lot of time with our two young children. That could be you one day too!
And be sure to visit our blogging tips page for more articles, resources, and blogging courses.
If you’re still reading, definitely you deserve some kind of medal or something! 😉 Thank you very much for continuing with us. We can’t wait to see what you do with your blog. Go out and get it!
This post contains affiliate links. For more information, please see our disclosures here.
The images below are from an earlier version of this article.
.