Have a great idea for a membership site? Wondering how to start a membership site in the easiest way possible to start generating income from your content, podcasts, courses, forums, or any other type of content you can dream of?
Start a Membership site is a very popular online business model for entrepreneurs, and for good reason. Paid online courses, premium support forums, and webinars are among the most profitable sites on the Internet. And the best way to set one up is with WordPress!
In this article, we’ll show you step-by-step how to easily create a membership website with WordPress.
How to Starting a Membership Site in 9 Easy Steps
- Choose the Right Platform for Your Membership Site
- Set Up Your WordPress Membership Site
- Set up your membership plugin
- Add payment methods
- Add membership levels
- Set up access rules for your membership plans
- Create members-only content
- Create a pricing page
- Add registration and login forms
Step 1: Choose The Right Platform for Your Membership Site
The first step in starting a membership site is choosing the right website platform. While there are many generic website builders on the market, you’ll need a membership platform with functionality that specifically meets your needs.
Some of the most important features you’ll need for your membership website are:
- Membership Management: Option to create different types of memberships and add and manage members
- User registration and member profiles : Interface options for your users to register or log in to your site, and to access your members area
- Content Restriction: Hide options your content exclusive to the public
- Payment Options: options to integrate payment gateways to accept online payments by credit card, PayPal, Google Pay and many more for paid memberships
You can add these features on almost any platform; however, many will require some technical skills, except for one: WordPress.
Fortunately, WordPress is one of the best website builders for small business, and it comes with an easy way to create membership websites. By using powerful WordPress membership plugins, you can quickly set up a membership site and start selling with little to no technical skills.
There are many free and premium membership plugins out there, so it can be difficult to choose the right one to use to start your membership site. However, there is one that stands out among the rest: MemberPress.
In this article, we will use the MemberPress plugin to create a membership website. It is the best and most popular membership website builder for WordPress.

MemberPress comes with many advantages and advanced features that allow you to create multiple membership levels, restrict access to content, accept payments and more. Plus, it integrates well with email marketing services and other useful tools like bbPress and Easy Affiliate.
That being said, let’s get started setting up your WordPress membership website.
Step 2: Starting Your WordPress Membership Site
In addition to a membership plugin, you will need a domain name, a web hosting account, and an SSL certificate to create a WordPress membership site.
A domain name is the web address of your membership site, for example, monsterinsights.com or google.com. A web hosting account is where your website files are stored online. Also, an SSL certificate is required for secure transactions.
You can buy a domain name for around $14.99 per year, web hosting for $7.99 per month, and an SSL certificate for $49.99 per year.
If you add these amounts together, the total cost would be very high, especially if you’re a beginner without a big budget.
Fortunately, Bluehost offers an exclusive deal to our customers. Now you can enjoy a 60% discount on WordPress hosting, get a free domain, and get a free SSL certificate along with it. That means you can get all 3 essentials for just $2.75 per month.
Bluehost is one of the oldest and most popular web hosting companies in the world. They are officially recommended by WordPress.org and the world’s most popular unofficial WordPress resource website, WPBeginner.
To get started, you need to choose a domain name and sign up for your hosting account. Once this is done, the next step is usually to install WordPress; but you won’t need to do it manually because it comes pre-installed in your Bluehost account.
So, the next step is to install and configure your membership plugin. Let’s do it now.
Step 3: Set Up Your Membership Plugin
As mentioned above, we’ve chosen the MemberPress plugin for this tutorial.
First, you’ll need to install and activate the MemberPress plugin.
MemberPress has three levels for you to choose from: Basic, Plus, and Pro. Choose the one that is best for your membership site. After making your purchase, install and activate the plugin.
For detailed instructions, see this guide on how to install a WordPress plugin.
Once the plugin is activated, you will see a notification bar with a link to the plugin options page to configure it.

Simply click the ‘options page’ link and it will take you to your options page from Member Press. Alternatively, you can go to MemberPress » Options to access plugin settings.

From this page, you can configure all your plugin settings.
Step 4: Adding Payment Methods
It’s very important to make sure you have all your payments set up and ready for new members to get started easily. Click the ‘Payments’ tab on the Options page to set up payment gateways for your membership website.

MemberPress, by default, allows you to use PayPal (Standard and Express), Stripe, and Authorize.net as your payment gateway. You can configure one or more gateways for your website.
Step 5: Add Membership Levels
Once you have configured the settings, the next step is to add Membership Levels that people can buy. Whatever your membership model, MemberPress allows you to create unlimited membership levels, each with different pricing, features, and access to content.
Go to MemberPress » Memberships from the your dashboard menu and click the ‘Add New’ button.
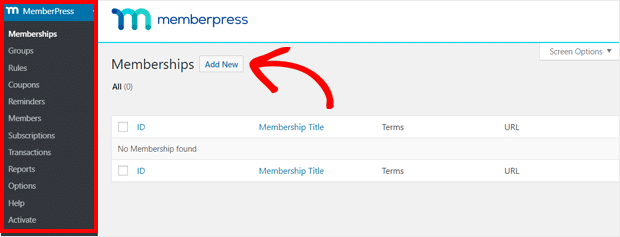
On the next screen, you will see a page similar to the classic WordPress editor. On this page, you can create a membership level.
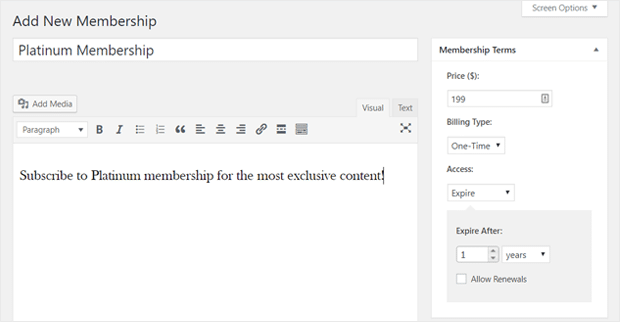
Enter a title and add a description for your membership level in the editor. Next, set the price, choose a billing type, and set an access time or expiration date in the “Membership Terms” section on the right side of the page.
After that , scroll down to the “Membership” section. Options section to configure registration, permissions, pricing table and more.
Once you have configured all the settings, go ahead and post your membership level.
Step 6: Setup Access rules for your membership plans
Now that you’ve created membership levels, the next step is to set up rules to define what content can be accessed for those different membership levels.
Go to MemberPress » Rules and click the ‘Add New’ button.

In the next screen, you can create a new rule to link your content to membership levels.
For example, you can select all co Content in a particular category so that it is accessible to users with a specific subscription plan.
p>

In the screenshot above, we have selected all the content in the ‘Advanced WordPress Guide’ category to be available only to members with a Platinum or Gold subscription plan.
Next, you’ll see the ‘Drip/Expiration’ box. Enabling the drip option will allow you to gradually release content; while the expiration option will allow you to choose the time in which the content will stop being available.

Once you have set all the options, save your rule. You can create more rules by repeating the same steps.
Step 7: Create member-only content
The next step is to create member-only content.
Member-only content refers to private content that is not accessible to the general public and is available only to registered members. Your private content can be downloads, courses, forums, and more.
You can add content with posts or pages, just like you would on a typical WordPress website. Next, we’ll create a post with the ‘Advanced WordPress Guide’ category to match the rule we created in the last step.
Simply create a new post and add content to it. Then select the ‘Advanced WordPress Guide’ category.
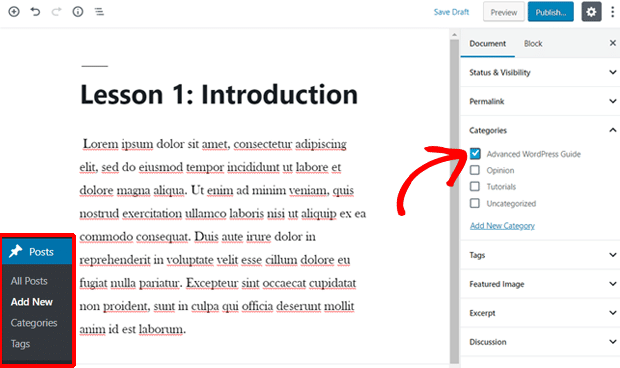
After that, scroll down to the ‘Unauthorized MemberPress Access’ section. You can configure what non-members (non-registered users) will see when they try to access this content.

Once you’ve added your content and set everything up, you can publish your page. After that, you can visit Posts » All Posts and see what content is protected for certain membership holders.

With MemberPress, you can also create online courses with the built-in courses Add. You can easily create your course syllabus with the visual online course builder, in a process similar to the steps above.
Note: If you offer downloads within your private content area, make sure you set up download tracking to track each piece of content.
Make sure any new content you create in the future is created in the same way.
h3>Step 8: Create a Pricing Page
Next, you’ll need to create a pricing page where your site visitors can choose a membership plan and sign up for that plan. The MemberPress plugin allows you to easily create a pricing page using your group options.
Visit MemberPress » Groups from your admin panel and click the ‘Add New’ button .
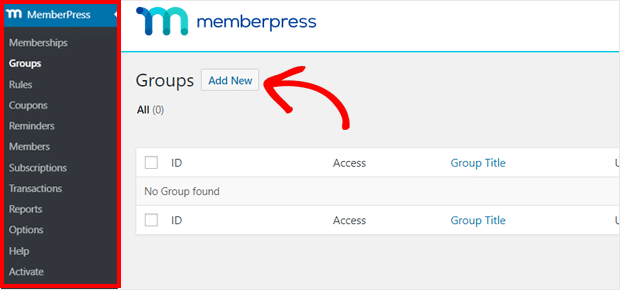
Enter your group title first. You can name it ‘Pricing Plans’ or something similar because it will ultimately serve as your pricing page.
Next, scroll down to the ‘Group Options’ section and add the memberships you want to display on your pricing page Choose the theme of your pricing page as well.
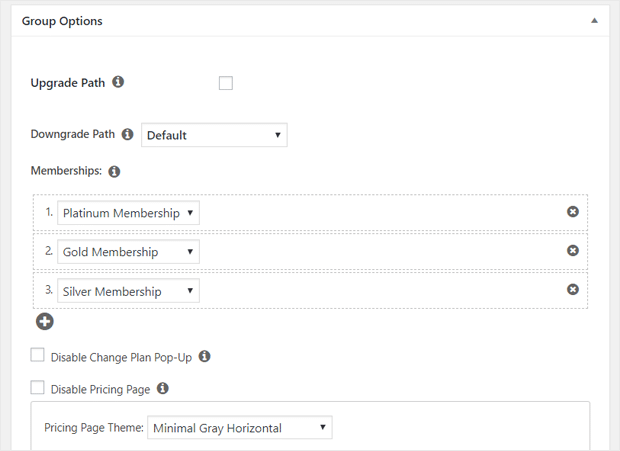
Once you have set all the options, click the ‘Publish’ button.
If you want to see what your MemberPress page looks like prices, you can preview. This is how a MemberPress pricing page will appear in the default Twenty Nineteen theme:

After that, you’ll need to direct unauthorized users (non-members) to the pricing page .
Visit the MemberPress » Groups page and copy the URL of the group you created earlier.

Then go Go to the MemberPress » Options page and go to the ‘Unauthorized Access’ section.
Now, check the box next to ‘Redirect unauthorized visitors to a specific URL’ and then paste the group url you copied earlier.
After that, click on the “Update Options” button at the bottom. Now your unauthorized visitors and non-members will be redirected to your pricing page whenever they try to access your hidden premium content.
Step 9 – Add registration and login forms
Now I have everything set up, the final step is to add registration and login forms to your site. The MemberPress plugin allows you to easily create a website with user accounts and profiles.
First, you can add a user login form using a widget. Go to Appearance » Widgets from your admin panel and add the ‘MemberPress Login’ widget to a widget-ready area.
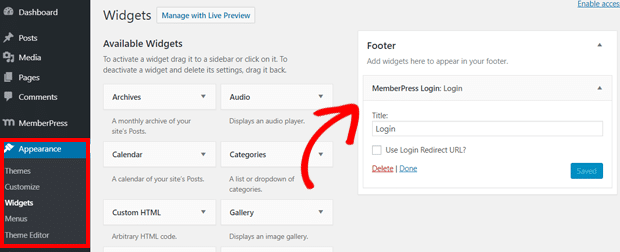
Next, you’ll need to add your pricing page URL to your navigation menu so your website visitors can sign up for a membership plan.
Visit the Appearance » Menus page from your dashboard. Create a new menu or choose an existing menu. Next, select ‘Pricing Plans’ under the ‘Groups’ tab and then click the ‘Add to Menu’ button.

Once your pricing page appears below the menu structure, you can drag it to rearrange its position. Once satisfied, don’t forget to save your menu.
That’s it! Now you can open your website and preview it in action, and advertise your new membership site on social media platforms, through email marketing, and any other marketing channels you own.
Optimizing Your WordPress Membership Website for Growth
Now that you’ve figured out how to start a WordPress membership website, your next task is to optimize it for more traffic and more transactions. Fortunately, there are many of the best WordPress plugins and tools to help you out.
You can use the following plugins and tools to grow your membership website:
1. MonsterInsights: The best Google Analytics plugin for WordPress. You can use this plugin to get comprehensive information about your users and eCommerce transactions. Are your campaigns and content marketing working? Find out with Analytics.
2. OptinMonster: The best lead generation software on the market. It helps you build your email list faster and increase your website conversions.
3. WPForms: The best WordPress form builder plugin available. You can use this plugin to create a simple contact form, as well as interactive polls and conversational forms.
4. All-in-one SEO – The best WordPress SEO plugin that helps you optimize your new site, rank in search and reach your target audience.
If you want to add more features to your website, check out our full list of must-have WordPress plugins and tools for business websites.
Want to add Google Analytics to your site too? Check out How To Add Google Analytics To WordPress (The RIGHT Way).
We hope this article helped you create a fully functional membership website that makes money. You can also read our guide on how to create a landing page in WordPress (step by step).
And don’t forget to follow us on Twitter, Facebook and YouTube for more helpful reviews and tutorials. and Google Analytics suggestions.
.
