An average employee spends 1/3 of their office time on email. At $142k (average Bay Area tech worker salary), we pay employees $47k per year to manage their inboxes!
That’s not even the worst part. every time you stop what you’re doing to check your email, it takes about 23 minutes to regain focus.
The ugly truth is that people will keep looking for you whether you like it or not. and it’s not very easy to ignore that unread popup.
You spend hours going through emails, figuring out what to do with them, and dealing with them eventually; you basically end up spending a lot more time in your inbox than you originally planned.
When you can’t completely escape but still want peace of mind, getting more organized is the best way out.
This post will tell you how to organize your gmail inbox so that it is more of a productivity and collaboration tool and not a distraction.
index
- 1. put the most relevant emails at the top
- 2. remove tabs you don’t use much
- 3. use tags to organize gmail neatly neat
- 4. automate emails to be assigned to your team (no forwarding)
- 5. stop writing emails for internal conversations
- 6. archive emails you don’t need in the near future
- 7. use filters to automate common actions
- 8. experiment with advanced gmail (you’d love multiple inboxes)
- 9. set desktop notifications for new emails
- 10. turn on nudges
- 11. highlight important messages
- 12. mute conversations
- 13. use gmail’s smart reply and smart compose options
- 14. reply to emails faster with standard replies
- 15. enable undo send
- 16. enable hover actions
- 17. postpone emails for later
1. put the most relevant emails at the top
do you really need all the new emails at the top of your inbox? I’m sure you don’t read them all at once.
A great way to keep your inbox organized is to put relevant emails at the top, like those marked as important or starred.
gmail offers you five options to organize your inbox.
-
- Go to your settings (the gear icon at the top)
- Click the dropdown menu next to the inbox type.
and this is what each of them means:
default – Shows emails in the order they came in, the layout we see every day.
important things first: Gmail uses its own prediction to determine which emails are important and places them at the top of your inbox with a yellow marker. everything else goes below that.
unread first – This setting shows unread emails on top of recent emails. This is especially useful if you use the read/unread task list.
Featured First – This is for those of you who use stars to prioritize your inbox. starred messages appear first, followed by everything else.
Priority Inbox: Gmail learns what types of emails you interact with the most and puts them at the top of your inbox. This is great for people who have to deal with a lot of email every day.
This is one of those gmail organization tips that I can attest to. It has worked wonders for me in terms of keeping out emails I don’t want to deal with right away.
2. get rid of lashes you don’t use much
it is not necessary to have all five tabs within gmail. you can disable the ones you don’t use much. the only tab you can’t disable is the main tab.
This is what you have to do:
-
- click settings.
- from the dropdown menu, click configure inbox
- select the tabs you want to enable or disable.
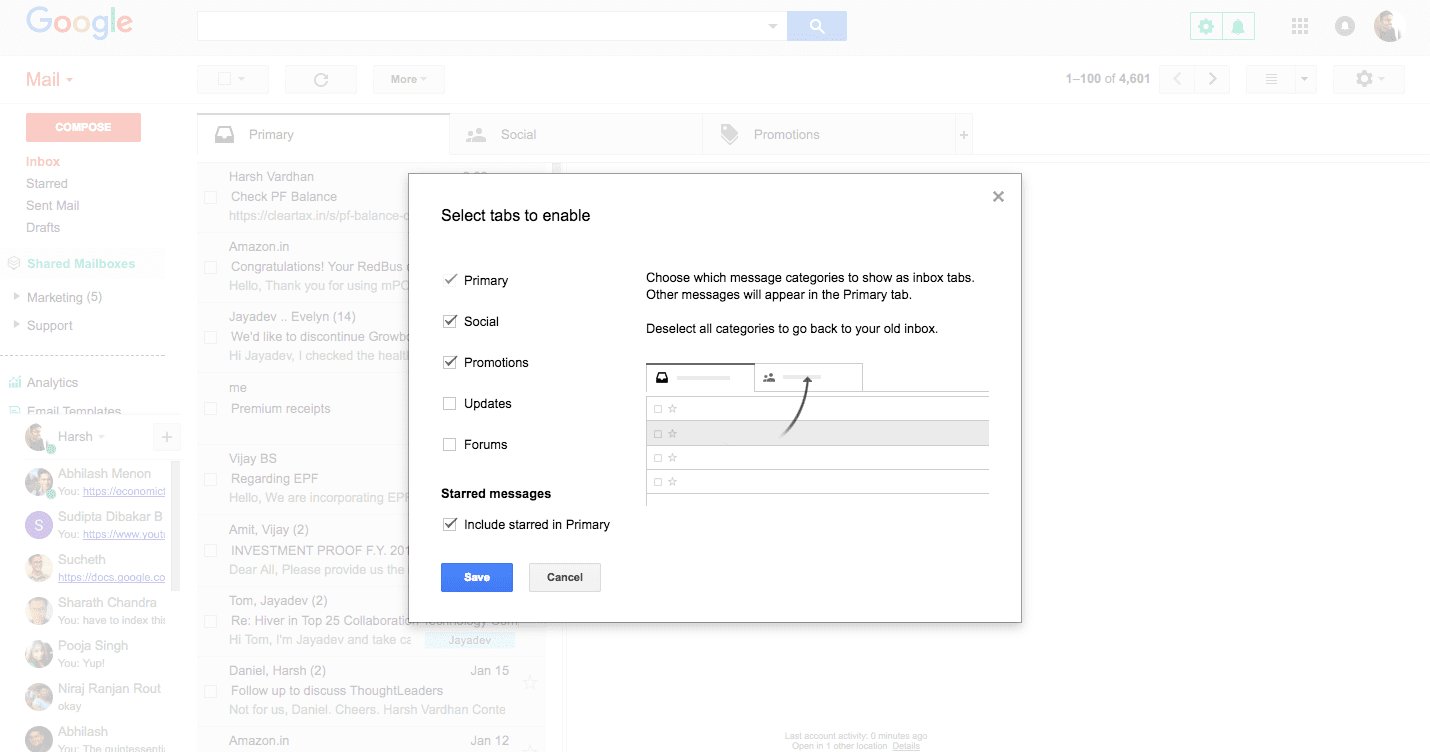
How to disable a tab in Gmail Pay careful attention here: If you disable a tab, its messages will appear in the Primary tab. Always remove the ones which do not receive many emails. One up for Gmail organization!
3. use tags to organize gmail neatly
gmail is a tag-based system. inbox, trash, drafts: these are technically labels.
Labels are a great way to organize gmail. they are like labels that you can add to the emails you send or receive. the good thing is that you can add more than one label to an email. Another feature that you would love is the ability to add colors to the labels.
You can also have Gmail apply labels to emails as they arrive, saving you the manual effort. for example, you can have all of your lawyers’ emails tagged as documents. all you have to do is create a filter.
recommended reading
4. Automate emails to be assigned to your team (without forwarding)
a lot of emails you receive require someone else on your team to work on them.
The usual course of action when you want to organize gmail is to check emails and forward them to teammates, an absolute waste of time.
If you delegate a lot of email to your team, you should try hiver. you will be able to specify conditions based on which emails will be automatically assigned to your teammates.
For example, let’s say you have a teammate who handles all emails from your shipping partner. Using hiver, you can have all incoming emails from your email address automatically assigned to them.
You also have the ability to specify multiple conditions, such as the sender’s email and a specific word in the subject line. the possibilities are basically endless. try it
5. stop writing emails for internal conversations
The only way all of us flood our and our teammates’ inboxes: Send emails for things that could very well be done otherwise.
If a topic has many aspects that will need to be explained or discussed, bring it to a personal meeting. in case of last minute cancellation of meetings, appointments or interviews, inform them in person or use the phone.
if nothing else seems doable enough, there’s one resource that works perfectly every time: email notes.
notes are messages you can write to your teammates and appear right next to the email thread you’re discussing (unlike slack or hangouts where you have to tell people which email you’re talking about and what happened and all that).
unlike chat, you can always go back and see what you discussed in a thread, you never lose context.
You can use notes to exchange client information, offer advice, or basically anything that doesn’t involve writing a full story. every step to unclog your inbox is worth it.
6. Archive emails you don’t need in the near future
Many times, we don’t delete emails just because we might need them later. and then they keep piling up like there’s no tomorrow.
for example, every time you buy something from a supplier, they send you a receipt. you don’t need them now, but they can come in handy when you’re doing your math at the end of the year. this is where the archive feature comes in.
Archiving doesn’t delete your email, it removes it from your inbox. they are also searchable. your gmail inbox is better organized. everyone wins!
select an email and look for the file-like icon at the top. click on it and voila.
you can also automate archiving using filters; I explain it in the next point.
7. use filters to automate common actions
gmail has great filtering capabilities. you can filter emails by subject, sender, recipient, content, and more. once you’ve filtered messages, you can tell gmail what to do with them: label them, set priorities, decide whether emails get to your inbox.
what you will love is the automatic filtering. you can set criteria and actions: gmail automatically treats all emails that meet the criteria.
all you have to do is start an advanced search. click the gray arrow on the far right of the search bar.
and a drop-down menu opens.
type an email address and click “create filter with this search” at the bottom right of the pop-up window.
for example, if you get a bunch of newsletter emails that you don’t care about, you can create a filter that will automatically archive all emails coming from that address.
ways you can use filters to organize gmail:
-
- star all emails from someone important (eg your bank)
- automatically forward emails from a certain address
- archive emails containing a certain word (say free trial)
recommended reading

8. Experiment with Gmail Advanced (you’d love Multiple Inboxes)
if you’re new to gmail advance (formerly labs), the first thing you should know is that it’s a testing ground for google. the ones that are successful become standard gmail capabilities and others may be shelved, but definitely worth a try.
The feature that has been a part of gmail advanced for years is multiple inboxes. allows you to create multiple panels, each designed to display a certain category of emails, based on email type, subject, or personal preference.
You can have emails from a particular sender, or emails carrying a certain label appear in a separate mailbox.
For example, you can add tags like Needs Response, To-Do, Project To-Do, and Weekly Reading – all emails with a particular tag appear in the respective inbox:
here’s a helpful video if you’re looking to organize gmail using multiple inboxes.
9. configure desktop notifications for new emails
If you have a customer support role, we’re pretty sure you get a lot of emails every day. If you prefer real-time engagement, we highly recommend setting up desktop notifications. this way, you’ll see pop-up notifications at the top right of your screen every time you receive a new email.
To enable desktop notifications, here’s what you need to do:
-
- go to your settings (the gear icon at the top)
- in the general settings menu, scroll to ‘desktop notifications’ and click on the radio buttons to activate them
Pro Tip: Sometimes desktop notifications can get annoying and distracting. To avoid falling into this trap, turn on desktop notifications for emails marked as “important”.
10. activate shoves
Thanks to a ton of spam emails, it’s often very easy to miss an important email in gmail. nudge is an algorithm in gmail that returns emails to the top of your inbox when you or a recipient have not sent a reply. It’s great if you need constant reminders to send replies or follow up on important emails.
nudges in gmail are of two types:
-
- Suggest emails to reply to: Emails you may have forgotten to reply to will appear at the top of your inbox.
- suggest emails to follow up: sent emails that you might need to follow up on will appear at the top of your inbox
you can turn nudges on or off in the “general” tab of your settings.
11. highlight important messages
gmail always tries to do its best to detect which emails (both individual messages and threads) are more important to you than others. it usually highlights them with “importance markers” (a yellow arrow right next to the star).
Until recently, gmail had in-app flags that made it clear why an email was marked as important, as opposed to “important according to our magic sauce” it says now.
While gmail, for the most part, still manages to mark most important emails correctly, there are times when it still manages to get it wrong.
For the algorithm to work best for you, be sure to tag important messages yourself; this way the algorithm will eventually figure it out quickly. one way to do this is to manually add/remove importance markers. another way to do it is by highlighting messages.
In gmail, stars are used for individual messages in a single thread, while importance markers are used for entire email threads. Stars and importance markers also help you organize gmail searches more quickly, so it’s definitely worth taking the time to add them.
12. mute conversations
If you’re tired of getting caught up in email conversations between co-workers/clients that don’t necessarily involve you? then the “mute conversations” feature in gmail is just for you.
Mute a conversation in gmail and you won’t see any more messages related to it in your inbox. All emails added to the conversation after you’ve muted it will still be stored in your gmail account, but will be automatically archived. you will still be able to search the conversation and view new messages.
To mute a conversation in gmail, open the conversation, then click the “more” dropdown menu. choose “mute” from the list and the conversation will be archived.
Any new messages sent to the thread will not appear in your inbox, but will be added to the archive.
pro tip: To find muted conversations faster, type “is: muted” into the gmail search bar.
You can always unmute a conversation. To unmute, simply find the muted conversation and remove the “muted” tag from the email thread.

13. Use Gmail’s Smart Reply and Smart Compose options
gmail’s “smart reply” feature displays suggested replies with short sentences based on the content of the email you received.
You can enable smart reply for gmail from the general settings tab.
Using this feature, you can click on the suggested short phrases you want to use as a response and submit them as is, or edit the response before clicking submit.
This is especially useful if you need to send quick responses to your emails.
Smart Compose builds on the idea of Smart Reply, but helps you write full responses to your emails instead of just short sentences.
You can turn on smart compose from the general settings tab in gmail.
pro tip: use the smart compose customization option to allow the smart compose option to adapt to your writing style and improve writing suggestions.
You can turn on smart compose customization from the general settings tab in gmail.
14. respond to emails faster with canned responses
If you find yourself writing the same type of email responses to multiple clients or co-workers, you should consider setting up canned responses (templates).
canned responses are email templates that allow you to reply to emails with default text.
Blogger Ryan Robinson regularly receives questions from his readers and uses this feature to quickly share helpful tips, direct them to free resources on his site, and send links to guides (like his tutorial on starting a blog). to continue learning.
you can enable templates from the ‘advanced’ tab in gmail settings.
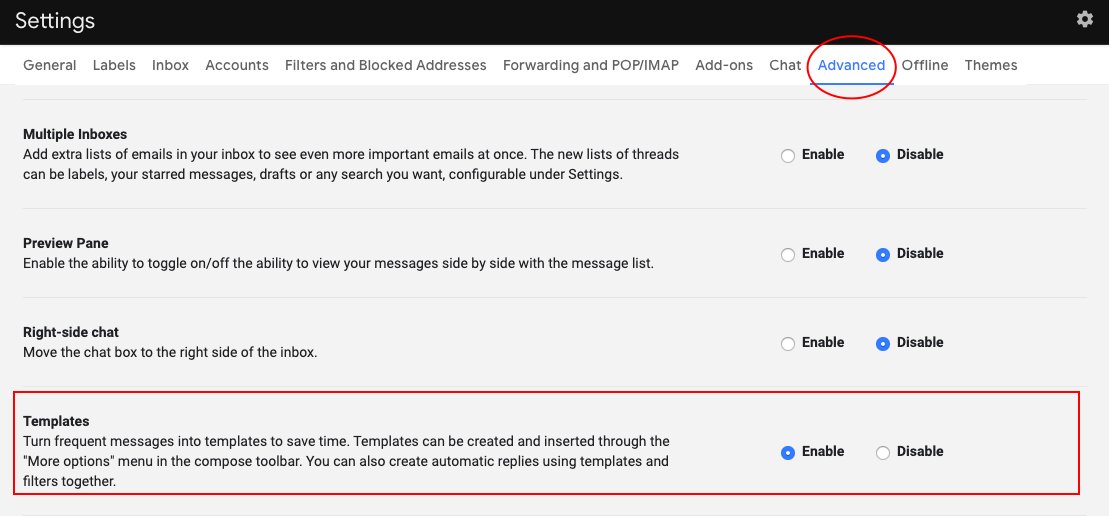
Enable the Templates option from the Advances tab 15. Activate Undo Send
this has to be one of the most useful features of gmail. If you’ve ever sent an email to a spam recipient or made a typo in an email, you’re no stranger to the unfortunate embarrassment caused by your mistake.
Fortunately, gmail has an unsend option that allows you to “unsend” emails up to 30 seconds after they’ve been sent.
You can enable this option from the general settings tab in gmail settings.
After you enable this, you don’t have to panic about a wrong recipient or a typo. instead, you now have five to 30 seconds to “unsend” your email and take action to correct your mistakes.
16. enable hover actions
With the new look and feel of gmail introduced in April 2018, gmail introduced scroll actions. hover your mouse pointer over any email in your inbox and you’ll see a collection of buttons.
These buttons, also called “floating actions,” allow you to quickly act on an email with a single click. you can archive emails, delete them, mark them as unread, or even snooze them. is a small feature that makes interacting with emails much faster.
scroll actions can be activated from the general tab in gmail settings.
17. postpone emails for later
Speaking of scroll actions in gmail, you now also have the option to snooze emails. this option deletes emails from your inbox only to retrieve them later, which is perfect for anything you need to act on eventually but can’t act on right now.
The functionality is simple: just click on the snooze feature and choose when you want to see the email again. when the timer runs out, the message reappears in your inbox.
some tools to get you started
Below are some tools to help you get started with organizing your gmail, keep in mind that it’s usually a good idea to have a small business project management tool that integrates with your gmail to help you organize your emails and tasks.
hiver: Delegate emails and chats as tasks automatically. write notes (and not emails) for internal conversations. use email templates.
sanebox: prioritize and summarize messages by parsing their headers. archive unimportant emails with the ‘sanelater’ tag so you can deal with them later.
maildrop: helps you stay away from spam.
unroll.me: Helps you manage all your newsletters from one dashboard. makes unsubscribing surprisingly easy.
awayfind: allows you to decide which emails deserve a notification. You can choose to receive information by SMS, phone call, desktop alert or the awayfind app.
conclusion
Distractions at work take up more time than you think. they derail your mental progress and it takes a while for your brain to refocus. Since emails are a huge source of distraction at work, it’s only natural to do something about it.
You’d be surprised how much time you can free up by better organizing your gmail.
don’t let your inbox take over.