The tutorial explains how to perform a mail merge from an excel spreadsheet for labels. You will learn how to prepare your excel address list, set up a word document, make custom labels, print them and save them for later use.
Last week we started looking at word’s mail merge capabilities. Today let’s see how you can take advantage of this feature to create and print labels from an excel spreadsheet.
- excel mail merge tags
- prepare excel spreadsheet for mail merge
- set up word mail merge document
- connect to excel address list
- select recipients
- organize mailing labels
- preview labels
- print mailing labels mail
- save tags for later use
how to combine match tags from excel
If you’ve had a chance to read our Mail Merge tutorial, a larger part of the process will be familiar to you because making labels or envelopes from Excel is yet another variation of the Word Mail Merge feature. Whatever intricate and intimidating the task may sound, it boils down to 7 basic steps.

Next, we’ll take a closer look at each step with Microsoft 365 for Excel. the steps are essentially the same in excel 2021, excel 2019, excel 2016, excel 2010, and very similar in excel 2007.
step 1. prepare the excel spreadsheet for mail merge
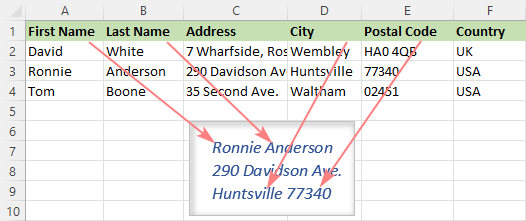
Essentially, when you transfer mail merge labels or envelopes from excel to word, the column headings in your excel sheet become mail merge fields in a word document. a merge field can correspond to an input such as first name, last name, city, postal code, etc. or you can combine multiple entries, for example the “addressblock” field.
Microsoft Word will be pulling out the information from your Excel columns and placing it into the corresponding merge fields in this way:
Before starting a mail merge, spend some time setting up your excel spreadsheet to make sure it’s structured correctly. This will make it easier for you to organize, review, and print your mailing labels in word and save more time in the long run.
here are some important things to check:
- Create one row for each recipient.
- Give clear and unambiguous names to your Excel columns such as First Name, Middle Name, Last name, etc. For address fields, use the full words such as Address, City, State, Postal or Zip code, Country or Region.
The screenshot below shows a list of the Address block fields used by Word. Giving identical names to your Excel column will help Mail Merge to automatically match the fields and save you the trouble of mapping the columns manually.

step 2. configure the mail merge document in word
with the excel mailing list ready, the next step is to set up the main mail merge document in word. the good news is that it’s a one time setup: all tags will be created at once.
There are two ways to perform a mail merge in word:
- mail merge wizard. provides a step-by-step guide that may be helpful for beginners.
- mailing tab. if you’re pretty comfortable with the mail merge feature, you can use the individual options on the ribbon.
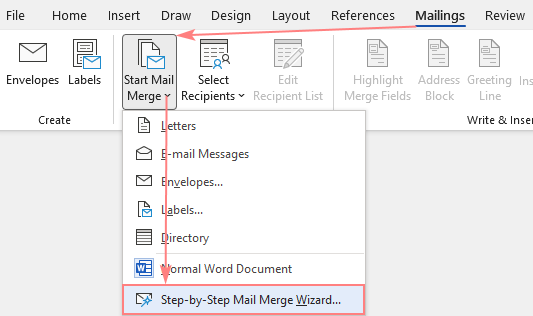
To show you an end-to-end process, we’re going to combine the address labels using the step-by-step wizard. also, we will indicate where to find the equivalent options on the ribbon. so as not to confuse you, this information will be provided between (parentheses).
- Create a Word document. In Microsoft Word, create a new document or open an existing one.
- Start mail merge. Head over to the Mailings tab > Start Mail Merge group and click Step by Step Mail Merge Wizard.
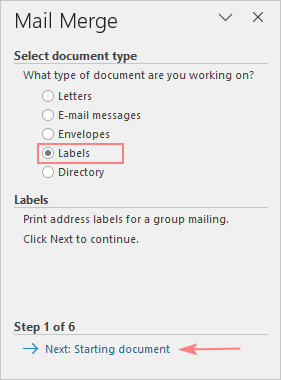
- Select document type. The Mail Merge pane will open in the right part of the screen. In the first step of the wizard, you select Labels and click Next: Starting document near the bottom.
(Or you can go to the Mailings tab > Start Mail Merge group and click Start Mail Merge > Labels.)
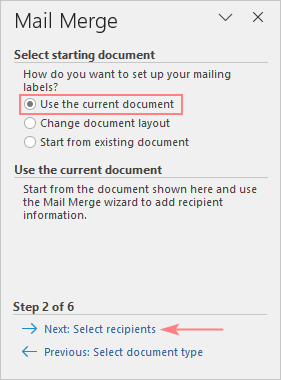
- use current document – start from the currently open document.
- change document layout – start from an out-of-the-box mail merge template that can be further customized to your needs. needs.
- start from existing document: start from an existing mail merge document; you will be able to make changes to its content or recipients later.
As we are going to set up a mail merge document from scratch, we select the first option and click Next.
- printer information: specify the type of printer.
- label information: define the supplier of your label sheets.
- product number: choose the product number indicated on a package of your label sheets.
If you are going to print Avery labels, your settings may look something like this:

When you’re done, click the OK button.
step 3. connect to excel mailing list
Now it’s time to link the word mail merge document to your excel address list. in the mail merge panel, choose the use an existing list option on the selected recipients, click browse… and navigate to the excel spreadsheet you have prepared.
(Those of you who prefer working with the ribbon can connect to an Excel sheet by clicking Select Recipients > Use an Existing List… on the Mailings tab.)

The Select Table dialog box will pop up. If you have given a name to your mailing list, select it and click OK. Otherwise, select the entire sheet – you will be able to remove, sort or filter recipients later.

step 4. select recipients for mail merge
The Mail Merge Recipients window will open with all the recipients from your Excel mailing list selected by default.

These are some of the actions you can take to refine your address list:
- To exclude a particular contact, clear the checkbox next to their name.
- to sort the recipients by a column, click the column header, and then choose to sort ascending or descending.
- To filter the list of recipients, click the arrow next to the header column and choose the desired option, e.g. blanks or no blanks.
- for advanced sorting or filtering, click the arrow next to the column name, and then select (advanced…) from the dropdown list.
- some additional options are available in the refined recipient list section near the bottom.
When the list of recipients is ready, click Next: Organize your labels in the panel.
step 5. organize the layout of the address labels
Now, you need to determine what information to include on your mailing labels and decide on their design. It does this by adding placeholders to the word document, which are called mail merge fields. when the merge completes, the placeholders will be replaced with the data from the excel address list.
To organize your address labels, follow these steps:
- In your Word document, click where you want to insert a field, and then click the corresponding link on the pane. For mailing labels, you’d normally need only the Address block.
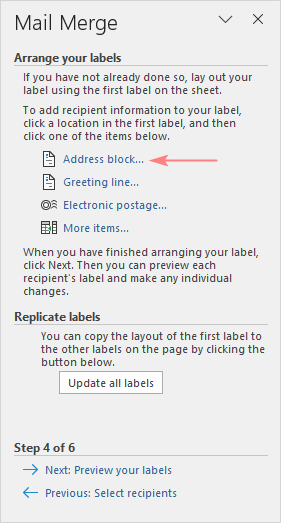
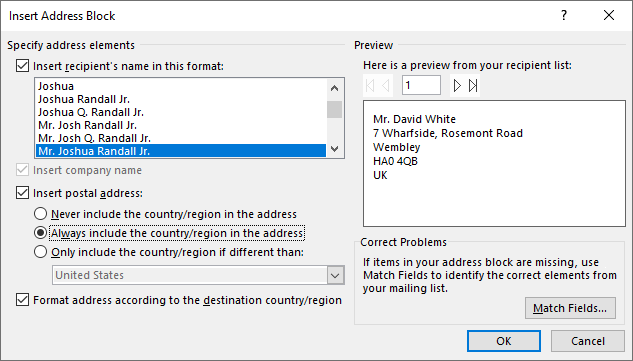
- In the Insert Address Block dialog box, select the desired options, check the result under the Preview section and click OK.
When you’re done with the address block, click OK.
the “addressblock” merge field will appear in your word document. note that it is just a placeholder. when the labels are printed, they will be replaced with the actual information from your excel source file.
when you’re ready for the next step, click next: preview your tags in the panel.
step 6. preview the mailing labels
Well, we are very close to the finish line 🙂 To see how your labels will look like when printed, click the left or right arrow on the Mail Merge pane (or the arrows on the Mailings tab, in the Preview Results group).

when you are satisfied with the appearance of your address labels, click next: complete the merge.
step 7. print address labels
You are now ready to print mailing labels from your Excel spreadsheet. Simply click Print… on the pane (or Finish & Merge > Print documents on the Mailings tab).
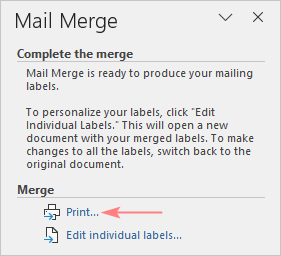
And then, indicate whether to print all of your mailing labels, the current record or specified ones.

step 8. save tags for later use (optional)
If you want to print the same labels at some point in the future, you have two options:
- save the connected word mail merge document to the excel sheet
save the word document in the usual way by clicking the save button or pressing the shortcut ctrl + s. the mail merge document will be saved “as is” keeping the connection to your excel file. If you make any changes to the mailing list in excel, the tags in word will update automatically.
The next time you open the document, Word will ask you whether you want to pull the information from the Excel sheet. Click Yes to mail merge labels from Excel to Word.

If you click no, word will break the connection to the excel database and replace the mail merge fields with the information from the first record.
In case you wish to save the merged labels as usual text, click the Edit individual labels… on the Mail Merge pane. (Alternatively, you can go to the Mailings tab > Finish group and click Finish & Merge > Edit individual documents.)
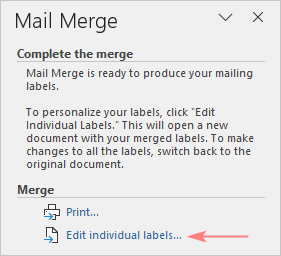
in the dialog box that appears, specify which tags you want to edit. when you click ok, word will open the merged tags in a separate document. you can do any editing there and then save the file as a regular word document.
how to make a custom mailing label design
If none of the predefined options in the address block are suitable for your needs, you can create a custom design of your address labels. here’s how:
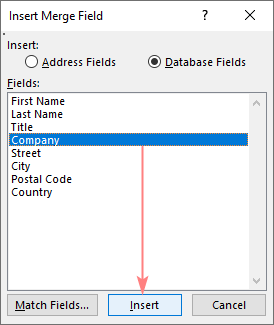
- When arranging the labels layout, place the cursor where you want to add a merge field.
- On the Mail Merge pane, click the More items… link. (Or click the Insert Merge Field button on the Mailings tab, in the Write & Insert Fields group).
- In the Insert Merge Field dialog, select the desired field and click Insert.
Here’s an example of how your custom labels may eventually look like:

how to add missing address elements
It may happen that the address elements you see in the preview section do not match the selected address pattern. This is usually the case when the column headers in your excel sheet differ from the default word mail merge fields.
for example, you have chosen the salutation format, first name, last name, suffix, but the preview shows only the first and last name.
In this case, first verify whether your Excel source file contains all the required data. If it does, click the Match Fields… button in the lower right corner of the Insert Address Block dialog box, and then match the fields manually.

for detailed instructions, see how to make mail merge match fields.
hooray! we finally did it 🙂 thank you so much to everyone who read our mail merge tag tutorial to the end!
you may also be interested
- outlook mail merge to send personalized mass emails
- how to merge letters from excel to word
- mail merge formatting issues in word