This comprehensive tutorial will teach you how to effectively mail merge in word using an excel sheet as the data source.
mail merge can be a real time saver when it comes to sending bulk emails. It allows you to quickly create personalized letters, emails, or mailing labels in Word by combining the information you already have in your Excel spreadsheet. This tutorial provides an overview of the main functions and explains how to perform a mail merge from excel step by step.
- mail merge basics
- prepare an excel spreadsheet for mail merge
- how to mail merge from excel to word
- mail merge step by step wizard steps
- how to merge fields in mail merge
- mail merge shortcuts
mail merge basics
A mail merge may seem like a daunting task, but the process is actually quite simple.
To understand the basics, you can think of three documents.
- excel source file with information about the recipients, such as names, addresses, emails, etc.
- word document with codes for custom fields.
- the final word document with personalized letters, emails, labels or envelopes.
The goal of the mail merge is to combine the data in File 1 and File 2 to create File 3. 
preparing the excel spreadsheet for the mail merge
When you run a mail merge, your excel file will be connected to your word document and Microsoft Word will pull the recipient details directly from the connected worksheet.
Before running a mail merge in word, make sure your excel file has all the information you want to include, such as first name, last name, salutation, zip codes, addresses, etc. if you want to add more details, you should do this before you start the merge.
important things to check:
- your excel sheet has one row for each recipient.
- the spreadsheet columns match the fields you want to use in a mail merge. For example, if you want to address recipients by name, be sure to create separate columns for first name and last name. if you intend to sort contacts by state or city, check that you have a separate state or city column.
- if your excel file contains zip codes or any other numbers with leading zeros, format them as text to retain zeros during a mail merge.
- If you create an excel spreadsheet by importing information from a .csv or .txt file, this tutorial will help you get it right: import csv files to excel .
- if you plan to use your outlook contacts, the following article may be helpful: how to export outlook contacts to excel.
Here’s an example of an Excel sheet that can be used for a mail merge: 
how to mail merge from excel to word
Once your source data spreadsheet is set up and reviewed, you’re ready to run your mail merge. in this example, we will merge letters. for email messages, the steps will be essentially the same.
- Create a Word document. If you have already composed your letter, you can open an existing document, otherwise create a new one.
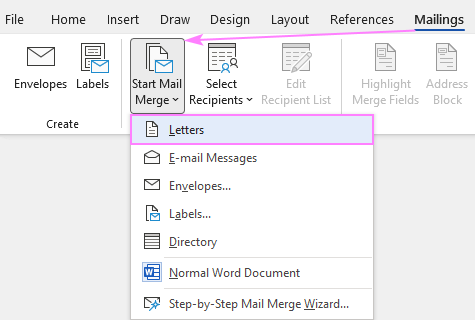
- Choose what kind of merge you want to run. On the Mailings tab, in the Start Mail Merge group, click Start Mail Merge and pick the mail merge type – letters, email messages, labels, envelopes or documents. We are choosing Letters.
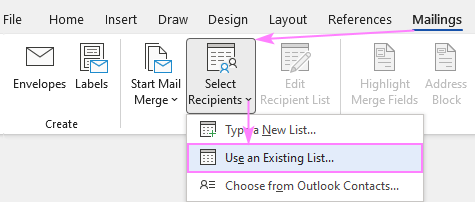
- Select the recipients. On the Mailings tab, in the Start Mail Merge group, click Select Recipients > Use Existing List.
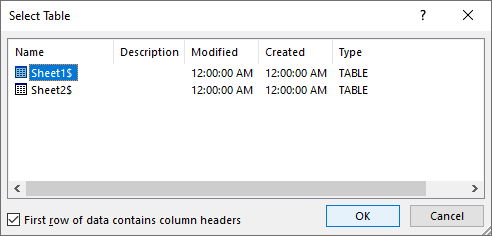
- Connect Excel spreadsheet and Word document. Browse for your Excel file and click Open. Then, select the target sheet and click OK.
By setting the connection between your Excel sheet and the Word document you ensure that your mail merge data source will be automatically updated each time you make changes to the Excel file that contains the recipient details.
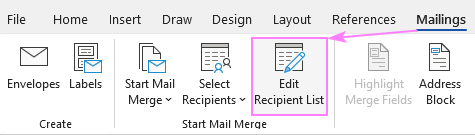
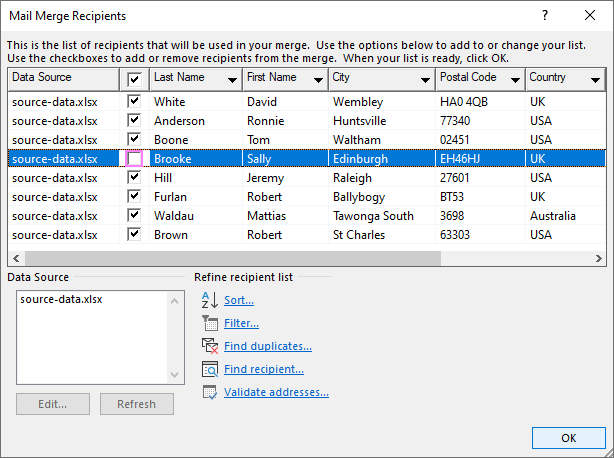
The Mail Merge Recipients dialog pops up, and you check or uncheck checkboxes to add or remove the recipients from the mail merge.
When you’ve finished your list of recipients, you’re ready to start your letter. type the text directly into a word document or copy/paste from an external source.
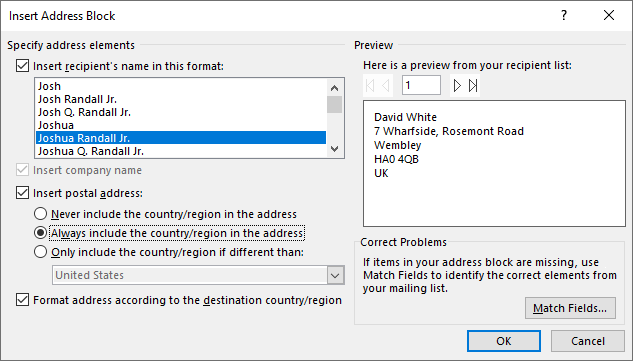
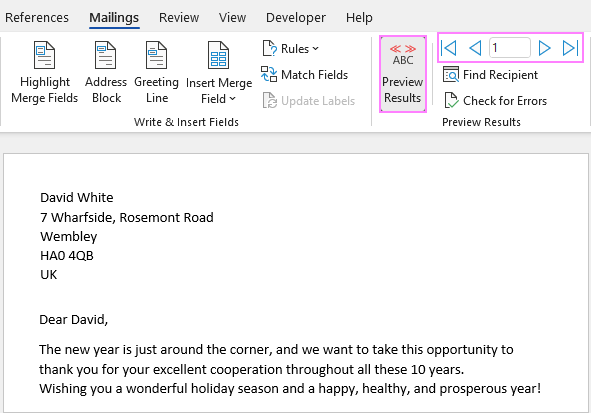
Depending on which merge field you are inserting, a dialog box will appear with different options. Select the ones that work best for you, observe the results in the Preview section and click OK. To switch to the next or previous recipient, use the right and left arrows.
When done, the merge field placeholders will appear in your document like shown in the screenshot below:

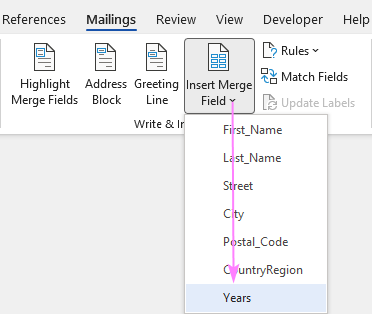
In other situations, you may wish to insert more merge fields to personalize your letters a little further. To do this, place the cursor exactly where the personal information should appear in the letter, click the Insert Merge Field button on the ribbon, and choose the field from the drop-down list.
If a merge field is inserted within the text, make sure there are spaces on both sides of it:

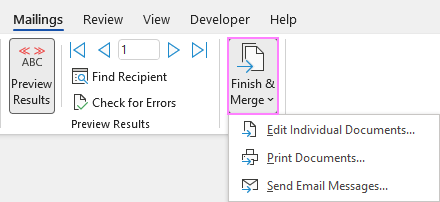
- Finish mail merge. If you are happy with all the previews, head over to the Finish group and click the Finish & Merge button. Here you can choose to print the letters or send them as email messages. To make some edits before printing or emailing, click Edit Individual Documents. A new document will open, and you will be able to make the changes in each particular letter.
- Save the mail merge document. Save the mail merge results as a usual Word document by clicking the Save button or pressing the Ctrl + S shortcut.
Once saved, the file will stay connected to your Excel mailing list. When you want to use the mail merge document again, open it and click Yes when Word prompts you to retain that connection. 
use the mail merge wizard step by step
In addition to the options accessible on the ribbon, the same features are available in the form of the mail merge wizard.
To start the wizard, go to the Mailings tab and click Start Mail Merge > Step-by-Step Mail Merge Wizard. 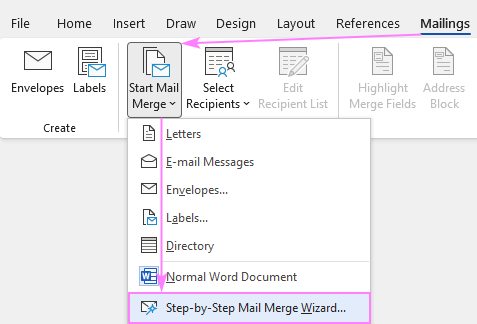
Once clicked, the Mail Merge pane will open on the right side of your document and walk you through the process step-by-step. 
in my opinion, working with the ribbon is more convenient since it allows you to use exactly the function you need at that moment. When performing your mail merge for the first time, the wizard’s step-by-step guide may be helpful.
how to make mail merge match fields
For word mail merge to recognize the fields correctly, you need to be very specific with the column names in your excel file. this is especially true for the address block and hello line functions.
- for the name fields, first and last name work without problems. other column names may cause mismatches.
- For address fields, use the full words, such as address, city, state, zip code, or postal code.
If your data source in excel has different column names, you will need to match the fields manually. here’s how:
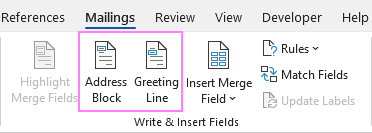
- In the Insert Address Block or Insert Greeting Line dialog box, click the Match Fields button. (This button is also available on the Mailings tab, in the Write & Insert Fields group.)
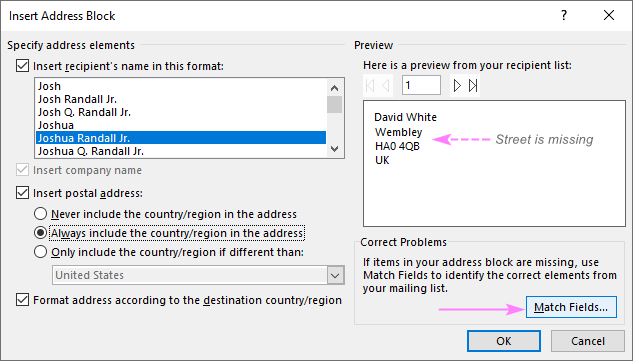
- In the Match Fields dialog box that pops up, you will see the list of fields required for a given block. To match a specific field, click the drop-down arrow next to it, and pick the correct field from the list.
In the screenshot below, we’ve matched the Street column from our Excel source data file to the Address 1:

mail merge shortcuts
If you do a mail merge in word regularly, learning a few shortcuts can save you a lot of time and increase your productivity.
hopefully this information has been helpful and now you know how to perform excel to word mail merge correctly. thanks for reading!
you may also be interested:
- how to create and print labels from excel
- mail merge format problems in word
- how to mail merge in outlook
- how to create / update a table of contents in word