A well-designed banner is the backbone of your marketing emails. Often, it’s the banner that helps your subscribers decide whether to read an email, click or close an email right away. In this tutorial, we’ll show you how to create a banner for your email campaign.

That’s why paying close attention to banner design will help you outperform your competitors. Here, I would like to share a step by step tutorial on how to create an email banner using Adobe Photoshop. Join me as I walk you through the steps of making a stylish eCommerce banner. At the end of the article, you can download a PSD file and the source image for our sample project.
Where can you find inspiration for your banner designs?
So Generally, it’s a job for marketers and designers to showcase their company’s product or service. But what if you don’t have them on your team?
Coming up with design ideas for your banners can seem like a daunting task. In my experience, all designers run into this problem sooner or later. Fortunately, there are many resources online where you can find visual inspiration for images related to any business. Such as:
- Behance
- Dribble
- eSputnik Email Gallery
It is important that you use high-quality images, preferably original images, for your banners. If you don’t have any, check out these free stock photo websites:
- Pngtree is a huge database of free images and pre-designed templates.
- Freepik is a site Graphic design website with a variety of vector images and PSDs.
- Pixabay is one of the best stock photo websites. It has a search option and there you can download images of various sizes.
- IM Free also offers free design resources on a variety of topics, although its collection is a bit smaller than that of Pixabay.
- Pickupimage is one of the top 3 stock image databases.
- Creative Commons Search is more like a stock image search engine that provides access to great design content available on various websites.
- The workspace to place your image components.
- The Tools panel. li>
- The Layers panel that displays a list of layers in your project file.
- Mover
- Eraser
- Paint Bucket
- Type
- Color Picker
- In the Layers panel, right-click the layer with the button. Click Blending Options from the dropdown menu.
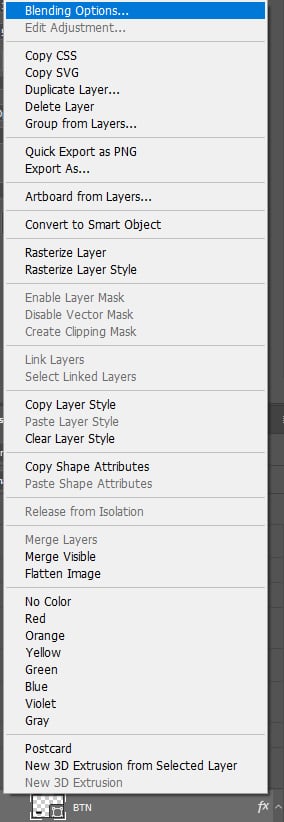
- Select Drop Shadow in the Blending Options window.
- Adjust the Drop Shadow settings.
- Set the Opacity level to 60-70%
- Set the Distance to 10-20 px
- Set the Shadow Size to around 50-60 px.
- Click “OK”.
- 25% opacity
- 3 px away
- 15 Size px.
- Add buttons, text blocks, or even animated GIFs/videos to your email template;
- Work with multiple layers;
- Use pre-made elements, such as menus, lines splitting, and social media links.
</ul
Paid stock image websites offer a larger selection of images, but you will have to pay for them. The most popular paid stock image websites are Depositphotos and Shutterstock.
Now let’s get back to business and move on to the main part. Read on for a detailed step-by-step tutorial on how to make an email banner.
How to Create an Online Store Email Banner
A banner is the first thing you your subscribers will see when they open your email. It means that your banners should definitely make a positive impression. Eye-catching and relevant banners are sure to improve email CTRs. Focus your efforts on banner design and you’ll see results in no time.
One last thing before we start. Take a look at these proven practices for creating an effective email banner. Next, I’ll walk you through the process of designing a banner using the basic tools of Adobe Photoshop.
Then let’s get started!
In addition, I’ll provide you with a tutorial step by step on how to create a visually appealing ecommerce banner. You’ll need Adobe Photoshop for this project, so install the software first if you don’t have it on your computer.
We’ll create a banner for the online clothing and bags store. For my sample project, I downloaded an image from the stock photo library. You can find the image here.
Here, we’ll skip over the most complicated details of how Photoshop works and focus on homework. It’s time to prove yourself as a designer and create something beautiful. Open your Photoshop and let’s get started!
Open Photoshop and click File New to create the document we’ll work with. Since it’s an email banner, set the width to 600px. If it’s wider, it could break the layout of your emails.
The height can vary, but for this particular banner, 450px is sufficient. At this size, the banner will look great at the beginning of your email, and your subscribers will also be able to see some text below the banner.
Now, your workspace is ready!
Click Create and you’ll see a blank image with the height and width you’ve set.
In this tutorial, we use the following Photoshop interface elements :
Open the downloaded image in Photoshop and drag it to the workspace . The image will be added to a separate layer in your workspace and in the Layers panel.
Press the Enter key or check the box in the options bar at the top of the workspace to start editing. work with the image.
Here are the tools you’ll need for this project:
You can read more about Photoshop tools on the Adobe Photoshop website.
Editing image background
Since we need some space for the text and a call to action button, use the Move tool to move the image to the right side of its space work.
If the background of the original image does not blend well with the whole design of the email, you can replace it with the help of the Magic Eraser tool. It’s great for removing backgrounds of a single color, as it erases all pixels of the similar color with a single click.
Right-click the Eraser tool and select Magic Eraser from the drop-down list.
First, check that you’re working on the layer with your photo. Then click anywhere on the blue background and click “OK” in the popup window.
If you have done everything correctly, the blue color will be erased.
Use Use the Magic Eraser to remove all the elements from the blue background.
Now you have the layer with a picture of a girl on a transparent background. Click on the Background layer in the Layers Panel. In the Tools panel, select the Paint Bucket tool.
Set the color you want to use from the Color Picker menu.
Click the background with the Paint Bucket tool and enjoy the result.
Adding text and call to action
Use the Type tool > to add a text message to create a banner.
At the top of your workspace, you’ll see a character panel that displays various options for editing text, such as font, size, scale, and more. .
You can see all installed fonts in the Font Family dropdown menu. If there aren’t enough fonts, you can always download and install new fonts from free font libraries, eg 1001fonts.
Next, let’s add a button with a call to action.
Draw the button using the Rectangle tool. Click Type to add call-to-action text.
If you need to resize a button, select its layer in the Layers panel. Next, press the CTRL+T combination, which enables the Free Transform tool. Drag a handle to resize the button. Click ‘OK’ or press Enter when done.
If you want to change the color of the button, you can do so by double-clicking the k on the button layer.
If I can’t see the CTA text, this may be because it is covered by the button. Check if the text layer in the Layers panel is above the Button layer and move it if necessary.
To center the text, hold down CTRL and select both the text layer and the button layer in the Layers panel.
Click the Move tool and center the text by clicking the Align Horizontal Centers and Align Vertical Centers buttons on the Options Bar.
Next, let’s add some shadow to the button to make it stand out from the background.


NOTE! Don’t forget about the layer hierarchy. If you can’t see the content on one of the layers, this may mean that there is another layer on top of it that is hiding the content. In this case, simply move the overlay layer below.
The final touch to create a banner!
Select the Ellipse tool in the Tools panel.
In our project, the ellipse runs off the edges of your image. If you need to edit the shape, select it in the Layers panel and activate the Free Transform tool with the combination CTRL+T.
Add a small Drop Shadow effect following the steps above to highlight the Ellipse .
The Drop Shadow setting I chose in this case is:
Next, I moved the ellipse closer to the girl. This way the banner looks even better to me.
The final step is to add your company logo.
Now you know how to create eye-catching banners with the basic tools of Photoshop . . It’s time to test and add an image to your email template. This is where you can use eSputnik’s drag and drop email editor.Take a look at the end result: a responsive promotional email your subscribers will love!
Congratulations on your helpful new experience! I hope this tutorial has helped you learn some new techniques for creating email banners. They should come in handy when you’re creating visuals for your next emails.
And if you don’t have access to Adobe Photoshop, the eSputnik email editor lets you easily create banners in a handy visual editor. All editing tools are always available in the eSputnik editor and very easy to work with.
When it comes to designing visual content, the eSputnik editor allows you to:
In addition, the editor offers a wide range of features and design customization options, which means you don’t have to use any third-party software.
If you haven’t already tried creating a banner along with this tutorial, you can do so at your convenience. Follow this link to download the original stock image, PSD file, and final banner result for the project.
Read Also
Premium Mobile Templates Responsive and Friendly HTML Email Campaigns 2018
Effective Email Marketing Tactics to Boost Ecommerce Business
10 Cheaper Alternatives to MailChimp for Email Campaigns affordable
The best email services You will Fall in Love with
.