Running multiple WordPress websites can be difficult. This is why many people want to reduce their maintenance and run multiple WordPress blogs on one WordPress installation. I would only update plugins once, not six times. Security would be tighter. Users only need a single login. There are many benefits to consolidating things on a WP site. Unfortunately, you can’t.
That’s right… You can’t have multiple blogs
At least not by default. The way WordPress Core is set up, each installation is an individual site. You have a database with a set of users linked to it. Posts and pages are attributed to the unique URL, Database ID, and RSS feed. One site, one Post stream.
Everything in the system is designed to be simple and easy to use. That’s why they have that famous 5 minute setup. If you need a second or third blog, just open one.
But that’s not very efficient. Double, triple, and exponentially increase the maintenance and security you need to worry about. Not to mention URLs and domain authority and forwarding and…
You get it. Having multiple blogs on multiple sites is not what you want. Although technically that’s the way WordPress does things. When you look at Settings – Reading, you can only choose 1 page to be the home of your posts, which will display them all as one feed.

No However, there is hope. We are going to offer two solutions on how you can have multiple WordPress blogs on one WordPress installation.
- Use categories and custom menus to filter and display posts
- Create a WordPress Installation multisite with multiple blogs in a WPMU network
Both ways are built into WordPress. They’re pretty simple to set up and use (for the most part). We are not using plugins to do this. However, even though they are built i, these methods are not simply clicking a button that says Create New Blog. (After installing Multisite, it will be!) With that in mind, let’s go ahead and see what we can do to run multiple blogs instead of what we can’t.
Option 1. Custom Categories and Menus for Multiple Blogs
Probably the easiest way to create multiple blogs on one site is to make use of WordPress’ built-in Categories, Menus, and Users features.
First things you should To do is log in to your site and navigate to Posts – Categories. It will be near the top of the left sidebar in the admin panel.

You will see four fields for your categories on this screen. Each of these is important in order to properly configure your WordPress site to host multiple blogs.
- Name – This will be the displayed title of the blog. If you have Categories indexed by search engines, the file will have this title. Otherwise, this name is for internal use only, though it might show up in some themes.
- Slug – Like a post slug, a category slug indicates where You can find the category file. Depending on your permalink settings (in Settings – Permalinks), this could also be part of your post structure.
- Main Category – The main category is very important for running multiple blogs on one site. You can run a brand called The Umbrella Corporation that will have its own publications, and its blogs could be called Raccoon City, Leon’s Journal, and Claire’s Diary. Each of them would be separate but linked to the main brand. You can also do this for a main category like the main blog for a podcast, but use subcategories like season archives. This is optional, depending on the structure you want.
- Description: The description may not appear everywhere (or nowhere) depending on your theme. But it can be indexed by search engines, and it’s good for internal organization at least. It’s definitely worth putting a Tweet’s information here.
Once completed, the new Categories will appear on the right side of the page as a list. Each parent category will appear above their respective children.

Also, whether you check the box or not, the child will always appear in the category in file and URL structures. Therefore , you may want to not use the parent/child hierarchy and set them all as top-level categories if they are all self-contained.

Add categories to the navigation menu
When using categories, you can now place direct links to “blogs” in your site’s navigation menu.Go to Appearance – Menus and select which menu(s) you want to add the links to.

- Find the new categories in the View All tab as you haven’t used them before.
- Select which ones you want to add to the menu and press the Add to button>button menu.
- The menu structure will update to include the selections you have made.
- Drag the individual blogs that you want to be children instead if you want.If they are not indented, they will be top-level items in the navigation .
- Press Save Menu. Menus don’t automatically open in WordPress, and this is an incredibly easy step to miss.
With that saved, you’ll now be able to see blogs listed separately in any menu you’ve created.
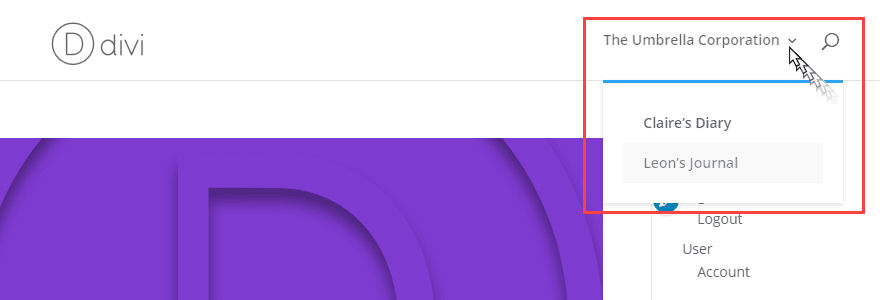
When you click on any of these, you will be taken directly to the page for that Category (archive). It will be a feed of posts that you have included in those categories. Just like your main blog feed.
The downside to doing this is that your main blog URL is pretty ugly. You don’t want people to see that you are using Categories as blogs. That can be embarrassing. But we can fix that. The URLs won’t be as ugly if you set the permalink structure to be somewhat readable. And that’s easy to do.
Changing the permalink structure of your blog
Navigate to Settings – Permalinks in your WP dashboard. You will have two options there that we suggest changing. The first is the permalink of your post. WordPress includes many variables to choose from. Depending on your needs, you can customize it however you want. Our suggestion is the Category/Post Name (%category%/%postname%) structure for SEO. Post name alone works too.
Once this is done, your URL for each post will be exactly as written above. You only have one more step before you finish setting up your new blog. You just need to change what WordPress uses for the Category permalink. Scroll down Settings – Permalinks until you see Category Base.

You can change that to whatever you want , but blog or blogs is a safe option. This will allow you to have the structure example.com/blog/umbrella-corp as a URL for each blog, which is much better. Each child category will be added. However, if you choose not to use the parent/child hierarchy, that’s not a factor.

Create a home page for each blog (optional)
Each blog has its own category now. URLs, menus and files are ready. However, you may want to set up a more customizable home page. Archive pages aren’t always the most customizable pages in WordPress, so we wanted to show you how you can use a page builder (like Divi) to create a unique home page for each blog.
I suggest that you make them using the same slug you used for the category itself. This won’t break anything, as the category URL will be example.com/category/slug, remember, and this page will be example.com /slug. This is more for consistency than anything else.

When using a builder (we’ll be using Divi in this example), open the page you’ve created to the blog in your editor. In Divi, you’ll select the row, then press Black + Circle which opens the Insert Module modal. From there, select Blog under the New Module tab.

In the Blog Module settings, you will see a Content tab. Scroll until you will see the list of Categories.

Select the category you used for the blog and press the green checkmark to save any changes you’ve made. There are many other customization options you have access to in Divi and other builders, but that’s secondary to displaying blog posts right? Now, the module should display any tagged posts with that. Category. And only those tagged that way.
This works best for child categories only or if you only use top-level categories to run multiple WordPress blogs on one WordPress installation. Because if you choose to display a parent category this way, you’ll also get all posts from all of its children. Even if they are only tagged with the Child Category.

Once this is done, you can continue to customize the page to suit the blog you host. Users visiting this page will only see a list of the posts you’ve filtered through the blog module, and since the URL is directly to a page, they won’t notice.
Congratulations! You just split a WordPress blog into many using nothing but built-in tools!
Creating individual feeds for new blogs
If someone subscribes to your blog, the food they would get would include each individual category. Because they would be subscribed to the website feed. If you want to get a separate feed for each individual category on your site, it’s very simple: add /feed to the end of the URL. That’s all. Very easy. super simple. People can subscribe to new blogs in something like this: example.com/blog/umbrella-corp/feed.

Option 2. Use WordPress Multisite for Multiple Blogs
In some ways, using WPMU is a more complete solution to the problem than using categories. Because what a multisite installation is is technically a central hub with a network of WP sites that branch off. Websites in a multisite installation share themes and plugins (and a super admin user), but maintain autonomy in most other ways. Also, when you use a multisite installation, the primary domain name is shared in some way, linking all the sites on the network.
We have an incredibly detailed guide on how to set up a WordPress multisite installation already. installed, so we won’t go into that too much here.
The reason we suggest using Categories over WPMU is that multisites can get messy quickly. From installation to ensuring they are compatible with each other, special issues arise. However, if you want to make your site multisite, here’s what to do.
Add the WMPU code to wp-config.php
You’ll want to find the wp -config .php for your site in the home directory of your installation. Then open it up and add the following lines to it, just above where it says /* That’s it, stop editing! Happy blogging. */
/* Multisite */ define( ‘WP_ALLOW_MULTISITE’, true );
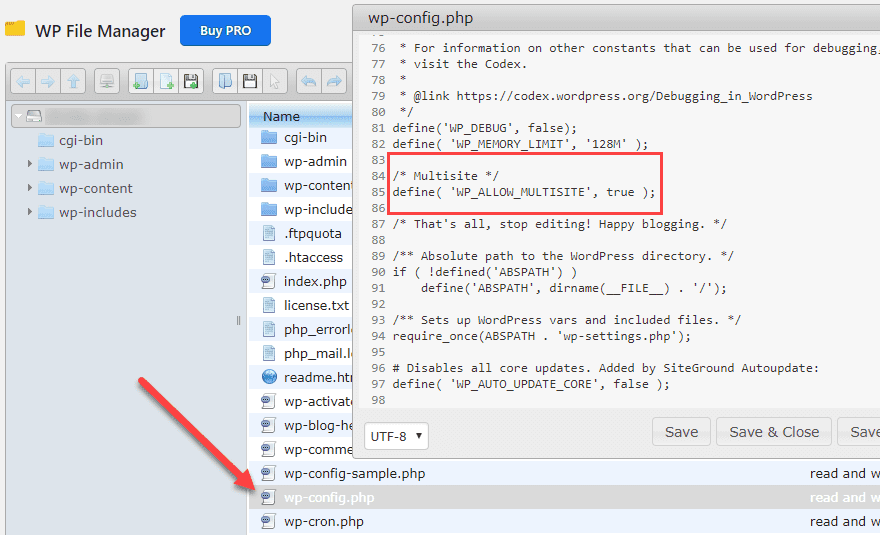
Save that and you have a new item in your WP admin menu under Tools – Network . Inside there, you’ll have a screen that lets you know what’s involved in setting up a WPMU site.

You get to name the network and it tells you the main domain that will be located. Also, you will only be able to use subdomains, not subdirectories. You can have blog.example.com, but not example.com/blog to prevent existing posts/pages from conflicting. When you are ready to proceed, click Install.
The next screen provides the code that you will need to paste into the wp-config.php and .htaccess files.
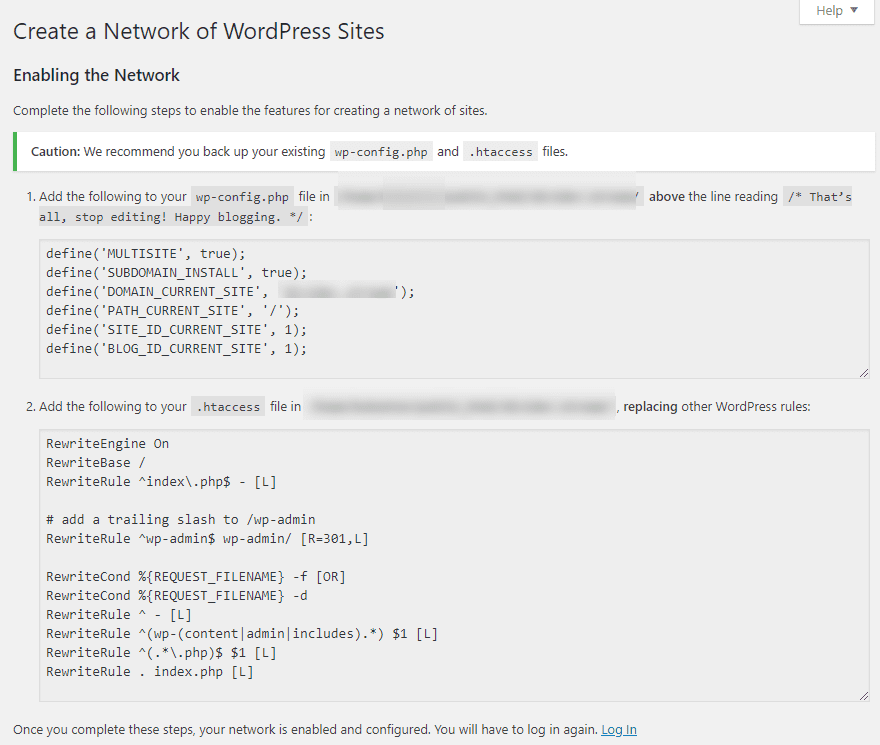
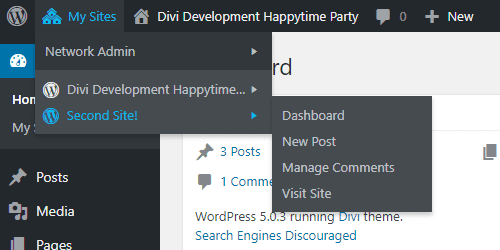
When you’re done, and you’ve pasted them in and updated/logged in, you should see a couple of new features. On the top left of the page screen, you’ll see a My Sites dropdown in the admin bar and a Sites section in the dashboard itself.
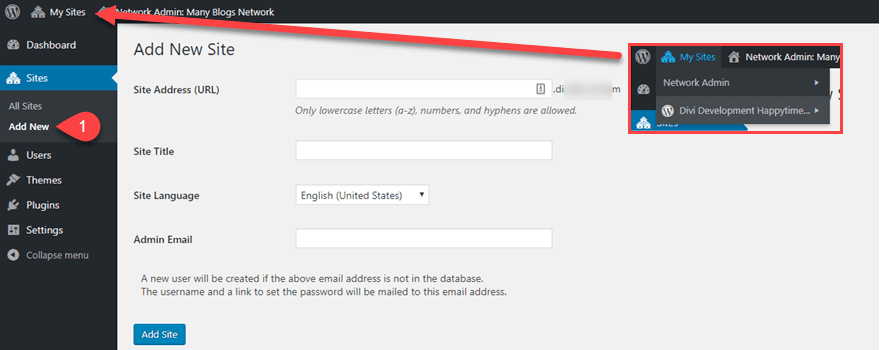
Hovering over the admin bar brings up a list of sites, with a menu of actions you can take with them.And under Sites, the Add New button lets you allows you to create new WP installations with the click of a button (and a few form fields.) Immediately after clicking the Add Site button, you will see the new listing as part of your network.
Adding the other blogs to the menus
In most respects, the new sites you create for blogs will be completely self-contained sites. They have their own feeds, URLs (depending on the subdomain), and a set of users. So, to link them back to the main page, you’ll do the same thing you did with the menus before. Only this time, you use the Custom Link option.

And that’s it! You still have to design and work on the other site. But you can immediately use it as a separate blog.
A Note on Subdomain vs Subdirectories with Multisite
If you want to use subdirectories with WPMU, you must do a clean install from scratch. Otherwise, you’ll have to use subdirectories, as we mentioned above.
Remember, DDomain Authority and Link Juice don’t go to subdomains. However, they go into subdirectories. They work as separate domains in terms of SEO.
If you’re looking to maintain the authority you’ve built with your main site for these new blogs, you’ll want to go with the former and use categories.
Summary
No matter which option works best for you, while there is no official way to have multiple WordPress blogs on one WordPress installation, you can move around and bypass the restrictions. It might take a bit of effort, but it’s definitely worth it if you want a large number of blogs in one central WP hub.
For more, check out these top multisite plugins to take your multisite setup to the next level. level .
Do you have multiple blogs on one site? How did you do it?
Featured image from Ico Maker / shutterstock.com article
.
