How to start an online store
- Choose an e-commerce platform
- Decide on a target audience
- Choose your products
- Design your site
- Connect a payment gateway
- Choose a business structure
- Prepare your store to launch
- Launch your store
- Market your store
1. Choose an ecommerce platform
An ecommerce platform allows you to create and launch an online store experience, make sales, and fulfill orders. Most people think of an ecommerce platform as a website builder: it just lists new products and accepts payments online. But they can do much more than that.
Your ecommerce platform acts as the control center for your entire business, controlling everything from inventory to marketing, giving you all the tools you need to sell online and provide customer support.
Key features to look for in an eCommerce platform include:
- Usability. Your ecommerce software should be easy to use, especially if you’re doing it yourself at first. Look for a tool that is intuitive and use a drag and drop online store builder to easily create your online store. Schedule a demo or free trial if you want to find out for yourself.
- Accessible customer support. Look for a platform that offers support throughout the process. For example, with Shopify, you can get help launching your site or migrating it from other software, as well as ongoing support. Support teams are available 24/7 via live chat, email, or even phone, anytime you need them, in 19 different languages.
- Hassle-free payment. Optimized checkout is critical to making sales. Find an eCommerce platform that makes it easy for buyers to buy your products. If you use Shopify, Shop Pay streamlines your online checkout, increasing your checkout speed by four times. You can also use Shopify plugins, with over 100 payment gateways to accommodate various payment methods and currencies.
- Web hosting. A web server stores information and content on your e-commerce website in a database on the server. You need web hosting to allow people to access your online store. Some eCommerce software offers integrated web hosting, while others require you to use a third-party solution.
When choosing your eCommerce software, consider your current and future needs. Some platforms may be the best solution for today, but a powerful platform like Shopify can help you get started quickly and support your future growth.
Start a free Shopify trial and build your ecommerce store using one of our professionally designed templates. The trial version should give you plenty of time to start a launch-ready online store if you follow this guide and keep in mind that you can continue adding products and improving your store after it’s live.
2. Decide on a target audience
A target audience is the group of people your marketing efforts are focused on. When starting an eCommerce business, knowing your ideal audience is critical. It helps you find new customers more easily and drive interested buyers to your website, resulting in higher conversion rates and more sales.
You can create an audience of any size or attribute, depending on the products you plan to sell. However, there are three main categories to consider as a new eCommerce entrepreneur:
- Demographics. Includes characteristics such as age, gender, occupation, education, and income.
- Location. Groups that divide the market based on geographic location, so you can better serve a specific area.
- Interests. Built around psychographics and includes attitudes, personality, opinions and lifestyle of your audience.
If you already have a product, choosing a target audience is easier. Ask yourself: Who buys my product? As they are? How old are you? Compile that information on a buyer persona and include it in your business plan. You’ll want it when you create your website copy and marketing campaigns.
If you don’t have a product yet, think about the types of people you know best. For example, maybe you love pets and understand other pet owners in their 40s and 50s very well. Chances are you have a good idea of their likes and dislikes, their needs and fears. That could be your target audience.
To sell online, you must genuinely know and appreciate your audience. For more help determining this, read Finding Your Ideal Customer: Defining and Reaching Your Target Audience.
3. Choose Your Products
One of the biggest challenges entrepreneurs face is finding profitable products to sell. Coming up with product ideas is a bit tricky, but if you have a target audience in mind, you’re one step ahead.Fortunately, there are many opportunities to find products to sell, whether you’re manufacturing, reselling, or dropshipping.
You can find profitable products to sell in a number of ways:
<ul
Resources:
- Getting Products For Your Online Store: Top Apps & Tips
- Product Ideas: 17 Places To Finding Profitable Products
- Find a Product to Sell: 12 Strategies to Find Your First Profitable Product
- 17 Hot Products to Sell Online in 2023
4. Design Your Site
Before you begin, you’ll need to start a free trial of Shopify. If you follow this guide, the trial version should give you more than enough time to build a launch-ready online store. Please note that you can continue to add products and improve your store after it is available.
When you start your trial, you will be asked to enter a store name, which will become your default URL (for example , storename.myshopify.com). You won’t be able to change this, but you’ll be able to buy a custom domain (for example, yourstore.com) later, so don’t worry about choosing the perfect name now.
After answering a few questions, you’ll find yourself inside your own Shopify account.
Here’s a quick checklist of what you should have before you get started and what I’ll be working on with to start my shop:
- A business idea. Since so many hot sauce brands brag about being “the hottest hot sauce ever”, I thought it would be fun to create a sample store called Kinda Hot Sauce that sells great-tasting mild hot sauces for the semi-adventurous. If you don’t have a business idea yet, you can look to our list of business ideas for inspiration.
- A company name. I used Namechk to check if my business name ideas were available on social media and as a domain before settling on it. Since some .com URLs are hard to find, I chose kindahotsauce.shop as the domain. Don’t know what to call your store? Learn how to choose a domain name or try Shopify’s free domain name generator.
- A logo. I worked with a designer to create this logo for a “challenging brand” who is smart, mischievous, bold, and spicy (ironic for a mild hot sauce company). I’ve prepared a .png file with a transparent background to make it easier to resize without losing quality. You can follow our guide to create your own logo for free or hire a designer.
- Photographs. Clean product photos help you to be your best. I’ll be using mockups of my hot sauce bottles on a white background, along with some stock photos for lifestyle imagery. If you’re on a budget, you can take your own product photos, even with just a smartphone camera, or use free stock photos until you can take your own custom lifestyle photos.
1 . Add your products
Why make an online store with nothing to buy? Adding products should be one of the first things you do, because your products are what will design the look and feel of your website.
In your new Shopify store, go to Products> Add Product to create your first product list.
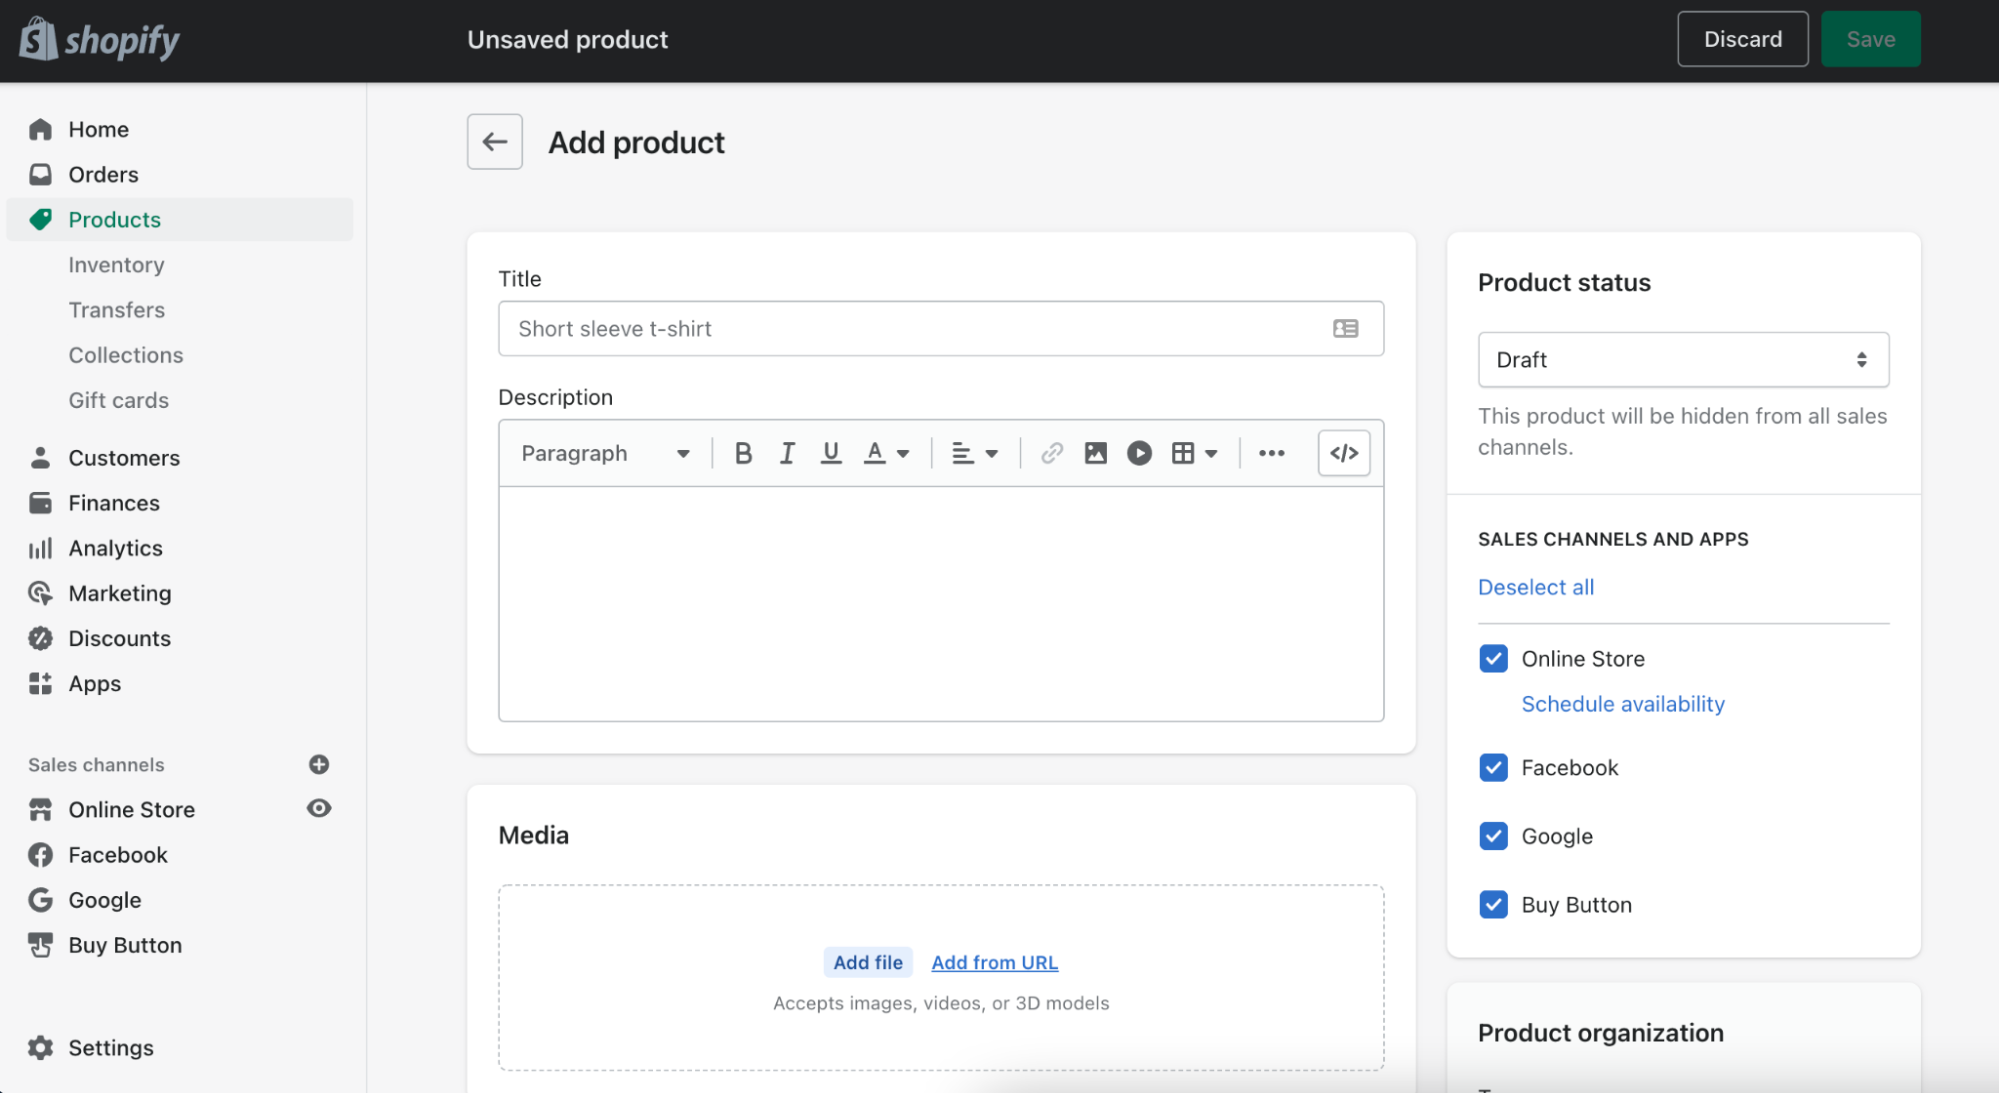
There are a number of decisions we’ll be making on this page, so we’re going to break them down into steps.
Write your product title and description
Product pages are the places customers go to get information about a product and decide whether or not to buy it. Details matter, and sharing the right information in the right way, from price to size, through text or images, can make all the difference. If you’re not sure what to include when creating your own online shopping website, you can look to others in your market for inspiration.
Your product title should make it clear which is the product This is what customers will see when they browse your store and what will help them find what they are looking for in your catalog. Try to keep it short and use your product description or variants (more on that later) to show other specific information or product options, such as colors or sizes.
For our first product title, just use the name of our flagship hot sauce, Hot Enough Habanero.
Product Descriptions describe and sell your product. They are also a common source of writer’s block. The good news is that you don’t need to be a professional copywriter to write a compelling product description. You just need to:
- Know who you’re talking to. Think about what your customer needs to know to feel confident buying your product, and try to communicate that in Your description.
- Highlight incentives. Do you offer a generous return policy or free shipping? Are your products organic? Consider what features, benefits, and offerings really matter, and cut the fluff. Many stores combine text and icons to quickly communicate these selling points on their product pages.
- Anticipate common questions or objections. What might make a customer hesitate to buy? Are you afraid of buying the wrong size? Do they need to know what their products are made of in case they have allergies? Do they need to know that their products are ethically made?
- Make your text easy to scan. Make your descriptions easier to read with short paragraphs, bullet points, subheadings, bold text, etc. Then ask yourself how quickly a visitor can get the information they need.
- Help customers see themselves using your product. Customers can’t taste, feel, touch or try their products. Outside of product photos, you can bring your products to life by listing the materials you use, including a sizing chart, or by sharing the story about how they’re made; it all depends on your product.
For a product like hot sauce, we can confidently assume that customers care about the following details in particular when making a purchase: ingredients, flavor, quantity , how spicy it is and what it goes well with. So I have done my best to make all of this information accessible at a glance to my shop visitors.

Upload product photos or other media
In the Media section of your product page, you can upload any visual media that helps you share more complete details about their products. : photos, GIFs, videos or even 3D models.
Presentation makes all the difference. Help customers imagine they own your product. Help them see it in action or proudly display it in their space. Here are some points to remember:
- Use high-quality photos that give your products the best light. Avoid blurry or low-resolution images.
- Try to keep the same aspect ratio (meaning the ratio of width to height) in all your product photos so that all your photos appear the same size. This consistency creates a cleaner, more professional look when you create your online store.

- If you’re on a budget, most modern smartphones are capable of capturing hot high quality. photos and you can use free photo-editing tools to touch them up (like removebg, which lets you remove the background for free).
- After uploading an image, you can click on it to make basic edits like cropping and resizing. You can also edit alt text for accessibility to describe your photos to people who can’t see them. For example, I’ve written “a 150ml bottle of Kinda Hot Sauce’s Hot Enough Habanero” to help anyone who is visually impaired shop with me.
I’ll use a single photo of a bottle of hot sauce on a white background. But for products where the customer might need more visual information, such as clothing or jewelry, using multiple photos that offer additional angles or detail can help build customer confidence.

Set your price
Now is the time to set the list price for your product. This is what customers will pay to buy your product.
Optionally, you can use the Compare on Price field to communicate how much the product would normally cost, especially in the case of a sale. . For example, if we wanted to show savings on the purchase of our hot sauce three-pack, we could enter the original price for three bottles here. However, I would caution against using this without a good reason, especially if you are selling premium products, as it could cheapen perceived quality.
The Cost Per Item field is also optional. . If you want, you can use it to track your profit margin for an individual product. On the Shopify plan or higher, this allows you to track earnings in your earnings report.

While there are some exceptions, businesses that sell goods and services are required to collect tax each time they someone places an order with them, so we’ll check that box and configure our tax settings later.
For simplicity, we’ll assume my cost per product, or the cost of producing and packaging a bottle, is $5. If I sell each bottle for $15, I’ll make a healthy margin that leaves room for discounts and marketing.

In reality, pricing is rarely that simple. Several variables can influence the price of your products, such as shipping costs, raw materials, overhead expenses like rent or employees, the cost of your time, and perhaps most importantly, the perceived quality of your products.
Inventory
If If we were drop shipping or using a print-on-demand service, you wouldn’t need to track inventory, but since Kinda Hot Sauces makes, sells, and ships its own hot sauce, we want to track inventory on Shopify so we know how much of it we have left. each sauce and how much more we need to produce as orders start coming in.
If this is your first time selling online, you may see some unfamiliar terms here, so we’ll go over them quickly.
- SKU. One unit is used d Stockkeeping to track and manage your inventory of specific products and variants. Create a consistent number or letter system that makes it easy to identify the exact item at a glance (for example, MHS-HEH tells me it’s the hot enough, Hot Enough Habanero sauce).
- Barcode. Barcodes (UPC, GTIN, etc.) are typically used if you are reselling products or eventually want to add scannable barcodes to your items to make inventory management easier. We can leave this blank for now, as we make and sell our own products.
- Quantity. This is the quantity of a specific product you have available. If you have multiple locations with inventory and you’ve set them up in Shopify, they’ll show up here. In the case of my example, I start with a small batch of 10 bottles for each hot sauce and use my own space to hold inventory.

Since it doesn’t take much time to make more of my product, I can activate “Continue selling when out of stock.” But you can turn this option off and mark items as “Out of Stock” if your inventory is limited or it takes longer to replenish your supply.
Shipping
In the shipping section, you will enter details that will automatically calculate shipping rates and print the appropriate shipping labels for each order.
For my Kinda Hot Sauce store, we will check “This is a physical product” and enter the following information:
- Weight. The weight of a bottle alone. I will enter 0.5 pounds.
- Customs information. This is important if you plan to sell internationally. We’ll put “Canada” since Kinda Hot Sauce is made and shipped from Canada, and use the search bar to find the Harmonized System code for seasoning, which is 21309.
Settings the actual shipping costs and options you’ll offer your customers will appear later in this tutorial.

Options
I’m not going to set options for my products, but I still want to explain how to use Shopify to do this, as many Shopify store owners do.
If your product comes with different variants, such as sizes or colors, instead of adding each one as its own product, simply you can add them as variants of the same product. Each option can have its own image, price, tracked inventory, and individual settings associated with it.
You can even go deeper into your options, for example, by offering multiple colors that come in different sizes.
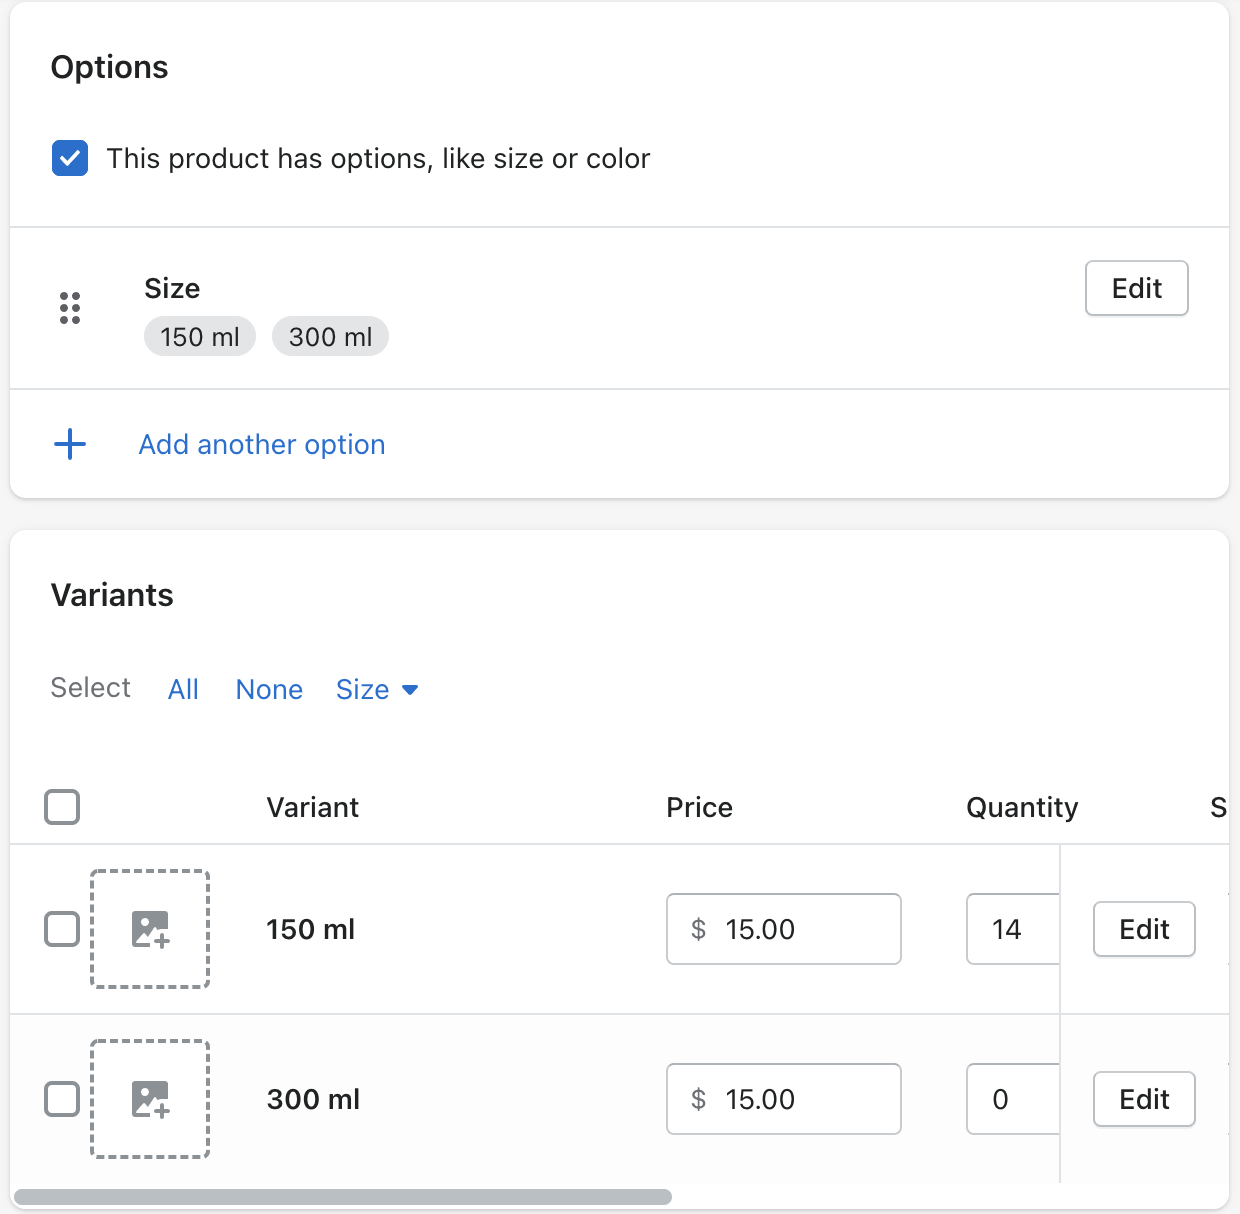
When you add variants to your product and press Save to refresh the page, Media, Prices, Inventory, and Shipping sections we covered above will need to be configured for each specific variant.
Since our product comes in one size and has no variants, we’ll leave this section alone. However, if you sell multiple variants of the same product, be sure to edit each variant with the appropriate product page information.
Product Organization and Availability
In the Organization section, you can label your products to help group them and make it easier to manage your store’s product catalog, select products for customers to shop and apply rules or discounts to specific products. Here’s what each tag means:
- Product Availability: You can choose from a multitude of sales channels, such as Facebook Shops or Amazon, to list your products, which I will go into later. For now, just make sure your product is available in the Online Store or it will be hidden.
- Product Type: This is a product category that you can use to identify certain products. (for example, a t-shirt). Each product can only have one product type.We’ll just use “hot sauce.”
- Seller: This is the manufacturer, wholesaler, or third-party supplier of the product. You can filter your product list by supplier, which can speed up inventory ordering. Kinda Hot Sauce is the manufacturer, so we’ll list that as a supplier.
- Tags: Tags are keywords that you can associate with your product. You can add multiple tags to a product to help customers find it through your online store’s search bar. You can also use tags to automate actions in your store, such as adding a product with a specific tag to a specific collection. I’m going to leave this blank since I don’t have any reason to use tags yet.
- Collections: Collections are important. They allow you to organize and curate your products for specific purposes and audiences. For example, a clothing brand might create a collection based on women’s products, men’s products, a summer sale, or new arrivals. The same product can be included in several collections. We will configure our collections after adding more products.

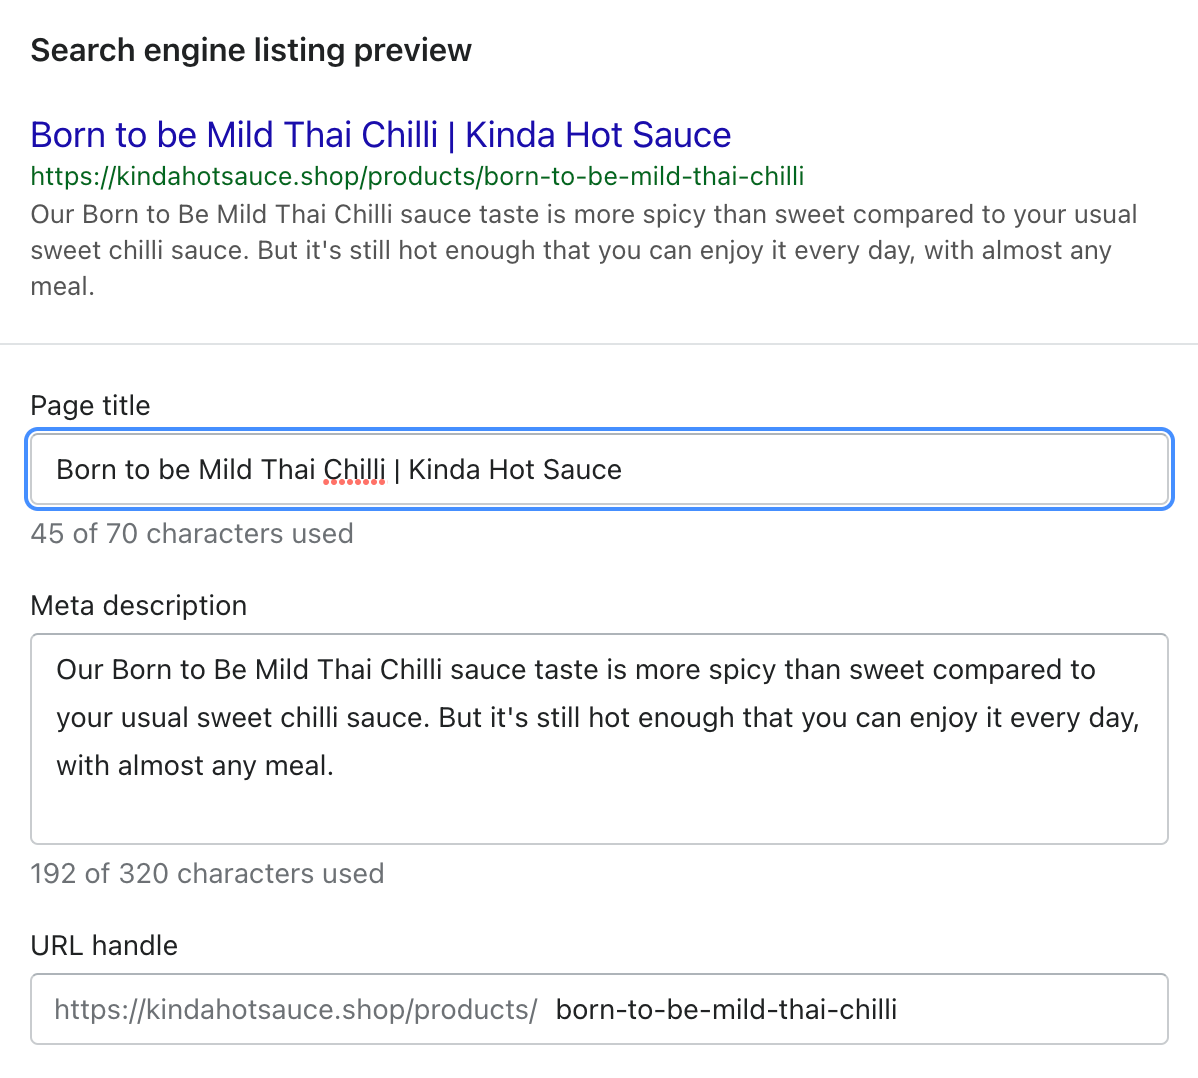
Search Engine Listing Preview
The Search Engine Listing Preview is where you can customize how a page appears in the search engine results. It is also where you can improve the visibility of your products through search engines like Google.
If you know what keywords your target customer is using to search for products like yours, you can include them in this section to increase your chances of appearing in search engine results over time.
I used Ubersuggest, a free keyword research tool, to measure how often people search for keywords related to my products. I discovered “habanero sauce” (5400 searches per month) and “mild hot sauce” (590 searches per month) and “medium hot sauce” (50 searches per month) as keywords I might want to include on my product page.
We’ll dig into SEO later, but here are some quick tips to optimize this section in the meantime:
- Page Title. Write your page title to include your target keywords while still being short and descriptive enough to be clicked. I’m going to focus on the “medium hot sauce” as it is the most relevant to this product. Aim for fewer than 60 characters if you can so your title doesn’t get cut off in search results. I will use “Hot Enough Habanero | Medium Hot Sauce” as my page title.
- Description. Use this space to display any compelling information that might persuade searchers to click when they see a link to your product in search. results or on social networks. I try to keep it short and simple while expanding on the information presented in my page title.
- URL and identifier. Keep this simple, unique, and meaningful to people using search engines to find your product. I’ll use “/hot-enough-habanero”,
Once we’re done, we can click save and preview our product page to see what it looks like. We can change the little details like colors and fonts later when we start customizing our store.
You can repeat this for each product you want to add to your store, keeping in mind that you don’t need to add all your products in order to launch.
Organizing your products into collections
Now that we have at least a few individual products listed, we can start organizing them into collections under Product > Collections in Shopify.
Collections can be created to select targeted products to a specific audience (eg, children’s products), a theme (eg, bestsellers), or a product category (eg, accessories). You can decide whether to manually add products to certain collections or automate what is included/excluded based on price, tags, or other conditions.
Collections serve a variety of purposes, such as:
- Extract certain products that you want to display in a section of your home page
- Link to product collections in your navigation or on your home page to help different audiences quickly navigate through your catalog
- Select the items you want to list (you can apply discounts to specific collections of products)
For now, I will create a collection for our medium hot sauces . That’s because I only want to include my three individual hot sauce items, while excluding the three-pack. This way, I can display the individual flavors and highlight the package separately.
I’m going to fill in the collection title and description based on how I want to greet visitors when they land on this collection page. The search engine preview can be completed using the same best practices we follow for product pages.You can also set a collection image, which will be pulled to represent your collection when we customize the appearance step to create an online store.

2. Create key online shopping pages for your store
So far, we’ve focused on products. But you need more than just products when you build your own online shopping website. You need to help shoppers understand your business, give them reasons to trust you, and make other essential details available to customers looking for them.
You can create most of these pages in Shop at line > Pages.
You don’t need to have all of your pages ready for launch, but some of the most useful ones to create include:
- Page of contact. This page gives customers clear ways to contact you with questions or directs them to a place to find answers, such as an FAQ page.
- About Page. An About page connects with customers personally, explains your business model, and/or shares why you started your business. A persuasive About page can go a long way in earning the trust of new brands. Keep this in mind when creating your online store.
- FAQ page. An FAQ page helps alleviate some of the most common customer support queries.
- Policy pages. There are certain legal pages that customers expect that can help protect you in case of disputes, such as your return policy and privacy policy, which you can configure in Settings > Legal.
To create our online store, and for the purposes of this tutorial, we will go over how to create an About page (called “Our Story”), a Contact page, and essential policy pages (Privacy Policy, Shipping Policy , and Terms of Service), but you can create any page that you think will help you earn the trust of your customers.
About Page
About pages are a great way to Embrace the “little” in small business and earn their trust as a new merchant as you build your online store.
You can have a video introducing yourself as a founder, links to awards and press mentions, images that explain their supply chain, or anything that helps this page. na to tell your customers who you are and what you are all about.
For Kinda Hot Sauce, we will create an online store with a simple About page, written as a letter to the customer explaining our philosophy and our reason for being.
When someone visits my store and is unconvinced about making a purchase, I want them to receive a heartfelt and heartfelt message if they choose to visit my About page for more information.
p>
Since we’ll be relying mostly on text, I’ll use the formatting options available in the toolbar to make the copy more eye-catching.

Just like you did for your products, you also need to customize the Preview Search Engine Listing section of your pages based on how you want the URL to be and how you want the page to appear in search engine results.
Contact Page
Your contact page is what customers will look for to ask a question or get support.
Most Shopify themes let you easily create one. Simply create a new page, go to the Template section on the right hand side and choose the Contact template. This should add a form to your page. You can then write some instructions to help customers get in touch or even link to other pages, such as FAQs, to help buyers solve their own problems first.

There are also live chat apps that you can install to make support even more accessible to buyers.
Policy Pages
Policy pages are a standard practice for online businesses. They give your customers a place to understand how you run your business and what to expect from you. They also help protect you in the event of a dispute with a customer.
In Settings > Legal in Shopify, you can generate templates that you can customize based on your business and local laws:
- Return Policy. What is your policy regarding returns and exchanges? How long do customers have to initiate a return? What state should the product be in? A generous return policy can help customers shop with confidence.
- Privacy Policy. A privacy policy describes how you collect information about your customers.
- Terms of Service. Your terms of service policy is an agreement between you and your customers that outlines how you will operate and what rights you reserve.
- Shipping policy. A shipping policy helps you set customer expectations about shipping costs, manufacturing times, and delivery speeds for the regions you ship to.
(Please note that these templates are not legal advice and should be adapted when you create your online store.)
3. Create a fully customized online store
Now that we have some products in our store and some pages ready to go, it’s time to go to Online Store > Themes in Shopify and get started. to think about what we want our website to look like.
Choose a theme
The first step is to choose a theme: a template that we install in our store that we can use as a starting point Starting to design as you create your own online store. The Shopify Theme Store is home to free and paid themes, each with its own set of styles and features.
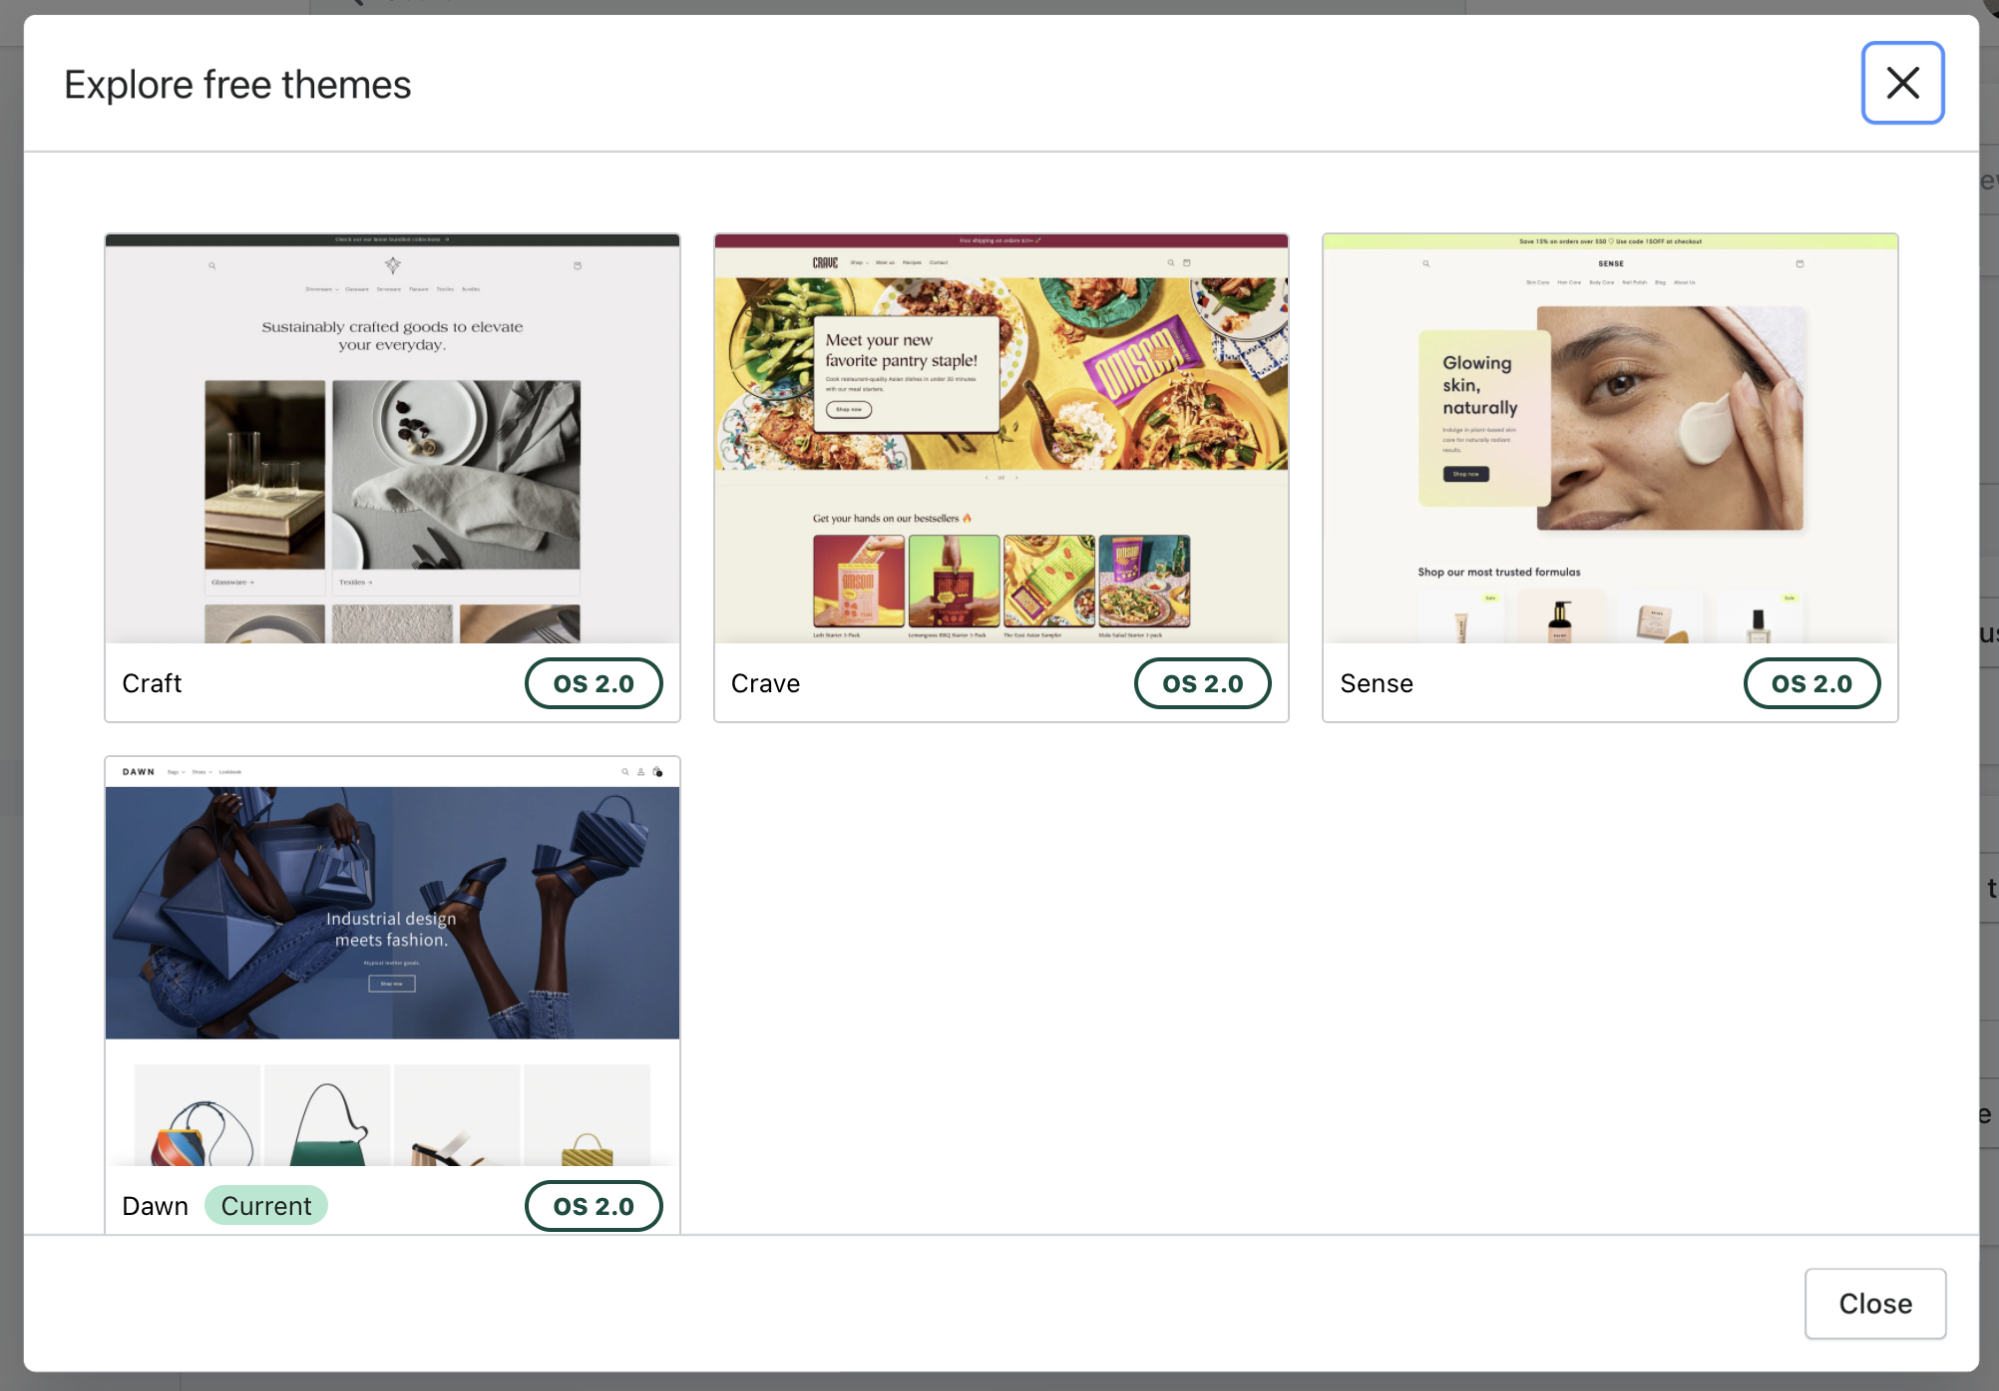
Some themes are built for larger product catalogs, while others are for single-product businesses. Others are made for certain industries or types of businesses, like the Express theme for restaurants.
Here are some key points to consider when choosing the perfect theme to create your own store:
- Each theme comes with several styles, so be sure to search for a theme and style based on the size of your product catalog and the type of aesthetic you want for your store. You want to create the online shopping you’ve envisioned.
- Consider whether the theme you’re looking at has the built-in features you need, such as a search bar that auto-completes queries or a section that displays press mentions. Note that you can also find free and paid Shopify apps that add additional features when you create your store website.
- Don’t choose a theme based on colors or fonts. These are all things that you can customize later. You can even make your theme truly unique by hiring a Shopify expert to customize it for you.
- You can try a paid theme before you buy it for a one-time fee.
- Above all, keep in mind that you are not stuck with the theme of your choice. If you change your mind later, you can preview other themes, install them in your current store, and customize them without having to recreate your product pages.
After playing around with some free themes like Debut and Narrative, I narrowed it down to Brooklyn (playful style), because Kinda Hot Sauce has a small product line and doesn’t require many features to launch with. The right foot. I like the modern layout of the product grid, the simplicity of the navigation menu, and Brooklyn’s emphasis on visual branding.

Design your homepage
Each theme is made up of of sections that you can rearrange, add, delete, or temporarily hide. Sections can help you decide on your store’s homepage presentation and try out different layouts.
When determining your homepage layout, think about the goals a homepage should achieve and determine how they apply to your specific business:
- Prioritize first-time visitors and help them quickly understand what your business is and what you sell.
- Accommodate visitors and make it easy for them to navigate to the products and pages they are looking for.
- Try to build interest in your products and trust in your business with every scroll.
- Create clear paths for them to your visitors take based on their intent to purchase. You can highlight an About Us page for people who want to learn more about your business or your various collections to allow visitors to self-select the products that interest them.
- Design your home page around that many of your visitors will browse it on their mobile devices.
Over time, they will revisit and modify your home page. Don’t let the pursuit of perfection hold you back with your release.
For Kinda Hot Sauce, I’ll use these sections to do the following:
- Introducing slides (with a single slide) to grab interest right away with witty copy that explains why this isn’t your typical hot sauce brand. “Not the World’s Hottest Hot Sauce” breaks expectations by communicating what my brand is all about with the tagline “Spice that’s nice.” I’ve also added an overlay and increased the opacity of the overlay to ensure my text is readable when displayed over my image.
- Featured Collection to display the three different hot sauces on the Collection of medium hot sauce that I made earlier.I’ll amplify the impression made in the slideshow with a bold statement about my products: “Delicious hot sauce doesn’t have to be deadly.”
- Image with text to summarize the positioning my brand and show the reason for my store with a link to its About page. I’m going to use my logo as my image for now, but you could use a photo of yourself, the founder, or an image that represents your brand well.
- Newsletter to attract people people to join my email list. Not everyone who visits my store will be ready to buy. By offering them a reason to join my email list (slightly spicy recipes, in this case), I can build my email list when I start to drive traffic to my store.
- Featured Product to highlight my three-pack hot sauce package (and the savings you’ll get) to insecure customers. I put the latter in place to provide a final path to purchase for customers who scroll to the bottom of my home page without clicking anything.
In the future, however, I might expand my home page to include a section explaining exactly how spicy “spicy enough” is, or a gallery of blog posts sharing recipes involving my hot sauces. I won’t know for sure if the decisions I make on my home page are the right ones until I start marketing, but I feel good about this design.
When designing your own home page, prioritize information without piety. Less is usually more. Instead of trying to fit everything you can on your home page, direct visitors to supporting pages that help them sell more of your business or explain non-essential information.
Customize your navigation menus
The Header section is where you will make changes to the top area of your online store, which includes your navigation menu, cart, and logo.
We We will mainly focus on creating a clear navigation menu, as this is how people will find their way around your website.
There are three main ways of navigation that you can set up in the header section:
<ul
You don’t want to overwhelm people with too many options early on. Instead, you can organize your navigation to prioritize the actions you want visitors to take, with a focus on shopping, of course.
For Kinda Hot Sauce, I’m going to create a simple navigation structure where :
- My medium hot sauce collection and three-pack appear below the home page with a Featured Collection section.
- Nestlé my Our Story page with an Image with Text section.
- Include a best-selling product using a Featured Product section.
I will also create another menu for my Footer to display my non-essential policy pages in the bottom section of my website.

Set your colors, typography and other configuration issues
Colors and typography ía play an important role in the visual identity of your brand and should be a main consideration when building your own online store. In the Theme Settings tab in the online store editor, you’ll be able to customize the overall look and feel of your online store, including colors and typography.
Even if you’re not a designer, you can still create your own store and choose font and color combinations that you feel good about using the following tips:
For colors
- Keep in mind color psychology and how different colors make people feel (for example, red makes people feel hungry, yellow suggests safety, and purple can have a royal quality).
- Use contrast to highlight important features of your home page, such as buttons.
- Use a tool like Coolors to cycle through different color palettes to find the colors you like and their associated hexadecimal code.
- Don’t be afraid to go with your gut or just keep it simple if in doubt (i Even if it’s just a basic black and white color scheme.)
I came up with the following color palette for Kinda Hot Sauce because I wanted it to look bold and colorful.I probably won’t end up using all of them, but I have enough to mix and match to find a combination I like:
- #392B58
- #FF0035
- # F7EE7F
- #654597
- #574AE2
Typography
<ul
For our store, we’ll keep it simple with two fonts:
- Titles: Lora
- Accented text: Roboto
- Body text: Roboto
Personalize your payment
In Theme Settings, you can also customize the look of your checkout. At the very least, it’s a good idea to add your logo to your checkout to give it a branded feel.
If you need to, you can also customize how your checkout works by clicking your checkout settings (or go to Settings > Checkout).

Here’s a quick summary of the choices you can make regarding your payment:
- Customer Accounts . You can choose whether you want customers to create an account at checkout. This can be useful if you run a members-only or wholesale store. We’re disabling it for our store because we don’t want to introduce unnecessary friction into our checkout experience.
- Customer contact. You can let customers choose how they want to be contacted by you after place an order (email or SMS text messages). I’ll select “Customers can only pay with email” for now to keep it simple and focus on building an email list I can market to.
- Form Options. Here you can decide if additional information such as name or company name is hidden, optional or required at checkout. Since we don’t need all of this information to fulfill all Kinda Hot Sauce orders, I’m going to make most of them optional.
- Order processing. You can find options to streamline the order process or add an extra confirmation step. To save customers time, we will use the customer’s shipping address as the billing address by default and enable auto-fill for addresses.
- Marketing Consent. Allow customers to sign up for your marketing emails and SMS at checkout. Since we want to connect with customers after they buy, it’s a good idea to activate them.
- Tips. You can allow customers to add a tip to their online purchase to show their support for your business.
- Abandoned payments. When a customer arrives to your payment and decide not to complete your purchase (this can happen for a number of reasons), you can set up an automatic reminder email for these buyers. We’ll set our automatic email to go out 10 hours after someone leaves their checkout, while our store is still fresh in their mind and you may have more time to reconsider your purchase.
When in doubt, prioritize options that reduce checkout friction for the most customers.
Ask for feedback
Feedback they’re a godsend, especially when you’ve spent so much time working to build your own online shopping website. Fresh eyes can often spot areas for improvement that you don’t and provide valuable insight you can use to make adjustments to your store.
By default, your store is password protected, but you can give it to people. to check that it works. You can find your password (or change it) in Online Store > Preferences.
Some other great places to get feedback include:
- People Nearby to you that you can trust to provide honest and constructive feedback
- Subreddds your target customers can subscribe to
- Facebook Groups
- Community Feedback from Shopify on my store forum
When I shared Kinda Hot Sauce for feedback, the following areas were mentioned to focus on for improvement:
- The writing my product pages could focus more on who my brand is for (responsible hot sauce lovers).
- Some people mentioned how “lovely” the About page was and how it made them want to buy in this business. I could carry that charisma into the rest of my writing and campaigns when I start marketing.
Take both the good and the bad with a grain of salt when incorporating comments into your shop. The best form of feedback you’ll get is when you start actively marketing your business.
4. Setting Up Shipping
Shipping can be one of the most complex considerations involved in running an eCommerce business.Between product weight, packaging costs, shipping destinations, carrier fees, and your potential profit per order, there are a lot of variables to juggle.
Hopefully, we can narrow it down to a few approaches. Some of the main ones, which can even be combined, based on your company’s unique needs, to find a shipping strategy that works for you:
- Offer free shipping. Free shipping It can be an effective incentive for customers to buy from you, whether it applies to certain products, order amounts (for example, if they spend more than $50), or regions of the world. Please note that you will need to factor this into the retail price of your products if you plan to absorb the cost of shipping on behalf of your customers.
- Collect freight rates in real time. Shopify integrates in real time with various carriers like USPS and Canada Post to generate shipping options and prices in real time. This allows your customers to choose the exact service and price they want. You can take advantage of discounted rates through Shopify Shipping.
- Charge a flat rate. Flat rate shipping works best when your products have similar sizes and weights, making it easier to the actual shipping costs. to predict.
- Offer local pickup/delivery. You can also give local customers the option to pick up their online order at one of your locations by setting specific notification settings, pickup instructions and other details for each location.
For more tips on creating a shipping strategy, you can read our Beginner’s Guide to Ecommerce Shipping and Fulfillment. Remember, like most of what we’ve done so far, this is something you can review and adjust over time.
For Kinda Hot Sauce, since it’s located in Canada, we’re going to set up our shipping as follows to illustrate some of the various approaches you can take:
- A flat rate of $8 to ship to Canada and the US
- Free shipping to Canada / USA when you spend $30 or more
- Real-time carrier rates for the rest of the world
Setting up our shipping zones
You can implement your shipping strategy in Settings > Shipping & delivery in Shopify. Here, you will be able to create shipping zones where you can set your rates for shipping to customers in certain countries.

Set conditional shipping rates
Within the shipping zone we just created, we can use the Add Rate button to create specific rates based on certain conditions. For example, we may offer free shipping on the condition that an order reaches a certain value threshold. Or we may increase the shipping fee if the order is over a certain weight.
Usually, you can save time and money on shipping while getting more per sale by encouraging customers to add more items to their order. Therefore, we’ll use free shipping on orders over $30 (two hot sauce bottles or the three-pack) as an incentive for customers to spend more.

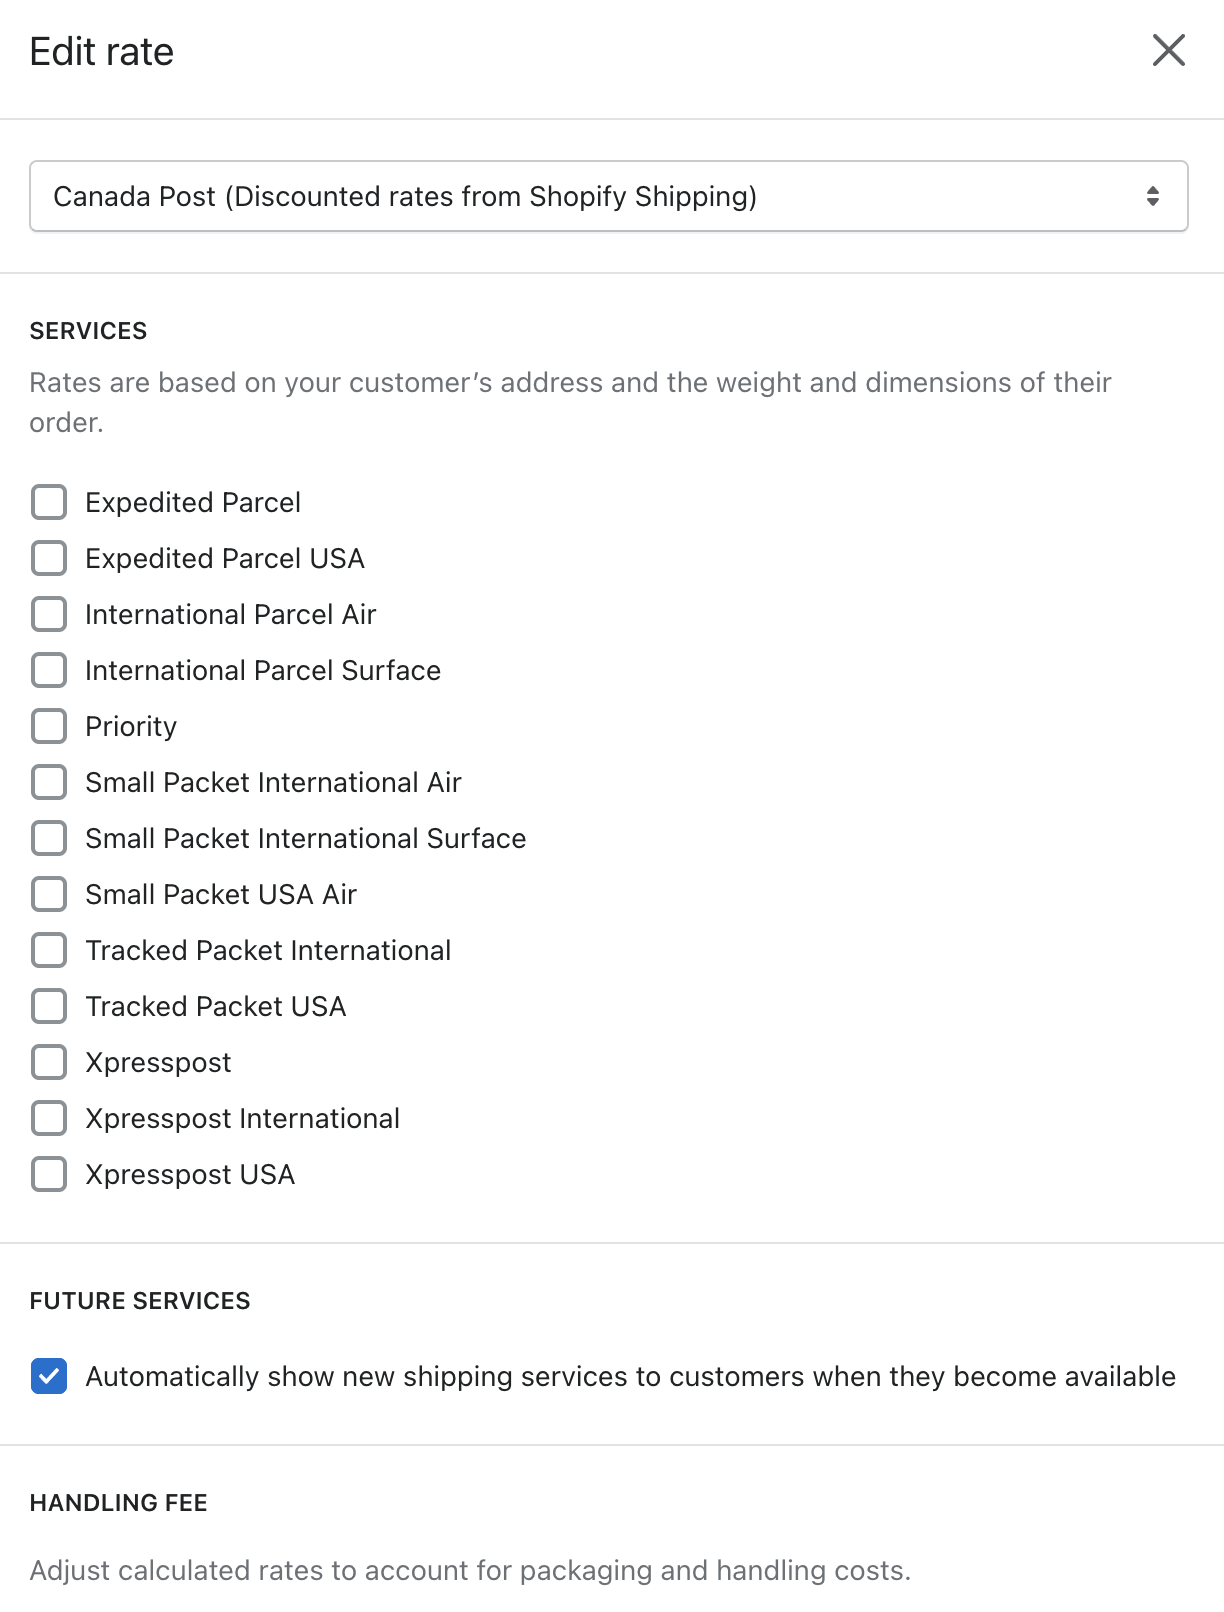
Setting shipping rates calculated on time real-time
Real-time shipping rates are based on the shipping details you entered when adding your products and package dimensions on the Settings > Shipping page. . Customers can choose their preferred service and rate at checkout.
You can also adjust these fees to include a handling fee to account for additional costs such as packaging or your time, in addition to courier fees.
5. Setting Up Tax
As a business that sells goods or services, you must collect tax to send to the government every time someone places an order in your store (some exceptions apply, such as for digital products in many jurisdictions) .
Shopify will help you automatically handle most tax calculations using predetermined sales tax rates around the world. Still, it’s a good idea to do some research or ask a tax professional to make sure you’re collecting the correct amount of sales tax.
You can override the default tax settings if there are specific requirements for your region, such as tax for specific products or shipping.
Go to Settings > Taxes and Fees in Shopify to set up your tax regions. Here, you can edit the default rates, if you wish, or apply overrides if specific conditions apply in your region or for your products.
Since Kinda Hot Sauce operates in Canada, we will set our default tax rates for Canada. If you have a tax identification number, you can enter it here or you can do it later.You can see how much tax you’ve collected in Analytics > Reports.

None of this should be taken as tax advice and you should consult a tax professional if you are unsure of your tax situation. Shopify doesn’t file or remit your sales tax for you.
5. Connect a payment gateway
We are in the final stretch! The next step is to decide your store’s payment methods and how you, as the store owner, will be paid.
Go to Settings > Payments to set up your payment provider. Payments. Shopify has made it easy to start accepting all major forms of payment with Shopify Payments.
As long as you operate your business in one of the supported countries and you’re not considered a prohibited business, you can enable Shopify One-Click Payments and pay 0% additional transaction fees. You can also choose from over 100 third-party payment providers here or offer your customers additional payment options, such as PayPal.
In my case, I’ll complete the account setup for Shopify Payments by entering my business and banking information. I can also Manage my settings for Shopify Payments and do things like:
- Choose the payment options I want to offer, such as different credit cards (for example, Visa) , and accelerated one-click checkout options like Apple Pay and Shop Pay. Shop Pay is Shopify’s one-click checkout option that allows any customer at any Shop Pay-enabled store to save their payment information for future purchases.
- Sell in multiple currencies, which will automatically convert their prices to the client’s currency if you enable it. Since we are primarily selling in Canada and the US, we will be adding the US dollar and Canadian dollar to our enabled currencies.
- Set your payment schedule. You can receive your payment daily, weekly or monthly; it all depends on your preferences when it comes to your cash flow.
- Toggle on additional fraud prevention measures such as CVV and zip/postal code verification to add an extra layer of security.
- Customize how it appears on your customers’ bank statements. We will use KINDAHOTSAUCE for customers to recognize our brand.
The currency in which you sell your products can be set in Settings > General. I will sell in US dollars as it will be familiar to US and Canadian customers.
6. Choose a Business Structure
Now you’re done with all the fun parts of starting an online store: choosing your name, building your site, finding products, writing product descriptions. But before you launch, you want to legalize your new business.
While it’s not the most fun part, incorporating your business is a must. A government-recognized legal entity also protects your personal assets if something goes wrong. It also helps you:
- Potentially receive a lower tax bill
- Secure business financing more easily
- Create retirement plans
- Separate your credit score from your personal score
Common business structures for new business owners include:
- Sole proprietorship . An unincorporated business with no legal distinction between the business and the individual who runs it. Qualifies as a non-employer business and is the easiest to set up and manage. About 40% of small business owners have a non-employer business as their primary source of income.
- Partnership. A partnership is a single business with two or more owners. Each owner contributes to the business through funds, property, labor, or skill. Partners share responsibility and profits.
- Limited Liability Company (LLC). An LLC is a hybrid business structure that combines partnership with the liability protection found in corporations.
To learn more about the best business structure for you, read Business Types: Which Legal Structure Is Right for Your New Business?
7. Prepare your store for launch
With all the work we’ve done so far, we could launch our store now if we wanted to. We would simply disable password protection in Online Store > Preferences, which is the final step in flipping the open sign and allowing people to start buying our products.
In fact, if you’re in a hurry to get started, you can skip some or all of the steps below and come back later when you have time.
But in this tutorial, I’m going to make sure my store not only makes a good first impression and offers a smooth customer experience at launch, but is also in a good place to start trading.
That said, here are the final steps we’ll go over:
- Adding a custom domain
- Install relevant sales channels
- Customize your email/SMS notifications (optional)
- Set up your store for marketing (tracking and analytics)
Add a custom domain
Buying a domain is like claiming land on the web. That’s why it’s called a “web address”.
A custom domain is a fully branded URL that replaces the default URL that was created based on the store name you chose in setup (for example , it could buy yourstore.com to replace yourstore.myshopify.com as your public URL.)
In Settings > Domains you can buy your domain directly through Shopify in a matter of seconds , or you can transfer your domain from another registrar and connect it to your store.
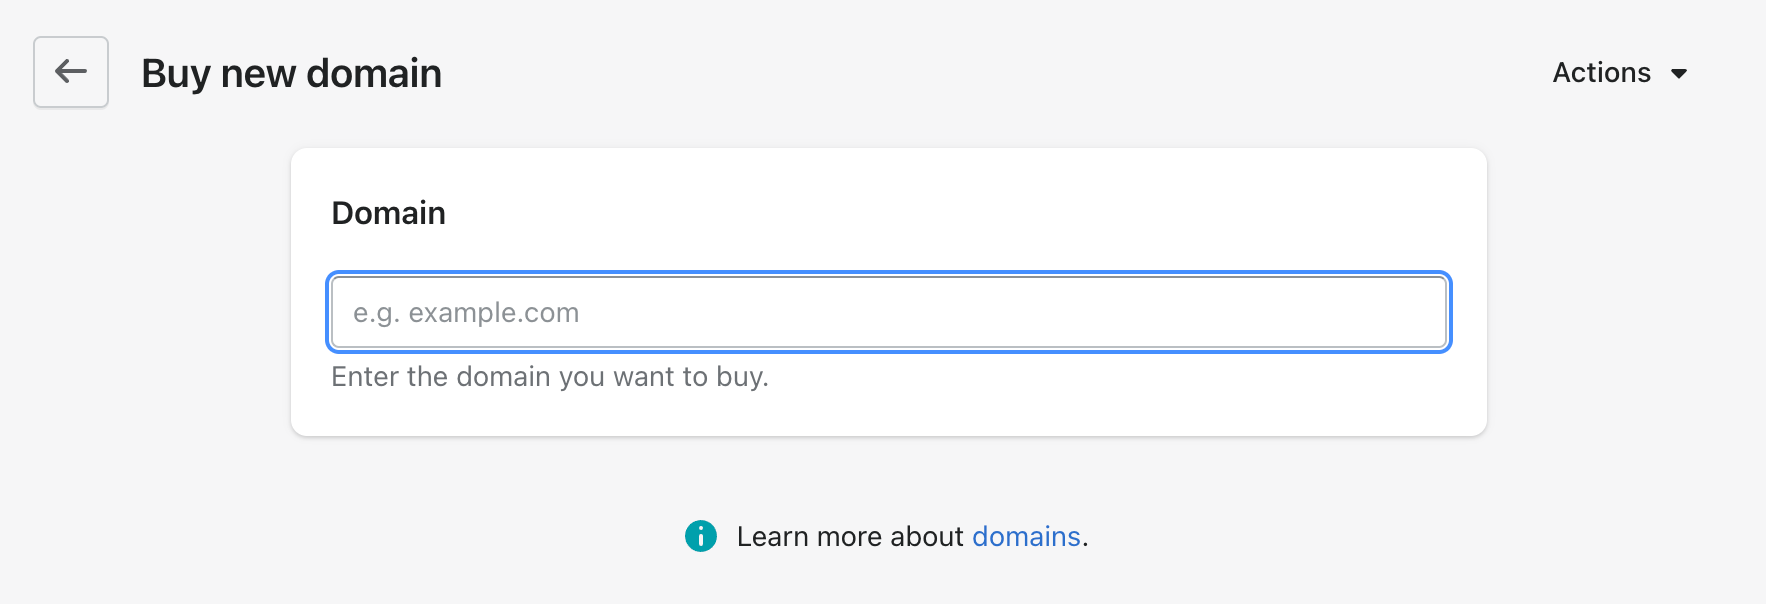
Since the .com is taken over, I will be purchasing the .shop extension for KindaHotSauce through Shopify. KindaHotSauce.shop is now my store URL.
Install Relevant Sales Channels
One of the benefits of learning how to use Shopify to power your business is that your online store is just one of many sales channels you can use to sell your products. You can create online purchases in a variety of places, selling your products to additional sales channels to meet your customers where they are, all while keeping track of your products, inventory, and reporting in the same Shopify account so you always know what is happening. in your business.
While you don’t need to connect them all right away to create your online store, it’s a good thing to keep them in mind when you’re ready to explore new ways to source your products. in front of the right buyers.
Not every sales channel will be relevant to your unique business, but here are a few worth highlighting:
- Shopify POS . Our point-of-sale solution for accepting payments in person and easily syncing physical retail sales with your online Shopify store and inventory.
- Social media. > You can sell your products through a Facebook shop on your Facebook page, product tags on your Instagram posts, Pinterest, and more.
- Marketplaces. Lots of buyers they begin their purchase process on markets such as Rakuten or eBay.
- Google channel. Google is the most popular search engine in the world. With the Google channel, you can run Google Shopping campaigns and list your products for free on the Shopping tab in Google search results.
- Buy Button. If you have a website or blog where you want to sell your products, you can install the Buy Button sales channel to insert your products on another page web, allowing you customers to buy them and check them out there. You can even create checkout links to send directly to a customer and have them jump straight to checkout.

You can quickly add sales channels by clicking the arrow next to Sales channels and type the channel you want to add. You can also view our full list of sales channels in the Shopify App Store. Then, on your product pages under Product Availability, you can choose which products are available on which sales channels.
I’ll definitely consider Facebook and Instagram channels as they a brand like Kinda Hot Sauce will rely heavily on social media marketing.
Customize your email notifications (optional)
Shopify comes with a series of automated emails and SMS out-of-the-box notifications to let customers know about order confirmations, status updates, and more.
I’ll leave them alone for now, but if you need to customize them for any reason (to communicate specific information or just better reflect your brand), you can edit these notifications in Settings> Notifications.

8. Launch your store 🚀
I’m finally ready to launch! Is my store perfect? No. But I feel good enough to put time and money into marketing it and learn from the feedback I get to make it even better over time.
I can remove my password page (in Settings > Preferences) and start telling the world I’m open for business.
The journey of creating an online store ends here for this demo store. But it’s just beginning for you. Here are some of the next steps and resources to help you boost your business after launch:
- Attract customers to the online store
- Generate traffic to get your first sales
- Learn from your traffic
- Optimize your store
9.Promote Your Store
Marketing is different for every business, but regardless of your strategy, it’s important to lay the right foundation as soon as possible so you can get the most out of your efforts as you build traffic. to your store
In particular, I want to cover the basics of almost all eCommerce marketing strategies that are important to new store owners.
Analysis
Shopify Reports (in Analytics > Reports) not only helps you monitor the traffic and sales generated by your store across all your sales channels, but also as a treasure trove of great knowledge to improve your business. over time.
You can see where your traffic and sales are coming from, your online store’s overall conversion rate, traffic and sales over time, and more.
For more detailed analytics and flexible reporting, you can set up Google Analytics for free.
Facebook Pixel
Have you ever visited an online store, considered a product, but you have run out of buying it? only to see an ad a few days later? Or have you ever seen an ad for a product from a company you’ve never heard of that seemed like it was made for you?
That’s made possible by something called the Facebook pixel, clever code that learns from how people interact with your brand and your website, from liking your social media posts to making a purchase. , and makes it possible to customize how you advertise to them over time.
The Facebook pixel learns from all the traffic it sends to your online store, so if you plan to advertise on Facebook or Instagram at any At some point in the future, it’s important to have your Facebook pixel set up.
You can get clear instructions on how to set it up for your Shopify store using our free Facebook marketing app (note that this process will require you to also set up a Facebook page and ad account for your business).
Search Engine Optimization (SEO)
Many buyers turn to Google and other search engines search as part of your purchases. journey, whether it’s to find a product they saw or heard about from a friend or are doing some parison shopping communication for a purchase.
Help your online store pages and products appear on these search results can create passive streams of relevant traffic for free. However, it takes time to grow this source of traffic, especially if you’ve just built your store’s website.
You can lay the right foundation through a practice called search engine optimization, which helps us presented for the first time. when we set up our Products and Pages in our store.
Other areas of your store where you’ll want to take SEO into account are the title and meta description fields, which can be found under Online Store > Preferences. For Kinda Hot Sauce, I want to make sure I include my brand name and a description of what my business is about, based on the keywords people might search to find my business.
You can use a free keyword research tool like Ubersuggest or Keyword Surfer (Chrome extension) to estimate how many times people search for a specific query in a month and what types of searches are performed around it. that keyword. Estimated monthly search volumes are not always 100% accurate, and the more popular a search is, the more competitive it tends to be.
Always remember that a search engine’s job is to display the most relevant results. to the user, so you should try to prioritize keywords that are directly relevant to your business.
Let’s take some hot sauce as an example to illustrate some of the key findings that can emerge from even the simplest keyword research:
- “Medium hot sauce” and “mild hot sauce” generate an estimated 480 and 40 monthly searches, respectively. Since they tie closely to the theme of my business, I can prioritize them in my home page title and description.
- Many people are also looking for a variety of spicy food recipes (eg “wings”). , which means you could blog later to create content around recipe searches involving hot sauce.

While I’m here, I’ll also add a Social Sharing Image to make sure I create a good first impression every time a link to my shop is shared on social media or in direct messages.
Recommended: See our SEO checklist for other steps you can take to help your store appear in relevant search engine results.
- Shopify App Store
- 26 Free Shopify Apps to Help You Create, Manage, and Grow Your Store
Create a Store successful online store store today
Today, you can sell anything online, including handmade goods, courses, graphic design services, custom printed t-shirts and other apparel, home baked goods, and more. As you can see, creating an online storefront is easy when you follow the simple steps above. It has a low start-up cost and can help you start your own business in no time.
Illustration by Marina Verdu.