Inverting the colors of your image is a great way to add a vintage artistic touch to your designs. Color inversion is usually a simple process, but GIMP offers several alternatives and controls that can be useful if you know how to use them. In this tutorial, we’ll go over how to invert colors in GIMP, and we’ll also see how the linear invert and value invert options work.
In summary, the way to invert colors in GIMP is to select the layer to which you would like to apply the changes and navigate to:
Colors > Invert
This will do a basic RGB color inversion. However, you may notice that there are additional investment options as well, namely linear investing and value investing. Let’s take a closer look at what all of these functions do.
Invert Colors in GIMP
To invert colors in GIMP, select the layer you’d like to apply the changes to and navigate to Colors > Invert. This will perform a standard RGB inversion where each color is swapped with its opposite color on the color wheel.
In the following video tutorial, I go through the process and explain how it all works in detail:
Continue with written instructions.
Table of Contents
- How to Invert Colors in GIMP
- How Linear Inversion Works
- How to value inversion works
How to invert colors in GIMP
First let’s see how to invert colors in GIMP using a standard RGB inversion.
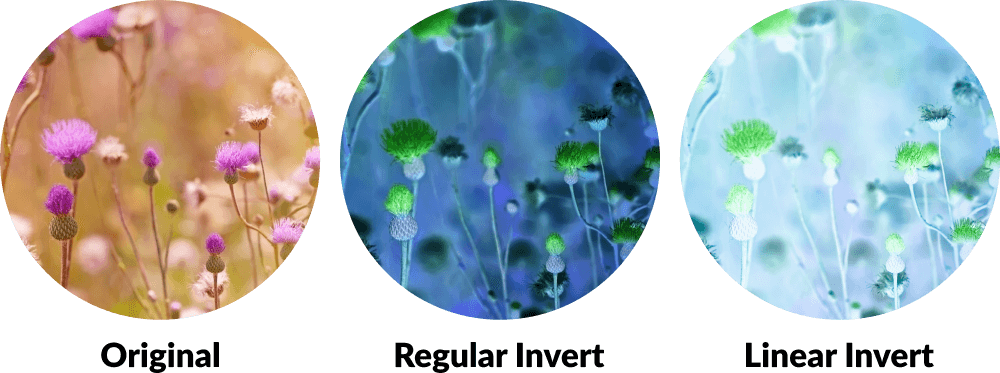
For this Demonstration I will use the following example image:

To invert the colors, simply navigate to:
Colors > Invert
This is what it looks like once applied:
Color Inversion Explained
Now that you know how to invert colors in your image, let’s briefly review what exactly happens when you invert colors in an image. image.
The following is an RGB color wheel:

Any time you invert the colors of an image, you are essentially taking each color from that image and changing it to the opposite color on the RGB color wheel.
So, for example, the red pixels in your image will turn cyan, the green pixels will turn magenta, the blue pixels will turn they will turn yellow and vice versa. This happens because these are all colors that are opposite each other on the color wheel.

And the same works for grayscale tones than Good. Black pixels become white, white pixels become black, and gray pixels are also swapped. 80% gray will become 20% gray, and vice versa.
Considerations
Here are some hints and tips to keep in mind whenever you invert colors in GIMP:
- The color inversion will only be applied to the layer you selected. If nothing changes on your screen once the inversion is applied, it’s probably because you selected the wrong layer.
- Color inversions can be applied locally via selections . So if you only want to invert the colors of a specific area of your image, and not the entire image/layer, all you have to do is create a selection around the area using one of the many selection tools in GIMP.</ li
- Because color inversions can be applied to selections, that also means that you won’t be able to invert the colors of the entire image if you have a selection enabled. This could be another reason why you may not get the desired result when using this function.
On Windows and Linux platforms, selections are easy to spot because they are rendered like dotted canopies. However, if you’re a Mac user, these selections are (for whatever reason) invisible. So you’ll need to deselect everything to be sure.
To make sure you don’t have selections enabled, go to:
Select > None
If the “none” option is greyed out, that means you currently don’t have any selections enabled.
How Linear Inversion Works
GIMP doesn’t just let you do a simple Linear Inversion. RGB colour. It also has another option for inverting colors, known as Linear Invert.
It’s not entirely clear what exactly Linear Invert does from a technical point of view.There is not much information about this function. In fact, it’s a blank page on the GIMP website that simply says “TO DO”.
That being said, here’s a visual representation of what the linear inversion function does on an image once time it is applied, compared to a normal one. RGB Invert:
Although I’m not sure, I’m guessing that the point of Linear Invert is to invert the colors of the image, but while it maintains some semblance of brightness and/or lightness of the original image.
Anytime you invert the colors of an image using a standard RGB inversion, it tends to invert the brightness of the image as well. Bright landscapes suddenly turn dark and dreary, and vice versa. This is due to the nature of how color inversion works.
The advantage of using Linear Invert is that you can invert the colors in an image, but without also inverting the brightness.
Again, the documentation on this is not clear. So if I misunderstood this, feel free to correct me in the comments.
To perform a linear inversion, all you have to do is select the layer you’d like to apply the effect to and navigate. a:
Colors > Linear Invert
It’s just below the standard invert option.
How Value Invert works
The last The way you can invert colors in GIMP is by performing a Value Inversion.
Value inversion is fundamentally different than standard RGB color inversions. By making a value investment, you are not actually investing any of the colors. Instead, you are inverting the value (v) channel of the HSV model for that color.
Here is a visual representation of what happens when you do a value inversion:
As you can see, the colors in the image didn’t change as much as the intensity of the dark/light areas. This is because only the value property was reversed.
Value represents the V property of an HSV ( hue, saturation , value) color model.
If you open the color picker in GIMP and click the HSV tab in the upper right corner, you can see the properties of HSV of the chosen model. color:
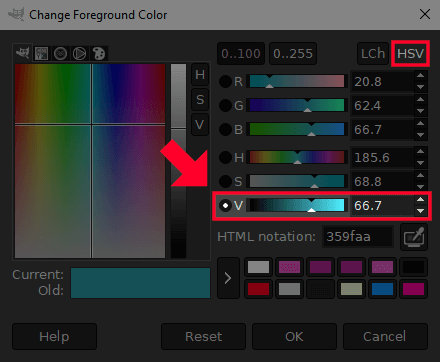
The value property operates on a scale of 0 to 100. Making a value investment will change that property to its opposite. So, for example, a color with a value of 80 will become 20 once inverted. A color with a value of 10 will become 90 once inverted, and so on. All other color properties will remain unchanged.
I’m not quite sure when a function like invert value might be useful, but people use GIMP for many different reasons, and I’m sure this function would be useful. useful. It wouldn’t be there if it wasn’t useful to someone in some way. Do you have a usage example for inverting the value of a color? If so, please let me know in the comments!
Conclusion
Because of how robust and complete the application is, there are several ways you can invert colors in GIMP, and not just a standard RGB inversion. There are commercial design applications that don’t even have these options. Hopefully this lesson has shed some light on how color inversion works in GIMP.
If you have any questions or need clarification on any topic covered in this tutorial, just leave a comment below.
Become A Master Of GIMP!
Want to learn more about how GIMP works? Take a look at The GIMP Series – a comprehensive collection of 60+ videos where I go over the main GIMP tools, features, and functions and explain what they do, how they work, and how they work. why they are useful.
Join Now
This post may contain affiliate links. Read the affiliate disclosure here.
.