Want to create a WordPress quiz for your readers? Quizzes can help you do everything from catch some of the BuzzFeed viral magic to learn more about your reader demographics. So whether you use them for fun or business, they are a powerful weapon in your WordPress arsenal.
In this post, I will give you a detailed tutorial on how you can create a WordPress quiz. using a free plugin called Quiz Cat.
How to Create a WordPress Quiz with Quiz Cat
Quiz Cat is a free plugin with a premium version that offers even more functionality. I chose to use Quiz Cat for this tutorial because:
- The free version has enough functionality to be useful
- Your quizzes come with a dedicated home page
- You can display different pages of results depending on how people respond to your quiz
- It’s responsive, which means it works well on both desktop and mobile devices
Put it all together and it’s the best tool I’ve found to create a free WordPress quiz.
The only downside is that in the free version you can’t create a true personality quiz. That is, you can only create a quiz where each question has only one correct answer. If you want to create more open ended quizzes, you will need the pro version. Or, you can always create a WordPress quiz if you only need to ask a single open-ended question.
Here’s how to use Quiz Cat to create a WordPress quiz:
Step 1: Install and Activate Quiz Cat
Quiz Cat is free and included in the WordPress.org plugin directory. To get started, you can install the plugin directly from your WordPress dashboard:

Make sure to turn it on, then you can head over to the new Quiz Cat link in the sidebar of your WordPress dashboard.
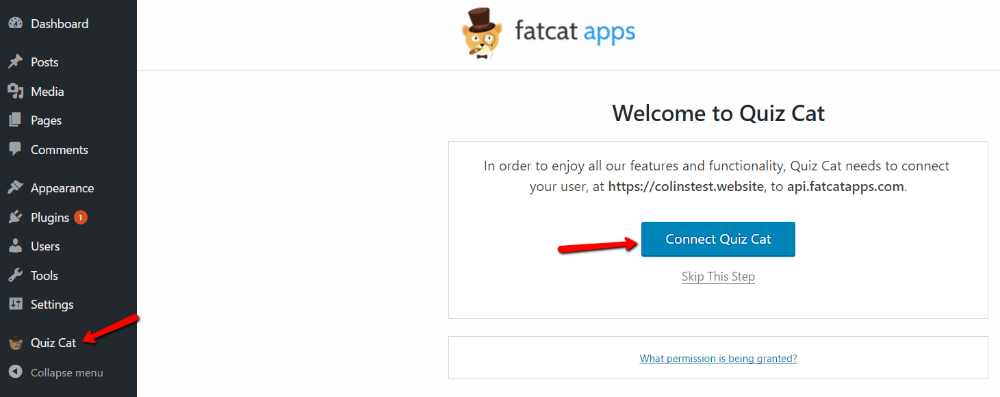
Step 2: Connect to Quiz Cat API
When you click the Quiz Cat link, you will see a message asking you to Connect Quiz Cat. This is required to gain access to all features. To do that, just click the button:
And that’s it! There’s nothing else to do.
Step 3: Create a WordPress Quiz
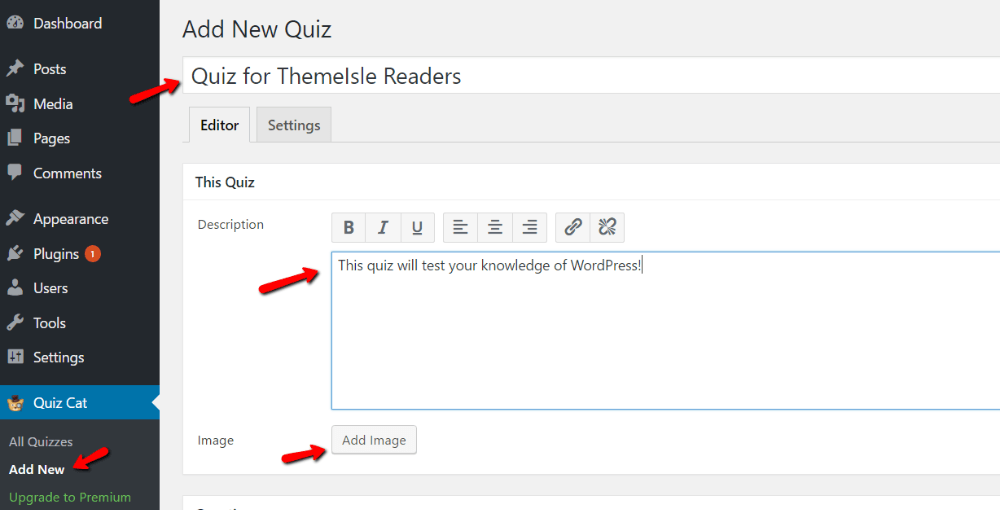
Now that you’re logged in, go to Quiz Cat → Add New to create a new quiz.
First, give your quiz a title and description. You can also add an image to the description if you want:
Step 4: Add your questions and answers
Next, scroll down the page a bit to the Questions box. Here, you’ll add all your questions and answers.
First, enter the question text. You can also add an image as part of the question.
Then, enter the Correct answer. If a user chooses this answer, they will get 1 point.
After that, they can enter as many wrong answers as they want. To add a new incorrect answer, simply click the Add Answer button:
Once you’ve finished your first question, you can repeat the process for as many questions as you’d like. like your test to contain by pressing the +Add button:
Step 5: Add your results
Once you’re done with your questions, you need to add the results that respondents will see in the end of the questionnaire. As I mentioned, you can add different results based on how the person answered the quiz.
Since each correct answer is worth 1 point, the Results defaults > page will cover all possible results. So if you have a quiz with 4 questions, the default results page covers all scores from 0 to 4 points.
You can style it by adding a title, image, description , and even custom HTML if you want:
But what if you wanted to show a “results” page to people who answered 3 or 4 questions correctly and another to keep those who only did they answer 0? -2 questions correctly? No problem! Simply click the +Add button to add as many different “results” pages as you like. You can rearrange them as needed by dragging and dropping them.
Every time you add a new “results” page, Quiz Cat will automatically adjust the number of points associated with each “results” page to split things up evenly:

Step 6: Get a view preview your quiz
Once you’ve added all the “results” pages you want, you can preview your quiz by clicking the Save & Preview button at the bottom:
You’ll see your test landing page first, and if you’d like to see the test in action, you can take it yourself to make sure everything works:

Once you’re happy with how everything looks, you’ll be ready to embed your quiz on your live site!
Step 7: Embed Your New WordPress Quiz
To display your quiz on the front-end, all you need to do is What you need to do is paste the shortcode wherever you want your quiz to be. To find your shortcode, you can go to Quiz Cat → All Q uizzes:
Then simply paste that shortcode into the WordPress Editor on any post or page you want display your questionnaire. When you publish the post or page, your quiz should be live:

How about you create a BuzzFeed? style personality quiz?
Unfortunately, if you want to create a BuzzFeed-style WordPress quiz, you’ll have to upgrade to the pro version of Quiz Cat for $29. You’ll also get access to social sharing buttons to help your quiz go viral.
But if you’re not interested in BuzzFeed personality quizzes, the free version should work for all other situations in the ones you need to create a WordPress quiz.
Summarizing things
Quiz Cat provides an easy way to create a WordPress quiz, even if you don’t know a single line of code. The plugin is pretty straightforward, so in combination with my tutorial, it should mean you won’t have any trouble setting up your quiz.
If you need any additional help, please leave a comment and I’ll do my best to help you.
.