
How to Add a Watermark in Lightroom
Like it or not, watermarked photos are an important part of producing and sharing images online, especially if your images are the way he makes a living!
Are you wondering how to put a watermark on your photos? Today I’ll walk you through the steps of creating and adding a watermark to your images in Lightroom Classic! (If you want to watermark in Photoshop, we have a separate tutorial here)!

Two things to know before you begin:
- Apply a halfway mark water to your photos while you EXPORT or post your photos online. You won’t see the watermark on your images while inside Lightroom.
- Certain Lightroom modules (print, web, and slideshow) allow you to use watermarks while creating in those modules.
Step 1. Open Lightroom’s Edit Watermarks Dialog

To start creating your watermark, select ” Edit Watermarks” in the Edit menu if you’re on a PC.
If you’re on a Mac, select “Edit Watermarks” in the Lightroom menu. This will open a new dialog similar to this:

Step 2. Choose the Watermark Type
Next, you’ll need to choose the watermark type that want to create: text or graphic watermark. You can find these options in the upper right corner of the Watermark Editor.
-
- A text watermark is typing the text that you want to use as a watermark. You can use any font on your computer for your watermark.
- A graphic watermark will require that you have an image that you want to use as a watermark. The one you choose will look best if saved as a PNG file with a transparent background (see additional video below).
Step 3. Apply Options to your watermark
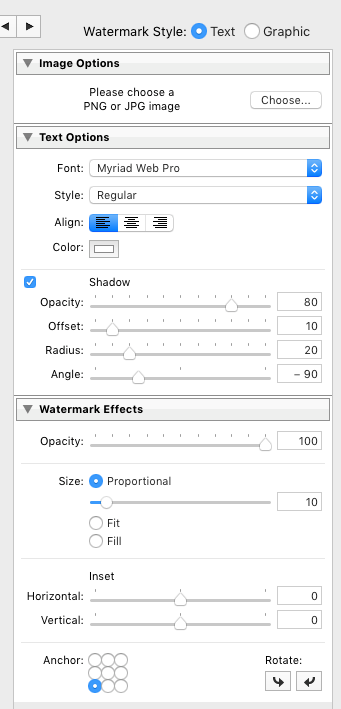
You can adjust the appearance of the watermark using the menu options located on the right side of the Watermark Editor. There will be font and drop shadow options if you use a text watermark. For text and graphic watermarks, there will also be options to adjust the opacity and position of the watermark.
Don’t be afraid to play around with these options to see what they do.
Step 4. Save the watermark in Lightroom
When you’re done creating your watermark, click the “Save” button and give your file an original name so you can find it easily. Once saved, it will be available in any Lightroom module that allows you to use a watermark, including during export AND when using Lightroom publishing services.
Remember that there is no limit on the number of watermarks you can create (as far as I know). So if you want, you can make many different watermarks for different uses.
Not sure about adding a watermark to your photos? You can read more about the importance of watermarking images here.
How to Create a Simple Text Watermark in Lightroom – Video Tutorial
As a BONUS, I created a bonus video (below) to show you how to create a transparent PNG file from a Photoshop file so you can create a graphical watermark in Lightroom. In the video, I also cover how to create and save a graphic watermark in Lightroom (this video is similar to the previous one but will give you a graphic to place on your photo).
Creating a graphic watermark in Lightroom – Video Tutorial
Enjoy creating your watermarks and adding them to your photos!
Do you have any questions or comments about of Create and Add a Watermark in Lightroom? Just leave us a comment below – we’d love to hear from you. And PLEASE SHARE this post using the social sharing buttons (we really appreciate that)!

.