Want to start a food blog but don’t know where to start? I know how frustrating it can be to deal with technical stuff when you really just want to share that amazing recipe. Whether you want to start a cooking blog or become a more successful food blogger, I hope these tips ease your technical woes.
Ready to start a beautiful food blog? You have two options:
- Hire a web designer to do it for you. Custom designs often cost thousands of dollars, but they are certainly One option. if you have money to spend Be sure to ask for referrals and lead times before writing a check.
- Do It Yourself. Here’s how to create your own self-hosted WordPress website. It will cost you as little as $2.95 per month in hosting, plus the cost of a theme (free up to $130). I built this site myself using the tools provided below, so I know you can do it!
Start Your Own Food Blog: The Basic Steps
Here are the basic steps to setting up a beautiful and functional self-hosted WordPress food blog. Your blog will have its own domain name and its own distinctive look and feel, and it will be able to scale with you as your blog grows. When you’re starting a food blog, I recommend following these steps to give yourself the best chance of success.
1) Give your blog a name and buy a domain name to match.
Domain names are short, easy to remember, and usually end in .com (yourblogname.com). Cost: Free with Bluehost or around $15 per year elsewhere.
2) Find a reliable web host.
A web host hosts your website and makes it accessible to the world wide web. In other words, your website “lives” on the servers of your web host. Cost: $2.95 per month and up.
3) Install WordPress.
WordPress is the best of the best online, industry standard blogging software. Cost: Free!
4) Install a WordPress theme.
Your WordPress theme will determine the look, feel, and functionality of your website. Cost: Free at $130.
5) Set up Google tools.
Google offers invaluable tools and services like Google Analytics and Search Console. Cost: Free!
6) Install WordPress plugins.
WordPress plugins extend the functionality of WordPress in certain areas. For example, one of my recommended free WordPress plugins helps prevent comment spam. Cost: Free, mostly!
7) Start Posting!
Post those recipes, stories, and photos. Cost: hard work!
Step 1: Name your blog and buy a domain name to match.
Propose a name for your new blog can be the most difficult step. You can start by brainstorming by creating a short mission statement or listing words that describe your cooking style, your lifestyle, your background, etc. Add your name and/or your dog’s name. 😉 Talk about it with your friends. There are plenty of big names out there that haven’t been taken yet, I promise!
Characteristics of an Ideal Blog Name
- Descriptive
- Memorable
- Short
- Easy to spell
Once you have some possible names for your blog in mind, you’ll need to check their availability. Since .com is the standard domain suffix, keep trying possible names until you find one that is available under .com. Don’t use hyphens or other punctuation to make it work (they’re too hard to remember).
You can buy your domain name from several providers, but it’s easiest to buy it through your web host . Go to Bluehost to enter your desired domain name. Press “search” and it will tell you if your domain name is available. If so, get it fast!
Once you’ve chosen your perfect domain name, you can get it for free with your BlueHost hosting plan. You can also just buy the domain name and find out the rest later (you can always transfer your domain name to another host if you want). Buy your domain name now, before someone else does!
Step 2: Find a reliable web host.
You’ll want to start with a Affordable shared hosting plan provider that offers automatic WordPress installation. I know this hosting thing sounds complicated, but pick one and go! Your food blog is waiting for you.
Best web hosting for new food blogs:

BlueHost: I recommend Bluehost for beginners and growing blogs because it’s affordable, reliable, easy to set up and fast and offers 24/7 customer support. Bluehost’s “starter” plan is as cheap as hosting. Click here to get started with BlueHost for just $2.95 per month and get a free domain name.
With Bluehost, like all other cheap hosts, you’ll pay for your plan up front.Don’t worry though, if for any reason you’re not happy with Bluehost, you can cancel within 30 days for a full refund. (Excludes domain fee, which you’d pay elsewhere anyway.)
Good to know: Bluehost loves Cookie and Kate readers. Buy your hosting through any of my Bluehost links and you’ll get the best deal available. No promo code required.
Here’s how to get the most out of your Bluehost plan:
First, choose your plan. I recommend the basic plan, which is the least expensive and offers everything you need to get started.

Then, choose your term. To get your free plan name domain for one year (a $15 savings) and a significant discount on your monthly fee, you’ll need to pay for at least one year of hosting up front. Feel free to choose a longer term if you’re serious about blogging and want to save more money, but a year is a great start.

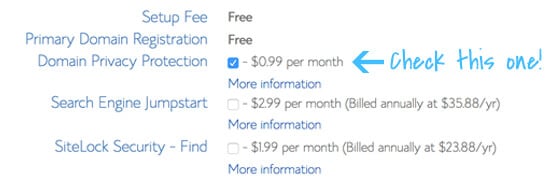
Lastly, choose your plugins. The only plugin I would choose is “Domain Privacy Protection”, which will ensure that your personal address and phone number are kept private. Otherwise, your personal information will be available to merchants and the general public. Be careful!
Step 3: Install WordPress.
This part is very easy. If you purchased a shared hosting plan from Bluehost as suggested, WordPress will be installed on your site automatically!
Once you’re logged into your WordPress site, go to Settings > Link Settings Page permalinks and change your permalink structure to “Position Name.” Press save. Now it’s time to make your blog look pretty.
Step 4: Install a WordPress theme.
Now for the fun part! ! Your WordPress theme will determine how your site looks, so choose a good one.
What to look for in a WordPress theme
- Well-designed: Your theme should fit your aesthetic and offer the features you want. The theme should also be coded by someone who knows what they’re doing.
- Responsive. Responsive layouts are built to provide an optimal viewing experience for your visitors, whether they’re visiting from your computer, phone or tablet. That means your visitors won’t have to pinch and zoom to read your posts; your text will already be a readable size.
- Optimized for search results: This goes along with the last couple of points, because a well-designed site will naturally rank higher. High in the search results than a site built on a topic that is riddled with errors. (Want to know if your potential theme has coding errors? Run your URL through the W3C markup validation service. You don’t have to understand what all the errors mean, but know that less errors is better than more errors.)
- Easy to use: Find a theme that offers built-in design options so you don’t have to edit the code to change basic things. These features will save you a lot of time. Your theme should make it easy for you to change your logo, color scheme, etc.
- Backed by excellent support: When you experience technical issues, a responsive support team and/or the Community forums are invaluable resources.
My bottom line: You can start with a free theme, but I recommend you invest some cash for a premium theme WordPress from a reputable provider. The time and headache you save along the way will make your money well spent.
Recommended Premium WordPress Themes
I originally built this I blog on a base , free WordPress theme and I customized it myself. In February 2014, I launched a redesigned, responsive website and my site has grown significantly since then.
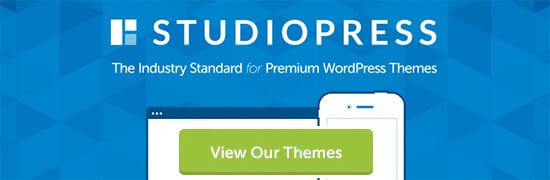
My blog runs on the Genesis framework through Studiopress. I think Studiopress offers the most beautiful and functional themes available. All of their themes are responsive, which is a must these days! Their community forums are also helpful. Get Studiopress themes through Genesis Pro for an annual fee, or get them free with a WP Engine or Flywheel hosting plan (this website is hosted by Flywheel).

Foodie Pro Theme is a fantastic theme by Studiopress designed specifically for food blogs. After seeing how great my friend’s new blog looks right out of the box, I wish I had gone with the Foodie theme.The built-in recipe page template is a huge plus. Check out Foodie Pro Theme.
How to Install a WordPress Theme
Another easy step! Look in the sidebar and hover over “appearance”. Click on the “themes” option. From here, you can upload a theme or browse the available free themes. Hover over any theme to find links to preview or install it. Click here for more detailed instructions with visuals.
Tips for Designing a User-Friendly Food Blog
When Adjusting Your Theme Settings WordPress, keep the following in mind.
- Clear navigation: Keep your blog layout clean and uncluttered, so visitors can find what they’re looking for.
- Encourage the following: Place prominent links to your RSS feed, email subscription option, and social media on each page.
- Comment : Don Does not require CAPTCHA or ask visitors to log in first.
- Suggest sharing: Provide social sharing buttons at the bottom of each post.
Step 5: Set up Google tools.
First, set up a new Google account and email address (Gmail ) for your blog . It’s good to keep blog-related emails and accounts separate, and you’ll need a Google account to use the following tools. Create a new Gmail account here.
Once you have a Google account, sign in and set up the following:
- Google Analytics: helps you track blog traffic. (Note: Please install the tracking code in Yoast SEO plugin settings.)
- Google Search Console: Makes sure your website is up and running. (Note: Install the tracking code in the Yoast SEO plugin settings.)
Step 6: Install the WordPress plugins.
Each of these plugins provide valuable features that might not come automatically with your theme.
Recommended WordPress plugins for food blogs:
- Akismet: Filter spam comments without CAPTCHA. Nobody likes CAPTCHAs.
- Tasty Recipes: Format your recipes for search engine optimization (SEO), add star ratings, create printable recipes and more. This plugin will help your recipe photo appear in search results, and we’ll all be more likely to click on those links, right? This is a paid plugin, but I think the functionality is absolutely worth it.
- Share buttons of some kind: There are many social bookmarking plugins that will add a Like button from Facebook, Pin-It Button, etc. in each post. Pick your favourite!
- Subscribe to Uploaded Comments: With this plugin, your commenters will receive your responses to their comments via email. This is a useful feature for readers and improves engagement.
- Yoast SEO: SEO is a tricky beast and this plugin will help make sure you’ve covered your bases. However, you will need to take the time to go through all the steps and set it up correctly. Be sure to use it to set up Google Analytics and Google Search Console. It will be worth the effort!
How to Install a WordPress Plugin
Easy! Go to your WordPress dashboard and look in the sidebar for “Plugins”. Hover over “Plugins” and click the “Add New” option.
Then find the “Search Plugins” field and search for one of the plugins by name. When you find it, click “Install Now”. Then, configure the plugin settings as directed.
Step 7: Start publishing.
Congratulations! You are now ready to start posting to your new food blog.
I have a food blog! What now?
Here are my top 20 tips for food blogging with more helpful links below.
How do I write great content?
<ul
How do I take photos of appetizing food and make videos?
Practice, practice, practice!
- My Food Photography Tips
- My Composition Tips
- Pinch of Yum Tasty Food Photography eBook
How do I get traffic to my blog?
Search Engine Optimization (SEO): Following SEO best practices will help your posts rank well in search results.
- Google SEO Starter Guide
- WPBeginners Ultimate WordPress SEO Guide for Beginners
- Google Search Quality Rating Guidelines in PDF (160 pages, yikes!)
More resources for building traffic:
- 10 ways to market your new blog by The Everygirl
- 33 Ways to Market Your Blog by Amy Andrews
- 21 Quick Actions You Can Take Today to Set Your Blog Up for Massive Success by Fizzle
- How to Develop a Social Media Strategy for Your Business
How Do Food Bloggers Make Money?
Options include ad networks, affiliate links, sponsored posts , eBooks, etc.
- How to Make Money Blogging by Amy Andrews
- How to Monetize Your Food Blog (Free Ebook)
- How to Create a Business Plan for a Blog by Melyssa Griffin
- El La tram Comparison Pa: Enjoying Others’ Success
- FTC Blogger Disclosure Guidelines
Questions? Please Leave them in the comments section below and I’ll do my best to answer them.
.