The
Java web application is used to create dynamic websites. Java provides support for web applications through Servlets and JSPs. We can create a website with static HTML pages, but when we want the information to be dynamic, we need a web application.
Java Web Application
The purpose of this article is to provide basic details. of different components in the web application and how we can use Servlet and JSP to create our first java web application.
- Web server and client
- HTML and HTTP
- Understanding URL
- Why do we need Servlet and JSP?
- First web application with Servlet and JSP
- Web container
- Web Application directory structure
- Deployment descriptor
Web server and client
Web server is software that can process the request from the client and return the response to the client. For example, Apache is one of the most widely used web servers. The web server runs on some physical machine and listens for the client’s request on a specific port. A web client is software that helps communicate with the server. Some of the most used web clients are Firefox, Google Chrome, Safari, etc. When we request something from the server (via URL), the web client takes care of creating a request and sending it to the server and then parsing the server. and present it to the user.
HTML and HTTP
The web server and web client are two separate pieces of software, so there must be a common language for communication. HTML is the common language between the server and the client and stands for HperText Markup Language. The web server and the client need a common communication protocol, HTTP (HyperText Transfer P rotocol) is the communication protocol between the server and the client. HTTP runs on top of the TCP/IP communication protocol. Some of the important parts of the HTTP request are:
- HTTP method: action to perform, usually GET, POST, PUT, etc.
- Form parameters: similar to arguments in a Java method, for example, user details and password of the login page.
<li URL: page to access
Sample HTTP Request:
GET /FirstServletProject/jsps/hello.jsp HTTP/1.1 Host: localhost:8080 Cache-Control: no-cache
Some of the important parts of HTTP responses are:
- Status Code: An integer to indicate if the request was successful or not. Some of the most popular status codes are 200 for Success, 404 for Not Found, and 403 for Access Forbidden.
- Content Type: text, html, image, pdf, etc. . Also known as a MIME type
- Content: The actual data that is represented by the client and displayed to the user.
Sample HTTP response:
200 OK Date: Wed 7 Aug 2013 19:55:50 GMT Server: Apache-Coyote/1.1 Content Length: 309 Content Type: text/html;charset=US-ASCII
Hello!
Date=Wed Aug 07 12:57:55 PDT 2013
MIME type or content-type – If you see the above sample HTTP response header, contains the “Content Type” tag. Also called a MIME type, it is sent by the server to the client to inform it of the type of data it is sending. It helps the client to represent the data to the user. Some of the most commonly used mime types are text/html, text/xml, application/xml, etc.
Understanding URL
URL is an acronym for Universal Resource Locator and is used to locate the server and the resource. Every resource on the web has its own unique address. Let’s look at parts of the URL with an example. https://localhost:8080/FirstServletProject/jsps/hello.jsp https:// – This is the first part of the URL and provides the communication protocol that is used used in server-client communication. localhost – The unique address of the server, most often it is the hostname of the server that maps to the unique IP address. Sometimes multiple hostnames point to the same IP addresses, and the web server virtual host takes care of sending a request to the particular server instance. 8080: This is the port that the server listens on, it is optional and if we do not provide it in the URL, the request is directed to the default port of the protocol. Port numbers 0 to 1023 are ports reserved for known services, for example, 80 for HTTP, 443 for HTTPS, 21 for FTP, etc. FirstServletProject/jsps/hello.jsp: Requested resource from server . It can be static html, pdf, JSP, servlets, PHP, etc.
Why do we need Servlet and JSP?
Web servers are good for HTML pages with static content, but they don’t know how to generate dynamic content or how to save data to databases, so we need another tool that we can use to generate dynamic content. There are several programming languages for dynamic content such as PHP, Python, Ruby on Rails, Java Servlets, and JSP. Java Servlet and JSP are server-side technologies for extending the capacity of web servers by providing support for dynamic response and data persistence.
Java web development
First web application with Servlet and JSP
We will use the “Eclipse IDE for Java EE Developers” to create our first servlet application. Since servlet is a server-side technology, we will need a web container that supports Servlet technology, so we will use Apache Tomcat server. It is very easy to set up and I leave that part to yourself. To make development easier, we can add configure Tomcat with Eclipse, which helps to easily deploy and run applications. Go to Eclipse Preferences and select Server Runtime Environments and select your Tomcat server version, mine is Tomcat 7. Provide the location of the apache tomcat directory and JRE information to add the runtime environment. Now go to the Servers view and create a new server like the image below pointing to the runtime environment added above.
 Note – If the Servers tab is not visible, you can select Window > Show View > Servers to make it visible in the Eclipse window. Try stopping and starting the server to make sure it’s working fine. If you’ve already started the server from the terminal, you’ll have to stop it from the terminal and then start it from Eclipse, otherwise it won’t work perfectly. Now we are ready with our setup to create the first servlet and run it on the tomcat server. Select File > New > Dynamic Web Project and use the image below to provide the runtime as the server we added in the last step and the module version as 3.0 to create our servlet using the Servlet 3.0 specifications.
  Can be clicked directly Click the Finish button to create the project, or you can click the Next buttons to explore other options. Now select File > New > Servlet and use the image below to create our first servlet. Again we can click on finish or we can review other options through the following button.
  When we click the Finish button, it generates our servlet skeleton code, so we don’t need to write all the different methods and imports in servlet and it saves us time. Now we’ll add some HTML with dynamic data code in the doGet() method that will be called for the HTTP GET request. Our first servlet is seen below.
package com.journaldev.first; import java.io.IOException; import java.io.PrintWriter; import java.util.Date; import javax.servlet.ServletException; import javax.servlet.annotation.WebInitParam; import javax.servlet.annotation.WebServlet; import javax.servlet.http.HttpServlet; import javax.servlet.http.HttpServletRequest; import javax.servlet.http.HttpServletResponse; /** * FirstServlet servlet implementation class */ @WebServlet(description = “My first servlet”, urlPatterns = { “/FirstServlet”, “/FirstServlet.do”}, initParams = {@WebInitParam(name=”id” ,value =”1″),@WebInitParam(name=”name”,value=”pankaj”)}) public class FirstServlet extends HttpServlet { private static final long serialVersionUID = 1L; public static final string HTML_START=””; public static final string HTML_END=””; /** * @ver HttpServlet#HttpServlet() */ public FirstServlet() { super(); // TODO Automatically generated constructor stub } /** * @see HttpServlet#doGet(HttpServletRequest request, HttpServletResponse response) */ protected void doGet(HttpServletRequest request, HttpServletResponse response) throws ServletException, IOException { PrintWriter out = response.getWriter() ; Date date = new Date(); out.println(HTML_START + “
Hello!
Date=”+date +”
“+HTML_END); } /** * @see HttpServlet#doPost(HttpServletRequest request, HttpServletResponse response) */ protected void doPost(HttpServletRequest request, HttpServletResponse response) throws ServletException, IOException { // ALL auto-generated method stub } }
Before Servlet 3 , we need to provide the URL pattern information in the web application deployment descriptor, but the 3.0 servlet uses Java annotations which are easy to understand and less chance of errors.Now choose the Run > Run on Server option from the servlet editor window and use the images below for the options. 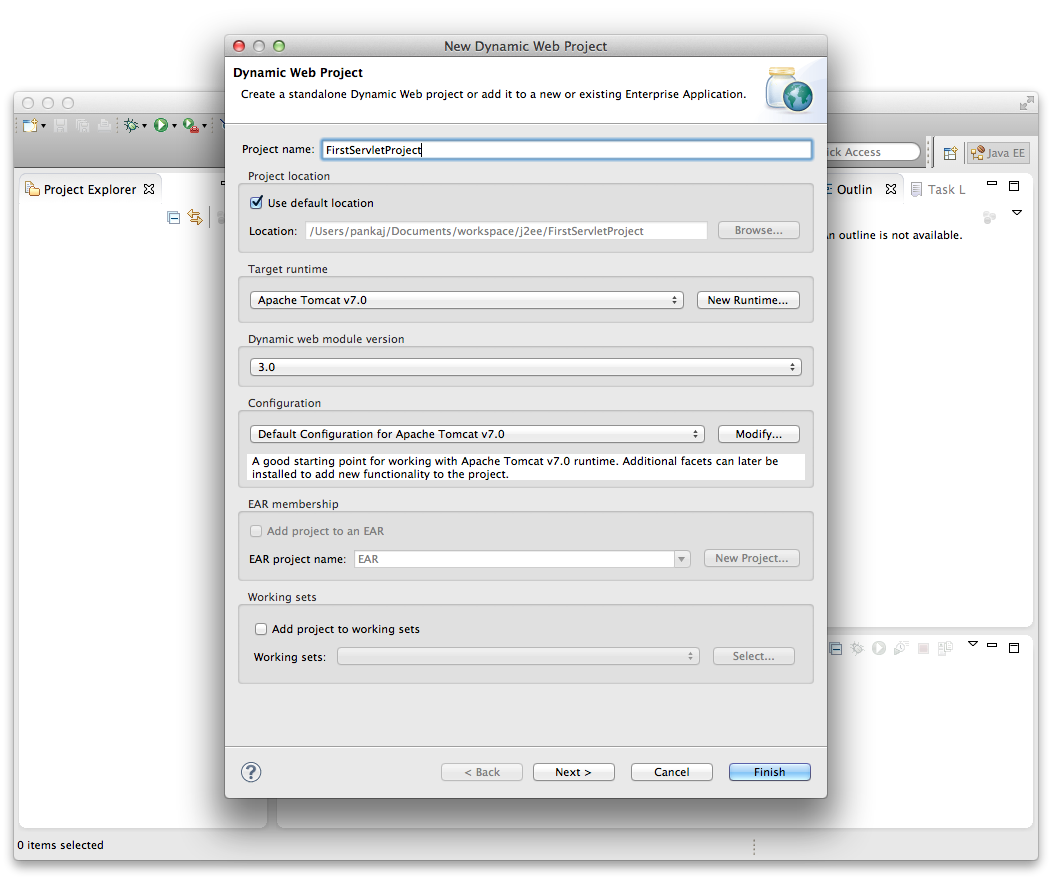
 After clicking Finish, the will open the browser in eclipse and we get the following HTML page.
  You can update it to check that the date is dynamic and sticks by switching, you can open it outside of eclipse in any other browser as well. So the servlet is used to generate HTML and send it in response, if you look at the implementation of doGet() we are actually creating an HTML document as writing in response to the PrintWriter object and adding dynamic information where we need it. It’s good to start with, but if the response is huge with lots of dynamic data, it’s error prone and hard to read and maintain. This is the main reason for the introduction of JSP. JSP is also server-side technology and is like HTML with additional features to add dynamic content where we need it. JSPs are good for presentation because they are easy to write because they are just like HTML. Here is our first JSP program that does the same thing as the previous servlet.
Hello!
Date=
If we run on top of JSP, we get a output like the image below.  The final project hierarchy looks like the image below in Eclipse .
Download FirstServlet project
Download the Servlet Hello World sample project
We’ll discuss Servlets and JSPs in more detail in future posts, but before concluding this post, we should have a good understanding of some of them. the aspects. of Java web applications.
Web container
Tomcat is a web container, when a request is made from the Client to the web server, it passes the request to the web container and its web container work to find the correct resource to handle the request (servlet or JSP) and then use the resource’s response to generate the response and provide it to the web server. The web server then sends the response to the client. When the web container receives the request and if it is for a servlet, the container creates two HTTPServletRequest and HTTPServletResponse objects. It then finds the correct servlet based on the URL and creates a thread for the request. It then calls the service() method of the servlet and, based on the service() method of the HTTP method, calls the doGet() or doPost() methods. The servlet methods generate the dynamic page and write it to the response. After the servlet thread completes, the container converts the response to an HTTP response and sends it back to the client. Some of the important jobs performed by the web container are:
- Communication support: The container provides an easy way of communication between the web server and servlets and JSPs. . Because of the container, we don’t need to create a server socket to listen for any request from the web server, parse the request, and generate a response. All these important and complex tasks are performed by the container and all we need to focus on is our business logic for our applications.
- Lifecycle and resource management: The container is responsible for managing the life cycle of the servlet. The container takes care of loading the servlets into memory, initializing the servlets, invoking the servlets’ methods, and destroying them. The container also provides a utility like JNDI for resource pooling and management.
- Multi-threading support: The container creates a new thread for each request to the servlet and when it is processed , the thread dies. Therefore, servlets are not initialized for each request, saving time and memory.
- JSP support: JSPs do not look like normal Java classes and the web container provides compatibility with JSP. Each JSP in the application is compiled by the container and converted to a Servlet and then managed by the container like other servlets.
- Miscellaneous task: Web container manages resource pool, performs memory optimization, runs garbage collector, provides security settings, multi-application support, deployment hot and various other background tasks. that makes our lives easier.
Web Application Directory Structure
Java web applications are packaged as a Web Archive (WAR) and have a defined structure. You can export the above dynamic web project as a WAR file and unzip it to verify the hierarchy. It will be something like the image below. 
Deployment Descriptor
The
web.xml file is the web application deployment descriptor and contains a mapping for servlets (before 3.0), welcome pages, security settings, settings session timeout, etc. That’s it for the Java Web Application Getting Started Tutorial, we’ll explore more Servlets and JSPs in future posts. Update: The next tutorial in this series is the Java Servlets Tutorial
.