This post may contain affiliate links.
In this article, learn how to connect cursive letters when using script fonts in Cricut Design Space to create the appearance of cursive writing. I’ll show you the three easy steps you need to follow to create beautiful script lettering with the soldering tool.

Ever tried to use a script font in Cricut Design Space and found the letters weren’t connected?
Knowing how to connect cursive letters is an essential skill when using script fonts in Cricut Design Space. In this article, I’ll show you how to adjust the spacing between the letters and match them correctly.
Whether you’re designing wedding invitations or a wooden sign for your home, I think these simple tricks will help you design! your own projects using script-style fonts!
So, let’s open Design Space to a new canvas, and I’ll walk you through the tutorial step by step.
Note: If you don’t already have Cricut Design Space, you can download it for free. You can use the program on Mac, Windows, iOS (iPhone or iPad), and Android devices.

May 2021 Update
Cricut has just released an update to Design Space to make working with fonts easier. The new version includes font kerning, which is the process of adjusting the space between characters in a font. There are many inline fonts available in Design Space, including Cricut fonts and system fonts.
Kerning makes it easier and faster to work with script fonts in Cricut Design Space. Kerned fonts should automatically display correctly, which means you won’t have to adjust manually the letter spacing or go through the “Ungroup to Letters” process.
Okay, let’s learn how to make your script lettering designs look polished and professional.
To get started, use the Type tool to write a word on your canvas. Select a script font from the Font dropdown menu. In this example, I’m using a super cute font called Elderflower.
The best place to find new fonts is the Creative Market. (Don’t forget to check out their 6 free products every week!)
Immediately, you’ll see that the letters in the script aren’t connected. Okay, we’ll fix that!
Adjust letter spacing
The first technique you can use to connect italic letters is to adjust letter spacing.
You’ll find the Letter Spacing tool in the top panel of Cricut Design Space, right next to Font Size. (Be sure to select your text first, so the text editing options appear.)
Click the down arrow to decrease the space between letters, which will bring the letters closer together. For this particular font, I changed the letter spacing to -0.7. You can experiment with the letter spacing to see what looks best with your particular font choice.

Use “Ungroup on Letters”
At this point, depending on your particular font, there may be finished.
However, if your letters still look “wrong” or disconnected after adjusting the Letter Spacing, you can use Ungroup on Letters to adjust the position of each letter individually.
To do this, first select your text. Next, click the Advanced dropdown menu and select Ungroup in letters. (You’ll find the Advanced menu in the top panel of Cricut Design Space, on the right side.)
After clicking Ungroup on letters, you’ll see that each letter is now on its own layer . You can use your mouse cursor to click and drag each letter to adjust its position individually.

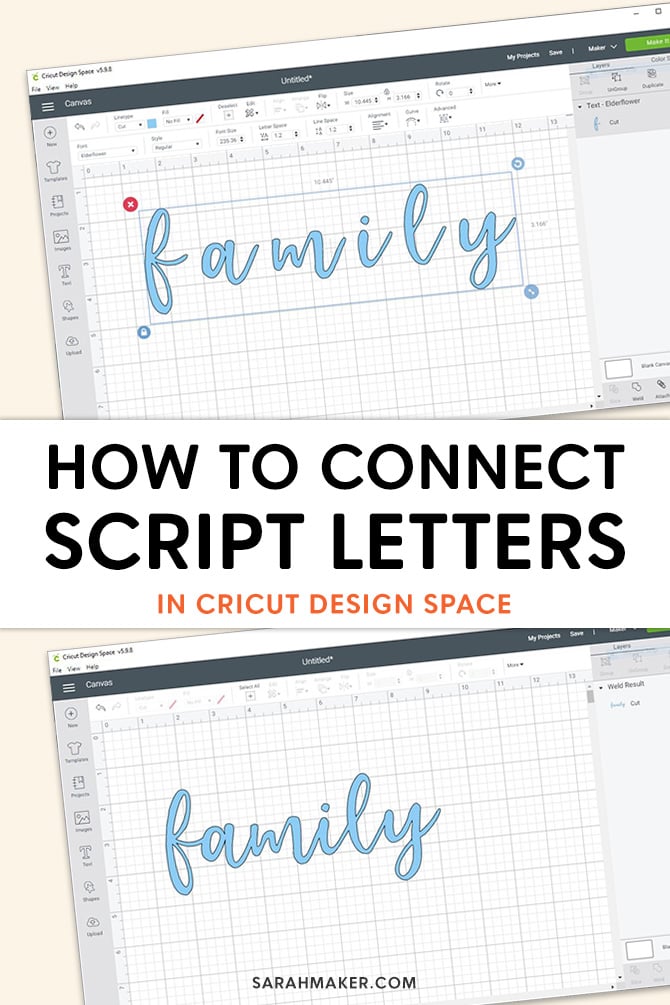
Use Weld to connect the letters
After you have positioned the letters exactly how you want them, use the Weld tool to connect them. Don’t forget to weld the letters or Cricut will cut each letter individually.
Select all the letters you would like to connect and click the Weld button in the lower right corner of Design Space.
The thin black lines between each of the letters will disappear. This tells you that all the letters are fused together, creating a single shape.
You can verify that your letters are fused together by looking at the Layers panel on the right side of the screen. You should see a single layer with the entire word on the thumbnail.
Then, when you submit your design to the mat, you should see the word as a single shape, with a single black outline around the outside. of the word.

Troubleshooting script fonts in Design Space
Here are some frequently asked questions I see about connected italics in Design Space.
Should I use Letter Spacing or Ungroup?
You may be wondering which of the two techniques you should try first: Letter Spacing or Ungroup. is better than the other – like two tools in your toolbox. In fact, I often use both techniques on the same project!
I like to start by reducing letter spacing. Sometimes that’s all what you need.For other projects, reducing the letter spacing is not enough, and you need to use the Ungroup tool on letters to adjust some letters manually.
Letter spacing can cover about 90% of the way , and Ungroup at letters can fix the last 10%.
How much space should I leave between e letters?
When I adjust a script font, I like to overlap the letters as much as necessary to make the hand look natural. Be careful not to leave too long “tails” between letters, or you may find it difficult to get your word out of the mat without ripping or tearing it.
Can I use Attach instead of Weld? ?
Attach and weld may look similar at first glance, but they will give you very different results when it comes time to send your design to the mat.
When you use Attach, the position of the letters relative to each other is fixed. But they are still separate overlapping shapes. And Cricut will cut them out individually, instead of a single word.
To learn more about the difference between the Attach and Weld tools, check out this article: When to Use Weld or Attach in Cricut Design Space
The insides of the letters disappeared when I welded them!
Sometimes the Weld tool fills in open letters. If you solder letters that are too close together, the spaces inside letters like “a” and “o” may disappear.
This happens when letters are too close together. together, or when the letters overlap too much.
To fix this, click Undo to undo the letters and readjust the spacing.
If you’re having trouble seeing where the overlapping parts are, you can increase the font size of the entire word, correct the spacing, and then decrease the font size to whatever you want for your project. Then re-solder and send the design to the mat.
Have questions? Join the Facebook group!
We hope you found this article useful! If you have any additional questions, feel free to join my Facebook group. We created this group for you to share pictures, ask questions, and help each other out.
What’s next?
Pin this post: Save this tutorial to your boards on Pinterest so you can come back to them later.
Leave a comment: We love hearing your feedback. Let me know in the comments below!
Share on Instagram or Facebook: When you make this project, share it on social media and tag me @sarahmaker. We love to see what you do!
.