Good sound from your car’s audio system largely depends on the equipment you’re using and how you’re using it. Equalizers and crossovers are some of the most useful investments you can make for your system.
In this article, I’ll explain how to connect an equalizer and crossover for car audio systems. Inside you’ll find helpful diagrams, the basics you need to know, and other really useful information.
Which Comes First EQ or Crossover? Differences between equalizer and crossover

When using both an equalizer and a crossover, the equalizer is switched before the crossover. There are several reasons for this: one of which is the role of an equalizer versus what a crossover does.
Equalizers (even those that may include optional crossover functions) adjust the content of the audio signal while crossovers are used to separate parts of the audio. signal directed to one or more amplifiers.
- We use equalizers to enhance sound frequencies in music and adjust the audio signal itself.
- Crossovers are used to control the sound sent to one or more amplifiers depending on which speakers will be used and to set up installations such as 2-way or 3-way component speaker systems.
What does an equalizer do for speaker audio? car? ?
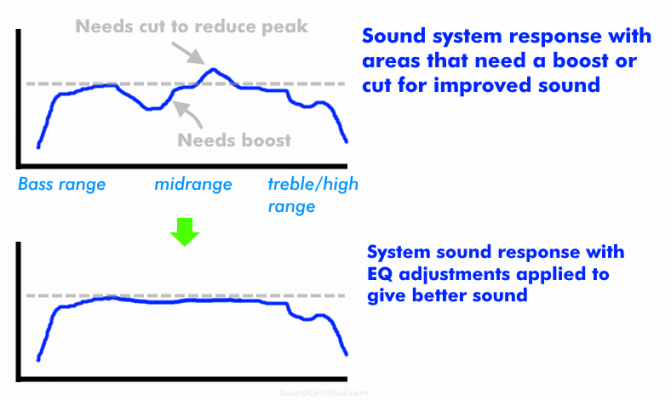
Diagram showing the basic idea behind an equalizer. An equalizer is useful for boosting or reducing small ranges of sound in your audio system to improve sound. For example, a “peak” (loudest volume area) at some frequencies can be cut while others can be boosted.
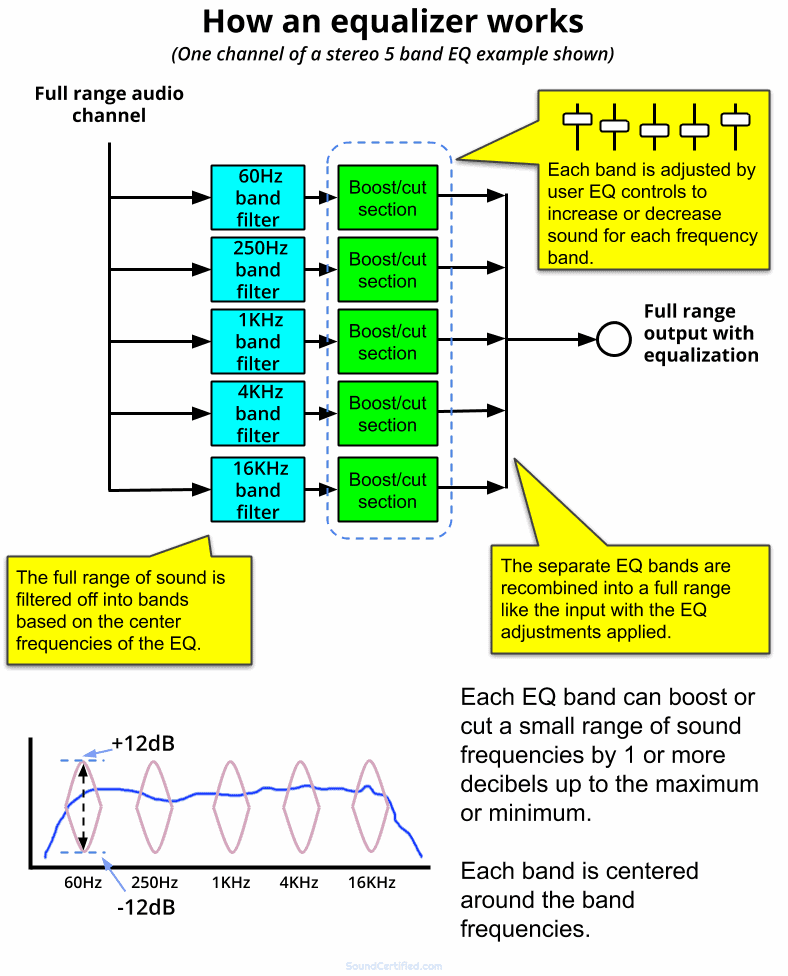
Equalizers aren’t just a fancy name for something cool to play with, they though Definitely not all are created equal as the saying goes. Equalizers are an electronic device that allow you to improve audio quality by fine-tuning “bands” or ranges of sound frequencies in your music.
They do this by providing controls to boost or decrease (“boost” or “cut”) sound frequencies to improve the frequency response produced by your system and speakers.
Equalizers provide a series of controls (usually sliders or rotary knobs) that allow you to adjust the sound to your liking as needed. For example: not enough bass? You can turn up one or more knobs in the lower frequency (bass) ranges. Is the music too harsh in some areas like the midrange? You can cut (lower) the range of audio frequencies that your speakers are over-producing.
What is the purpose of a crossover?

Crossovers are electronic devices that separate an incoming full-range music signal into one or more high-pass or low-pass signals. They allow you to block unwanted sound frequencies going to certain speakers for the best sound, avoid distortion, and get better sound.
For example:
- Tweeters need to be shielded from the bass that it would send to larger speakers. Therefore, we use high-pass crossovers with tweeters and other small speakers.
- Woofers sound bad when playing mid-range or full-range sound. We can get very clear sound and “pure” bass by using a low pass crossover for them.
Electronic crossovers are built into many car amplifiers these days. However, you may be using one or more amps that don’t offer them or have a limited amount of control. A separate electronic crossover gives you more control and tuning than you might otherwise have.
You can also use them for more sophisticated custom car audio systems.
Does a crossover improve the sound quality?

Crossovers can help with sound quality, but not in the same way that an equalizer can. For example, we can use a high-pass crossover with smaller speakers, such as 6.5″ full-range speakers, to block out very low bass that causes distortion and the speakers cannot handle. The result is better sound without the terrible sound that speakers get when driven beyond what they can handle.
Similarly, by blocking out unwanted sounds in the mid-woofers or subwoofer, the result is a great-sounding, “pure” range of sound without harshness or distortion of the sounds you’re making. they were not designed.
A properly configured speaker system that uses crossovers will sound much better than one that does not. You can also drive the speakers with more power and volume than you otherwise could. The result is very pleasant sound clarity and pleasant music even at higher power levels.
How do you connect an equalizer to a car stereo? (DIAGRAM)

Connecting a car stereo to an equalizer is generally pretty simple. Most are more or less the same but of course they can vary a bit from model to model. I’ll cover the basics here and then discuss crossovers in the next separate section.
1. Connect the remote start and power wiring

Example of a typical equalizer with its power wiring harness and optional speaker level input harness. Most equalizers use three power connections: constant +12V (battery power), remote turn-on wire, and ground.
Equalizers usually have fairly simple wiring that you’ll need to connect for power and ignition control. :
- Ground wire (negative) – connect to vehicle (chassis) ground or also to radio ground.
- Battery power : connect to the radio’s memory connection (+12 V BATT) or other always-on +12 V source.
- Wired remote control : This turns the equalizer on or off. it turns off automatically with the radio. Connect to the radio’s remote turn-on wire for best results (also easier than using another wire in many cases).
- *Lighting/dimmer [yes is present] – This is not as common, but some equalizers have a fader control. Be sure to check your owner’s manual as some dim the equalizer display or lighting when a positive lighting signal is connected. Others activate the dimmer with a negative (or ground) connection. You can ignore this wire if you want; no dimming/lighting control wires required.
Equalizers typically only draw a few amps, so in most cases you won’t have to worry about wire them to a separate power connection such as a car amplifier. Also, it is often a good idea to use the same ground as the radio as well, as alternator hum (ground loop noise) can be a problem for some installations.
Once After connecting the power wiring, it is time to set up an audio signal connection.
2. Connect the equalizer signal input RCAs

Most equalizers use a single pair of RCA inputs that connect to the RCA output connectors of the main unit. This is because standard equalizers use a single set of EQ controls that work on both the left and right channels at the same time. Many also include a front-to-rear fade control, so you often won’t need a rear RCA connection from your car stereo.
Connecting the RCA jacks on a car equalizer:
- Main RCA Inputs: Connect to the RCA (front) jacks on the main unit, if available. (If your head unit doesn’t have RCA, don’t worry; I’ll cover that below)
- Front RCA Outputs: Connect to the main RCA inputs on the crossover if it’s a stereo-only model (2 input connector). If you’re not using a crossover, connect to the front RCA inputs on your amplifier.
- Rear RCA outputs: Connect to the rear RCA inputs on the crossover if available and needed . If not, you can ignore them and ignore the fader control on the equalizer. If you’re not using a crossover, connect it to the rear RCA inputs on your amplifier.
- Subwoofer RCA outputs (optional): These are optional and usually have a low-pass crossover Incorporated. the output layout. If you are not using a crossover between your amplifier.
- AUX Input RCA Jacks (optional): Some equalizers offer an AUX Input feature that allows you to connect directly to the headphone jack from your phone, an MP3 player, etc. Connect to a stereo headphone 3.5mm to RCA cable as needed and use the AUX input switch when listening to other sound sources.
Once connected to the stereo of the car and crossover, I’m ready to install the crossover too.
Connecting a car stereo without RCA jacks to an equalizer

Examples of two good speaker cable line level converters (one for a pair of speaker outputs, one for 4 speaker channels and 4 RCA outputs) Line level converters reduce the higher voltage signal from a car stereo to a lower voltage (“line level”) that an equalizer, crossover or amplifier can use without distortion or damage.
The good news is that you can still use an equalizer and crossover with a factory or aftermarket car stereo without RCA connectors.You’ll need a line level speaker output converter good quality to do this.
Line level converters are designed to allow connection to the RCA inputs of an amplifier when converting the speaker outputs of a stereo (higher voltage is required to control the speakers) to a low level signal that can be used by an ecu car amp, crossover, or booster.
Purchasing a quality, well-designed line level adapter is very important to avoid noise, poor sound quality, and other problems. D Don’t get the cheapest; instead, get a brand name model you can trust (like the examples you see above). You can get a good one like these for around $15-$20 or less these days.
How to Hook Up an Equalizer and Crossover for Car Audio (DIAGRAM)
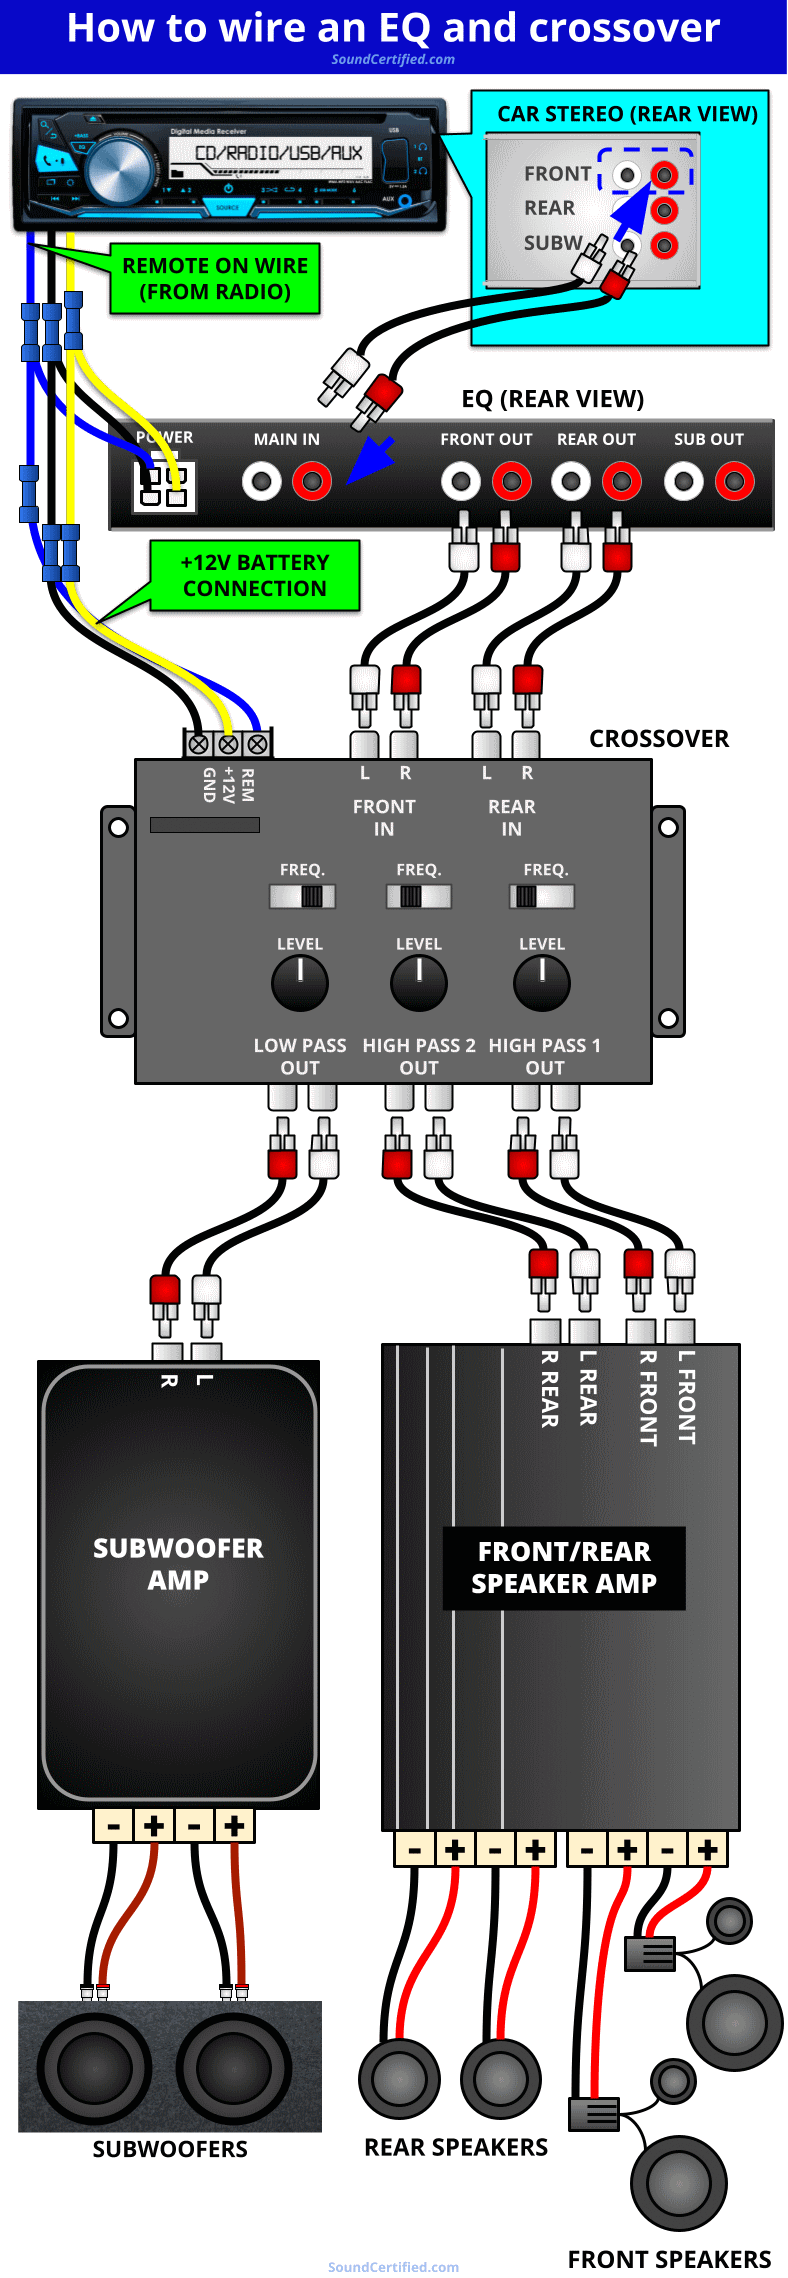
This diagram shows the basic connections for an equalizer and crossover. While the particular EQ or crossover you have may be slightly different, most have very similar connections.
The diagram above is a guide on how to make the correct connections for your equalizer and crossover. You can expect some slight differences depending on the model you have and the system you want to install, but most should be very similar.
How do you connect a crossover to an equalizer?
For When connecting a crossover to an equalizer, you’ll want to use the equalizer’s front or main RCA outputs for the front channel inputs or main inputs of your crossover.
- Front channel input(s) full range: the crossover’s main signal input from your car stereo, or in this case, the equalizer. The equalizer will send out a full range signal which you can then split as needed for your system using the provided outputs. Some crossovers only have a couple of inputs, while others have front, rear, and sometimes even subwoofer inputs. These additional inputs are usually optional.
- High Pass Outputs: These are the high pass (bass locked) audio outputs for your head amp channels such as the front or rear speakers. Using the selectable crossover frequency, you can block the bass and send it to the subwoofers for better sound handling and power.
- Low Pass Outputs: These are for sending only bass to your amplifier Used for mid-woofers or subwoofers. Low-pass outputs on a crossover typically have a selectable crossover frequency similar to high-pass outputs, but typically limited to 250 Hz or less.
Connecting power to a crossover
Crossovers typically have wiring similar to an equalizer: a ground (negative) wire, a +12V battery wire, and a remote turn-on wire. If convenient, you can connect the equalizer and crossover wiring to the radio connections:
- +12V battery connection: connect to the radio memory wire or other power source that it has +12 V all the time. (does not change with ignition switch).
- Ground wire: Connect to vehicle chassis via bare metal or the same ground wire as the car stereo.
- Remote Wire Connection: Connect to the car stereo’s remote wire, or alternatively to a +12V accessory wire that turns on and off with the ignition.
Can I use a filter? separate crossover and my amp’s crossover?

Yes, in many cases you can use an external crossover and the one built into your amplifier or head unit. However, it is generally not necessary in most cases.
It is fairly standard nowadays to find -12dB per octave crossovers (also called “second order”) at the crossovers and electronic amplifiers too. That’s typically a pretty good crossover slope for all kinds of speakers, including main speakers, tweeters, and subwoofers.
However, if you need an even steeper crossover frequency (say -18dB or -24dB per octave), you can use more than one. There are a few things to know first:
- You can combine the crossovers for similar cutoff frequencies. The tilt will blend, which means you’ll get even better filtering of unwanted sound frequencies.
- Mismatched crossovers can mean you’ll have unwanted sound.For example, say you’ve set your crossover to 70 Hz, and you’re also using an amp’s crossover set to about 50 Hz. The end result is that the amp’s lower cutoff frequency would block parts of the sound you want.
When in doubt, always use a second crossover that has the same or higher crossover frequency and you should be fine. As some of today’s car stereos include high or low pass crossovers, they also can be used (or in place of the ones built into your amplifier). They’re also more convenient to change since they’re right on the dash.
What are good crossover frequencies for car audio?

Car speakers are somewhat different from home audio in that they often suffer from terrible enclosures which exacerbate the problems they have when produce certain sounds. I’ve put together a few crossover frequencies below as general guidelines that work well in most cases. You may need to tune them up a bit for your particular system.
For example, small speakers without an actual cabinet can sound terribly “thin”; in that case, you may need to increase the high pitch. even higher HPF to minimize sound problems. Use these as a starting point, see what you get, and go from there.
As a side note, keep in mind that a crossover can’t compensate for a subwoofer that isn’t well matched to a speaker box. To get good bass sound, it is very important to have subwoofers in a box of the correct size and type.
Car Audio Amplifier and Speaker Crossover Frequency Chart
What are some good equalizer settings to get the best sound?

The simple truth is that there is no such thing as a true setting “best” of equalizer or audio system. It depends on your goals, but ultimately, the best settings are those that allow you to tailor the sound just the way you like it.
Regardless, I have some general guidelines for the equalizer that can help you. I’ll be sure to cover them in a separate section below after I explain why an equalizer (EQ) is so useful and problems with sound from speakers.
To keep things organized, I’ll split this into two. Approaches:
- Setting up your ear equalizer
- Using a real-time analyzer (RTA) and microphone
1. Setting up your equalizer by ear
Here I’ll share with you some basic steps and equalizer settings when doing it by ear. In the next section, I’ll explain the best way to do this: tuning your system with the right tools.
Getting Started

My advice is to do the following before adjusting an equalizer:
- Turn off any special audio modes like bass boost or “music enhancement” . Change bass boost, if present, to “flat” or turn it off.
- Set all equalizer band settings to flat. That is, at a level of 0dB, in the middle of the EQ screen (or at 0dB if using a numeric style control).

For many speaker systems ( e.g. factory speakers with a factory installed head unit) , type ically, sound is missing in 2 or more areas:
- Not enough bass
- Too many ranges mids
- Not enough treble (high frequency sounds like cymbals and strings)
- Music has little detail and doesn’t sound like the recording should
I recommend doing the following, making sure to use pe Make small adjustments with the EQ and make changes slowly while listening carefully.
- Turn up the bass a bit in the lower range. This will be a band with a frequency of 60 Hz or close to it; this depends on your particular equalizer. Then you can bump it up a bit in the upper band and listen to the results (eg 120Hz band, still a bass but in the lower end of the midrange sound and vocals).
- Boost the treble 6dB or so around the highest band at the high end of the EQ, then continue to increase by 3dB if you hear an improvement. Continue until it sounds unpleasant to you, then taper off until it’s better. This is usually a band with 16KHz or similar (some only go to 12KHz, which is sadly not good).Treble can be an issue because speaker placement is not ideal in vehicles along with low quality factory installed speakers.
- If you hear “harshness” and voices and sounds instruments in music sound like they’re irritating your nerves, you probably need to turn down the midrange sound. Start with a band around 1 KHz and drop by about 3 dB and listen to see if it improves. If there aren’t any, set it back to 0, then go up to 2 KHz, 4 KHz, and so on as needed.
Display of an equalizer setting for the widest ranges of sound Basics

Our ears are most sensitive in the midrange of sounds, making it often one of the most problematic areas of speakers that need attention. Tweeters very often need a boost at the top end as well. It’s a big problem with factory-installed tweeters that have poor response (sound output) at the high end of the sound range.
2. Using a real-time analyzer (RTA) to adjust your EQ

A few examples of your options for measuring and tuning your car audio speaker system. Of the 3, using a laptop and RTA software or smartphone app are the best values for the dollar. Today’s smartphone apps like AudioTool offer many of the same features as much more expensive options.
The best way to tune your system (find the optimal equalizer settings) is to use a measurement tool and find the areas that needed adjustment. To do this, you will need a real-time analyzer (RTA) and a microphone. There is simply NO WAY to get the best sound using just a little bit of music and adjusting it by ear.
This used to be too expensive in the past. However, these days you can get good results using your laptop and RTA software (like TrueRTA for example) or use an inexpensive RTA app with your Apple or Android smartphone.
To keep things Simple, I’ll cover using a smartphone and an RTA app. I recommend AudioTool for Android because it is very good and although it is not free, it is cheap! ($7.99 right now). Using an app isn’t as precise as a more expensive setup, but in most cases it’s enough to get the job done pretty well.
Using an RTA app and microphone to adjust the sound
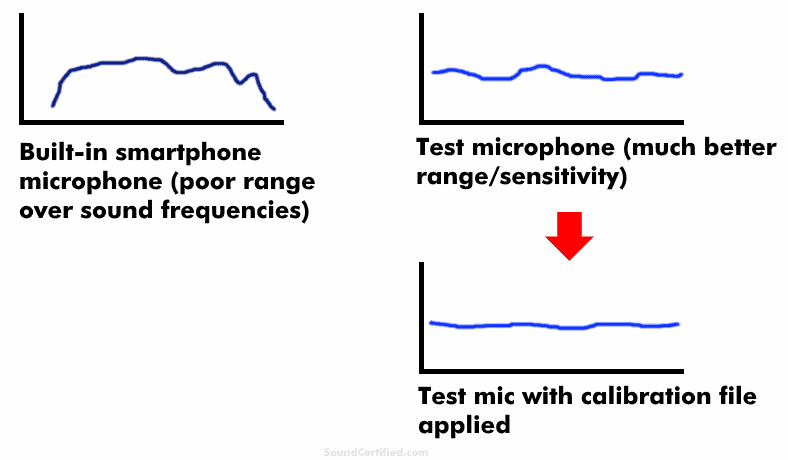
I do not recommend using a smartphone’s built-in microphone to adjust the equalizer settings. The built-in microphones have poor frequency measurement performance compared to an actual test microphone. The calibrated microphones also include a file that allows them to give a near-perfect measurement if your RTA supports it.
While you can use your smartphone’s built-in microphone to tune your system and set your EQ, you can’t. I recommend it. Built-in microphones have poor performance at measuring sound and will not read very well. This means that unfortunately you will never be able to get the sound right.

One option is to choose an affordable calibrated microphone like the Dayton Audio iMM-6 to around $17. As a bonus, each includes a unique calibration file to help you get more accurate readings. You will need an DAW that supports importing a calibration text file. (Not critical by any means, but nice if you can.)
.