When testing email delivery, some gmail users may find that email they sent to themselves appears to be undeliverable. In what is known as a false positive, the email was delivered, but google sent it directly to gmail’s ‘spam’ folder. gmail spam folder location is not easy to find. also, after sending an email to the “spam” folder once, gmail may permanently mark all subsequent emails from the same sender as “spam”.
The following steps describe how to locate the gmail ‘spam’ folder and then remove the ‘spam’ flag by adding the sender to your contact list.
mouse pointer rolls over “look”
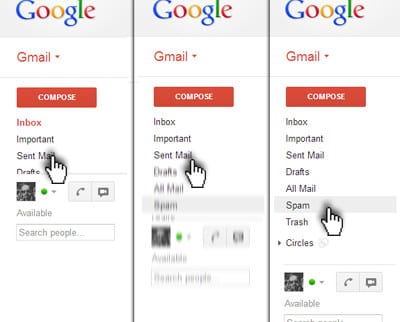
1. As seen in the image above, the gmail ‘spam’ folder is hidden by default. To view the folder, simply hover your mouse pointer over any of the folder names in the left column of the gmail user interface (ui).
2. the column will expand to show all folder labels, including the ‘spam’ folder.
3. clicking on the ‘spam’ folder text will load the folder in the main UI window.
4. if your email delivery test resulted in the test email being sent to the ‘spam’ folder, it will appear as unread, in bold, with the name and email account used.
5. click the square box in the left corner of the display bar that represents the email. a checkmark will appear.
6. then click the ‘don’t spam’ button at the top of the gmail user interface. this will automatically move the email from the ‘spam’ folder to the ‘inbox’.
important: by being marked as “spam” by google, all subsequent emails sent from that email account may also be sent to the gmail “spam” folder. worse still, the flag can be applied to everyone you send an email to. it is important to correct the erroneous “spam” flag by adding the sender to your contact list (see below)
always show spam folder
You can configure the gmail ‘spam’ folder to display in different ways. To change the setting to always show the ‘spam’ folder, follow the steps below.
1. in the upper right corner of the gmail user interface, click the gear icon. a dropdown menu will appear.
2. click on ‘settings’. the main window will be updated with all available settings.
3. click ‘labels’.
4. scroll down until you see the ‘spam’ folder settings.
5. choose from “show”, “hide” or “show if unread”. you can change the setting back and forth as you like.
Exactly how you set up your gmail account is up to you, but if you found one of your test email confirmations in the ‘spam’ folder, or if the ‘spam’ folder was already set to ‘hidden “, we encourage you to make the ‘spam’ folder visible and add the sender to your contact (see below).
additional information
google provides extensive help and advice on managing your gmail account. specific help files for managing folder viewing are here. Thundertix extensively tests all new features, but third-party applications like Gmail are not under our direct control. see the available gmail help files for additional information.
add a sender to your contacts
Once you have found the location of the gmail spam folder and made the appropriate account setup, we strongly recommend that you add the sender to your contact list. doing so is an important step in reducing the likelihood that subsequent test emails will be sent to the “spam” folder. google has recognized this as a good practice:
If you find a message incorrectly classified as spam, you can unmark it. simply select the message and click the not spam button that appears at the top and bottom of your current view. unmarking a message will automatically move it to your inbox.
If you find that messages from some senders are constantly being mislabeled as spam, you can avoid it:
- add their email addresses to your contact list. gmail will send messages from members of your contact list to your inbox, unless we know for sure that they are spam.
- some messages sent by contacts that are clearly spam may be sent directly to your spam label. more importantly, in some cases, messages from contacts will not be sent to spam, but will be marked with a red warning banner if the content is suspicious; for example, your friend’s or contact’s account was compromised and used to send phishing messages.
shortcut on hover
If you’re in a hurry, there’s a quick way to add a sender to your gmail contact list.
1. With the email in question open in full screen, hover your mouse over the sender’s email address. a popup window will appear.
2. At the bottom of the pop-up window, click the “add to contacts” text. the page will reload showing a partially completed contact form.
3. Please note that the contact form has automatically filled in the email address in the corresponding field. This temporary contact is automatically saved as-is, but you can embellish it with additional information (name, photo, alternate email addresses and phone numbers).
formal method for adding contacts
A more formal method of adding new email addresses to your gmail contact list is available as an option. the formal method provides a more step-by-step process and includes additional options not available when using the shortcut method.
To formally add a sender’s email address to your contact list, follow these steps:
1. in the top left corner of the gmail user interface, click the red text ‘gmail’. a dropdown menu will appear.
2. click on the text ‘contacts’. the page will reload with a new contact form, all fields will be empty.
3. Enter the sender’s information in the appropriate fields. any information you add will be saved automatically.
note: these instructions only work with the standard view of gmmail. if they don’t match what you see, please upgrade to a supported browser or go to standard view by clicking standard at the bottom of your gmail page.
Email addresses are automatically added to your contact list each time you use the reply, reply all, or forward features to send mail to addresses that do not already exist in your contact list. every time you mark a message as “not spam”, your contact list is also automatically updated so that future messages from that sender are delivered to your inbox.
find the automatically added contacts in the other contacts group on the left side.
If you don’t want contacts added automatically, follow these steps:
- click the gear icon in the top right, then select settings.
- from the menu general tab, find the “create autocomplete contacts” setting and choose I’ll add contacts myself.
additional information
google provides comprehensive help and advice for managing your gmail account. the help file for adding and managing your contacts is here. Thundertix extensively tests all new features, but third-party applications like Gmail are not under our direct control. see the available gmail help files for additional information.
need to sell tickets online?
thundertix is online ticketing software that helps event organizers sell tickets both online and in person. learn more about our features.