If you’re one of those who send emails from your phone, you know the importance of notifications. Through notifications, you can find out who sent the mail and read highlights without opening the app.
However, if your gmail notification isn’t working, the problem could be a simple permissions conflict with developer error.
why gmail notification not working?
how to fix gmail notification not working?
if you don’t receive gmail notifications, you need to force quit the app first and restart your phone. sometimes minor glitches also affect app notifications. once you reboot, the notifications may appear again. so please restart it and try it on your device.
Not only that, unstable internet connection can also be the culprit for these issues. For that, you can quickly turn your router off and on and also toggle Wi-Fi or mobile data. you should also try other methods that might work for you.
turn off do not disturb
do not disturb (dnd) is a useful feature that helps you stay focused by restricting notifications and ringtones when enabled. this may be the reason why you are unable to receive notifications. you can check your dnd settings and turn it off to receive all notifications normally.
- Open the Control Center by swiping down.
- Tap on the DND icon to disable it if it’s turned on.

disable battery saver
This is another useful feature that affects the functionality of the phone. If you have turned on battery saver mode, your device will automatically kill background apps and restrict other system activities to save battery life as much as possible. so in this case the app notifications are affected.
so turn off this mode and see if the notifications come back.
- Open the Control Center.
- Click on the Battery icon to turn it off if it’s turned on.

re-login with your gmail id
sometimes simple fixes like logging back in can do the job. Also, if you have logged in many Gmail IDs on your device, it is better to log out those IDs that you seldom use. because it may mess up your gmail settings, so please try to sign out and sign in again. that can help your notifications appear.
to delete the account
- Open Settings.
- Scroll down and Tap on Accounts and Sync.
- Tap on Google.
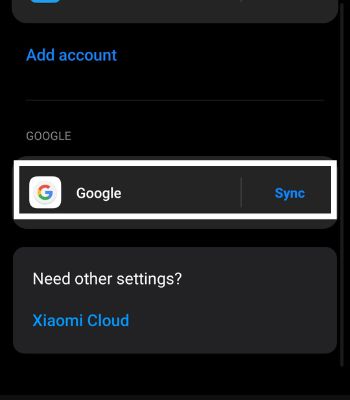
- Tap on your Gmail Id that you didn’t get the notifications on.
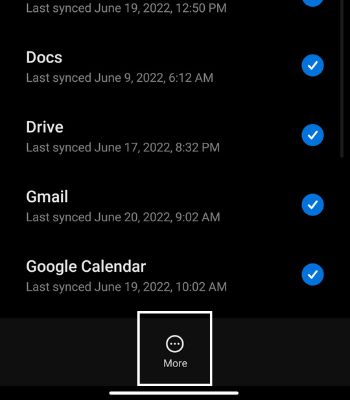
- Click on More and Tap Remove Account.
to add the account
- Open Settings.
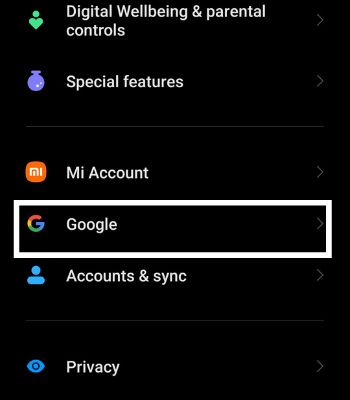
- Scroll down and Tap on Google.
- Tap your Profile and click on Add Another Account.
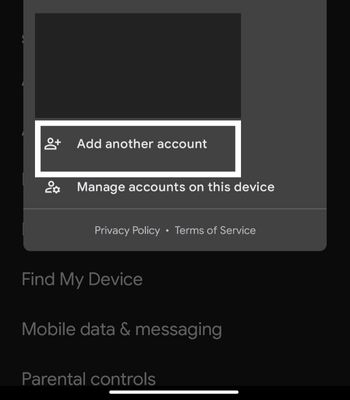
- Enter your Gmail ID and Password, and you will be logged in.
repeat off
When you snooze someone, you won’t get notification messages or even see their email in your inbox. You will only receive such notifications on the chosen date and time. so if you’ve postponed someone by mistake, you may want to cancel again. this is how you can do it.
- Open Gmail.
- Tap on the Menu bar (three bars) at the top left corner.
- Click on Snoozed.

- Long tap on the person’s name and Tap on Three dots.
- Hit Unsnooze.

enable gmail notifications
you should check if notifications are really disabled in your gmail app. You may have noticed that you are receiving emails but are unable to receive notifications on your device. This can happen if you have disabled notifications from the gmail app. so if it is disabled you can easily enable it.
- Open the Gmail app.
- Tap on the Three bars at the top left corner.
- Scroll down and Tap on Settings.

- Select the Gmail ID that you didn’t get the notifications on.
- Once you tap on your Gmail ID, Tap on Notifications.
- Then, Click All if it’s selected to None or High Priority only before.

- Go back once and tap on Manage Notifications.
- Toggle on the Show Notifications if it’s turned off.
- Again Go back to Gmail settings. Scroll down and ensure the Sync Gmail is enabled.

enable notifications from device settings
if you have enabled gmail notifications, but not enabled them from the device. you will not receive notifications yet. therefore, you must also enable it from the device settings.
- Open Settings.
- Go to Apps.
- Tap on Manage Apps.
- Search for Gmail. Then, Tap on it.
- Click on Notifications.

- Then, Toggle on Show Notifications.
clear gmail app data
Minor errors can be resolved by clearing the application data. clearing app data will reset the app. however, please note that all your login credentials and other data will be deleted.
- From Settings > Apps.
- Tap on Manage Apps.
- Search for Gmail. Then, Tap on it.
- Click on Clear Data.
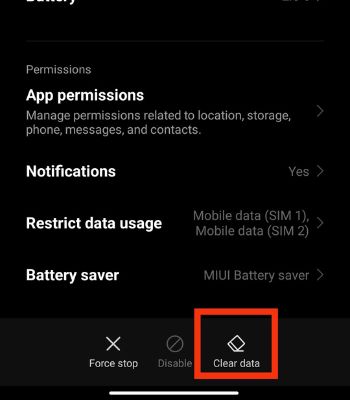
- Select Clear All Data.
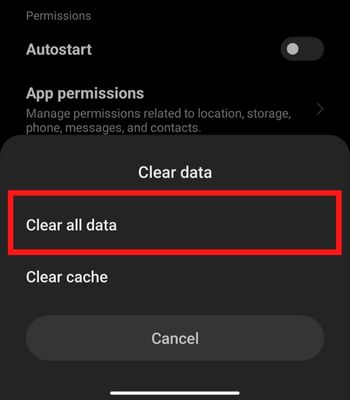
- Tap OK.
update the gmail app
Sometimes bugs within the device can also hamper its functionality. In that case, updating the gmail app can help fix it. you need to update the app again and again for better optimization, extra features and get rid of bugs. so please update the gmail app and see if the issues are resolved.
- Open Play Store.
- Search for Gmail.
- Tap on Update.

update device
Most of the applications are optimized with the latest version of android. So if you are running the older version of android then you may encounter different issues. If you haven’t updated your device for a long time and if the new software update is available, it’s time to update it.
- Open Settings.
- Go to About Phone.
- Tap on System Update.
- Click on Download Update if the new update is available for your device.

