Before learning how to change phone number in Gmail or Google account, let’s know how significant phone number to account is. The phone number we enter is actually our mobile phone number, so this topic tells us as how to change mobile number in Gmail or Google account
Themobile number associated with your Gmail or Google account is used for manypurposes. One of these purposes is to provide a quick way to recover your accountif you’re locked out and do not have an alternative recovery method. Usingphone number as a recovery method, is a very quick and safest solution for me.You can also opt to login with phone, which makes your account more secure.
You are reading: Gmail account by mobile number
You can change your phone number any time. To change phone number in Google accountyou will need to update it in your Google account settings. You can change yourGmail phone number either on a computer or a mobile device.
Below are the steps to change your mobile Number in Gmail/Google account on computer:
Step 1. Login and go to Google account settings.
Login to your google account via gmail or google homepage or anywhere else (Google uses one account for all google products). After Login, you will see an image (your uploaed profile picture or your name initial turned your profile picture) at the top right corner of the google web page. Click on that image. You will get a google account button there. Click on that button.

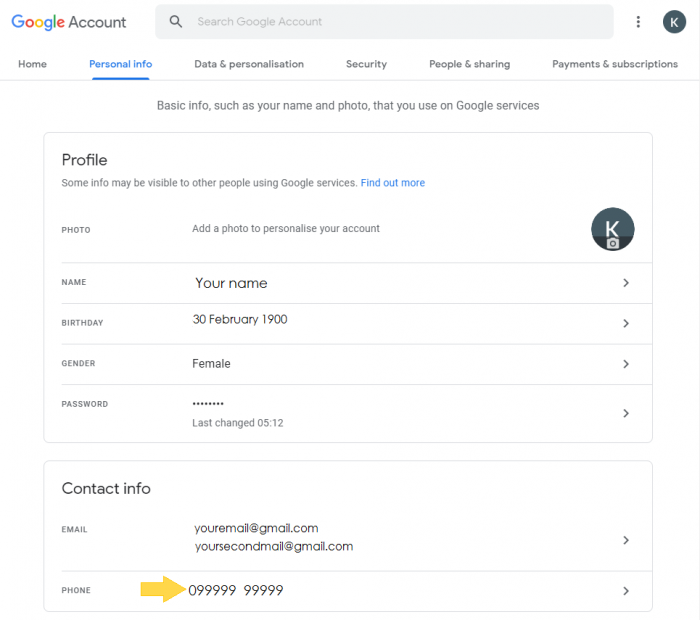
Step 2. Personal info tab
After clicking on that button you will get a screen shown below. Click on the Personal info tab.
*Screen with larger screen width will have this tab on left side, here it is on the top.

Step 3. Click on PHONE to change
By opting for Personal info, you will get this screen where Contact info section will have phone number. Click on PHONE row.
Step 4. Select number to change
After clickng PHONE, you will be shown your phone number and status(verified). Click on that.

Step 5. Edit phone number
Now you will get option to edit your phone number when you will click on the 3 dots present on right side. Click on edit option in the dropdown menu.

Step 6. Enter password to confirm
Now you will be redirected to login page to re-enter login password. Complete that step and click on Next.
Step 7: Finally edit number
Now again you will be redirected to same page as in step 5. Click on Edit option.
Step 8: Update number
Now you will get a Popup asking to UPDATE NUMBER or cancel. To change phone number, click on UPDATE NUMBER.
Step 9: Confirm that you selected the entered number
Now that popup will have option to type-in a new number. Enter New Number in the textbox and click SELECT.
Step 10: Final confirmation of number
After Selecting that number it will show a confirmation to proceed to next step. Click on NEXT to proceed.
Step 11: Get Verification code
As you will click on NEXT, your number will be ready for confirmation. Screen will have an option to get confirmation code. Click on GET CODE.
Step 12: Enter code to verify number
After clicking GET CODE, you will recieve a Google verification code via SMS on that phone number. On screen that code will be asked. Check your phone and enter the six digit Google Verification code and click on VERIFY.
If you have entered the correct Google Verification code your phone will be succesfully verified.
** I have edited the screenshots and replaced original credentials with demo data(sample data) which is not related to anyone.
Get more stuff
Subscribe to our mailing list and get interesting stuff and updates to your email inbox.
I have tried to cover the possible content in each article. If you have any queries or issues you feel free to contact on HTTLEN