One of the main reasons to own a Galaxy Note 3 is that you’re able to manage your emails on the go. But, before you start doing that, you must first know how to set up your email accounts on the phone.
You are reading: Note 3 gmail account – How To Remove Gmail Account S: Samsung Galaxy Note 3 (N900A)
In this post, I’ll show you how to configure both the Gmail and stock Email apps.
a. Gmail app: Configure your Gmail accounts
i. Set up the primary Gmail account on Gmail app
If you’ve sign-in your Gmail account during the initial setup, then you’re done with configuring the Gmail app for that particular Gmail ID. To access your Gmail, simply launch the Gmail app and start reading your emails.
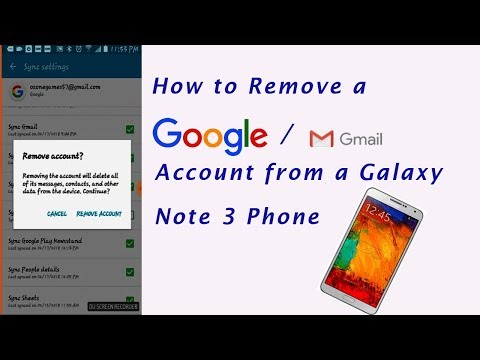
ii. Set up a 2nd Gmail account on Gmail app
The Gmail version 4.6 has completely removed the add account option on its own app. If you wish to add a 2nd Gmail account, you’ve got to do it via the home Settings. Here’s how:
On your Galaxy Note 3 home screen, tap the Menu button, and then select Settings.Next, go to General > Accounts.On the Account screen, tap Add account.


ii. Set up a Internet email account automatically
If you have a Gmail, Yahoo, or AOL account and you wish to manage it using the pre-installed Email app, the setup can be done pretty much automatically. Here’s how:
Launch the Email app on your phone. If this is your first time launching this app or you haven’t had any email account configured, skip to Step 4.Tap the Menu button, and then select Settings.On the Settings screen, tap Add account.On the Set up email screen, enter the email account and password, and then tap Next. The Email app will configure the incoming and outgoing server settings automatically.On the Account options screen, customize the email syncing frequency for both peak and normal hours, ensure both Sync Email and Notify me when email arrives are checked, and then tap Next to continue.On the Set up email screen, customize the email account and sender’s name. Lastly, tap Done to complete the whole process.
Note: The steps here were written for Android 4.3 on a Samsung Galaxy Note 3 (SM-N9005). If you’re having a different model of Galaxy Note 3 or other version of Android, there’s a possibility that the steps and screenshots will be different.
(Click here for more Samsung Galaxy Note 3 tutorials, tips and tricks.)
Hi,
Thank you for writing this column. I followed you instructions for “ii. Set up a Internet email account automatically” for my gmail account and got the following error (I double checked my password) “Setup could not finish” ‘Authentication failed’. Then it gave me an option to ‘edit details’ which brought me back to the original set up field. Is it possible that I have to set it up using the manual option? If so, would you know what the ports are for imap and pop3 configurations? I appreciate that I’m asking for a lot, so if you happen to have some quick answers I would very much appreciate it. Thanks again!
Sanjay
Before you try to do manual setup, make sure you’ve turn on the POP Download and IMAP Access settings on web based Gmail. Anyway, here’s what you’re asking for.