Want to use your car stereo at home? Good news: It’s actually not that hard…if you know what you’ll need.
In this article, I’ll show you how to connect a car stereo to AC power along with:
- What you need to know first
- Deletejpg” alt=”Example of AC-DC Wall Outlet Adapter with Barrel Plug” />
While you can use a wall adapter to power a car radio with decent results, most are quite poor and can’t supply many amps and only a little bit of power.You will also need to cut the wiring which in some cases can be a bit tricky as sometimes it is a very small wire.
Technically, You can use a 12V AC-DC adapter for power outlet, but I don’t recommend it.
They are quite limited in how much power output and amperage they can take provide (many are rated less than 1A) They are designed to do things like charge devices or power low wattage devices.
They also don’t have a good power reserve and when you start turning on your car radio car, the voltage may start to drop (drop out) and it will not work well together with the s ear breakingpng” alt=”How to connect a computer power supply to a car stereo diagram” />
Using an ATX (desktop computer) power supply for a car stereo is not difficult; in fact, it only takes a few steps:
- Electrical connections: Cut a 12V wire (yellow) and a ground wire (black) from the main connector. 3/8″ to 1/2″ bare. Use a crimp, solder, or other type of connector to join the 12V output from the power supply (yellow) to the 12V battery wire from the radio (yellow) Do the same for the ground wires (black).
- Supply in control: PC supplies do not turn on even if the on/off switch on the case is used . A PC motherboard uses a control signal for the “supply on” wire pin.To do the same, you’ll need to find, cut, and jumper this signal wire l to a ground wire, either directly or with an on/off switch, if desired [See diagram above]
- Accessory ground wire radio: Connect the rad io accessory/power cable (red) to the 12V power cable from the supply, either directly or you can use an on/off switch if desired.
Once you have connected the 12V power and ground wire to the radio, connect the “power” wire shown above to another ground wire as shown. The supply should start and your car radio should come on.
As I mentioned earlier, turning off the power supply will cause the radio to lose its “memory” (settings, last station listened to, etc.), so you may find it easier to use an on/off switch. off. on the accessory cable or turn on the radio
Some examples of battery options you could use are:
- 12V backup batteries for home/building alarm system
- Motorcycle, lawn mower and other small outdoor vehicles 12V batteries
- Two 6V batteries connected in series (this will provide a total of 12V)
- A boost supply in 5V to 12V miniature connected to an external USB battery pack.
Most car stereos need a memory wire voltage close to 11 volts or more to avoid losing what’s stored in memory. Below that, you can start to lose saved settings and presets – it depends on how the particular car stereo model behaves.
Use a Common Ground
When using multiple voltage sources like this, be sure to connect all the ground wires together at some point. This is It’s necessary because the voltage from a power supply is provided relative to ground. In other words, if we are powering something, it is because the positive side has voltage potential relative to a ground wire at some point.
When the grounds are not connected correctly, this can cause some strange problems. or a power failure altogether. Once you’ve wired everything up, an easy way to check this is to use a test meter set to ohms or continuity.
With a probe held to the negative terminal of the main supply, touch the other items. ground wire When everything is connected correctly, you will measure exactly zero ohms on each ground wire.
How to Properly Wire Your Car Stereo
You have several options for connecting your car stereos. of the cars connect the cables correctly. I will cover a few here. These are:
- Using the twist and tap method (not something I recommend, but it works “in a pinch”)
- Using connectors like crimping (” butt ”) or wire nuts
- Soldering the wires together
I’ll cover each one in detail.
1.Connecting wire using the method of twisted and taped
Although easy and inexpensive to do (especially if you don’t have a lot of tools), it is the least reliable way to connect speaker wires. speaker or car stereo.In my experience, the tape may come off later or the twisted wire may come loose at some point.
It’s as easy to do as:
- Strip about 1/2 inch of insulation from the end of each wire
- Twist the stripped wires as tightly as possible. as tight as possible, wrapping them around each other to help hold them together
- Remove some electrical tape and tighten and wrap it around the exposed wire and also the wire insulation
2. Connection cable using crimp connectors
This is one of the most reliable ways to connect wires and one I have used for years to car stereo installations You will need one or more tools to strip the wire and crimp the connectors.
Here’s how:
- Strip the wire leaving 3/8″ to 1/2″ bare wire exposed.
- Tightly twist the wire so that it can be inserted correctly into the connector.
- Insert the wire at one end firmly, pushing it into the metal contact. Be sure to insert it all the way.
- Place the connector in the crimp tool in the proper position on the tool, near the end of the connector.
- Crimpe very tightly with the tool to press the connector down forcefully, clamping the wire inside permanently.
- Repeat the same for the other side
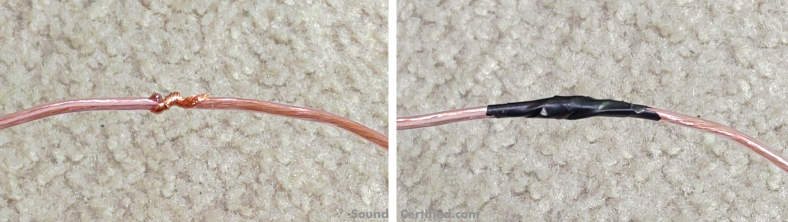
- Hold both ends and tightly twist each end around the other until they are completely wrapped around each other.
- After the soldering iron is hot, apply heat to the wire with the tip . Once heated (usually after a few seconds), apply enough solder to flow completely through the wire.
- Turn the wire the other way and apply solder until the entire wire is fully saturated with solder.
- Allow wire to cool for a few moments.
- Tear off 2 short pieces of electrical tape. Starting at the insulation and at an angle, wrap the tape tightly until it is completely covered.
It is important to completely cover the wire once you are done. That’s to prevent adjacent wires from touching each other and causing a short that can permanently damage the output stages of the radio.
How long does it take to properly solder speaker wire?
In general, it will need about 30 minutes to solder a complete set of car radio power
